

ARMember Installation, Activation and Update!

Requirements
You need to follow very simple steps for getting started with ARMember Plugin:
- WordPress version: 5.0+
- PHP version: 7.2+
- MySQL version: 5.1.20+
- Browser: Modern browsers with cookies and JavaScript support.
ARMember Lite Installation:
The ARMember Lite is the free version offered by the ARMember, and along with the ARMember Lite, you can explore the functionalities of the plugin and then further dive into the ARMember Pro which has much more to offer. It is a stand-alone plugin that allows users to subscribe to a plan and handle multiple subscriptions and much more.
You can easily download the ARMember lite version from the website and further explore the ARMember Lite.
ARMember Pro Installation:
- Install Via WordPress Uploader:
-
Download the latest version of the ARMember.
If you have purchased the ARMember Pro from the ARMember Website, then to download the latest version, login to your account, navigate toMy Account->Purchase History/ Download History, and hit the download button.
If you have purchased the ARMember Pro from Code Canyon, then to download the latest version, log in to yourEnvato account->My Account->Download, and here the zip file will be accessible for download. - Login to your site Admin Panel and navigate to
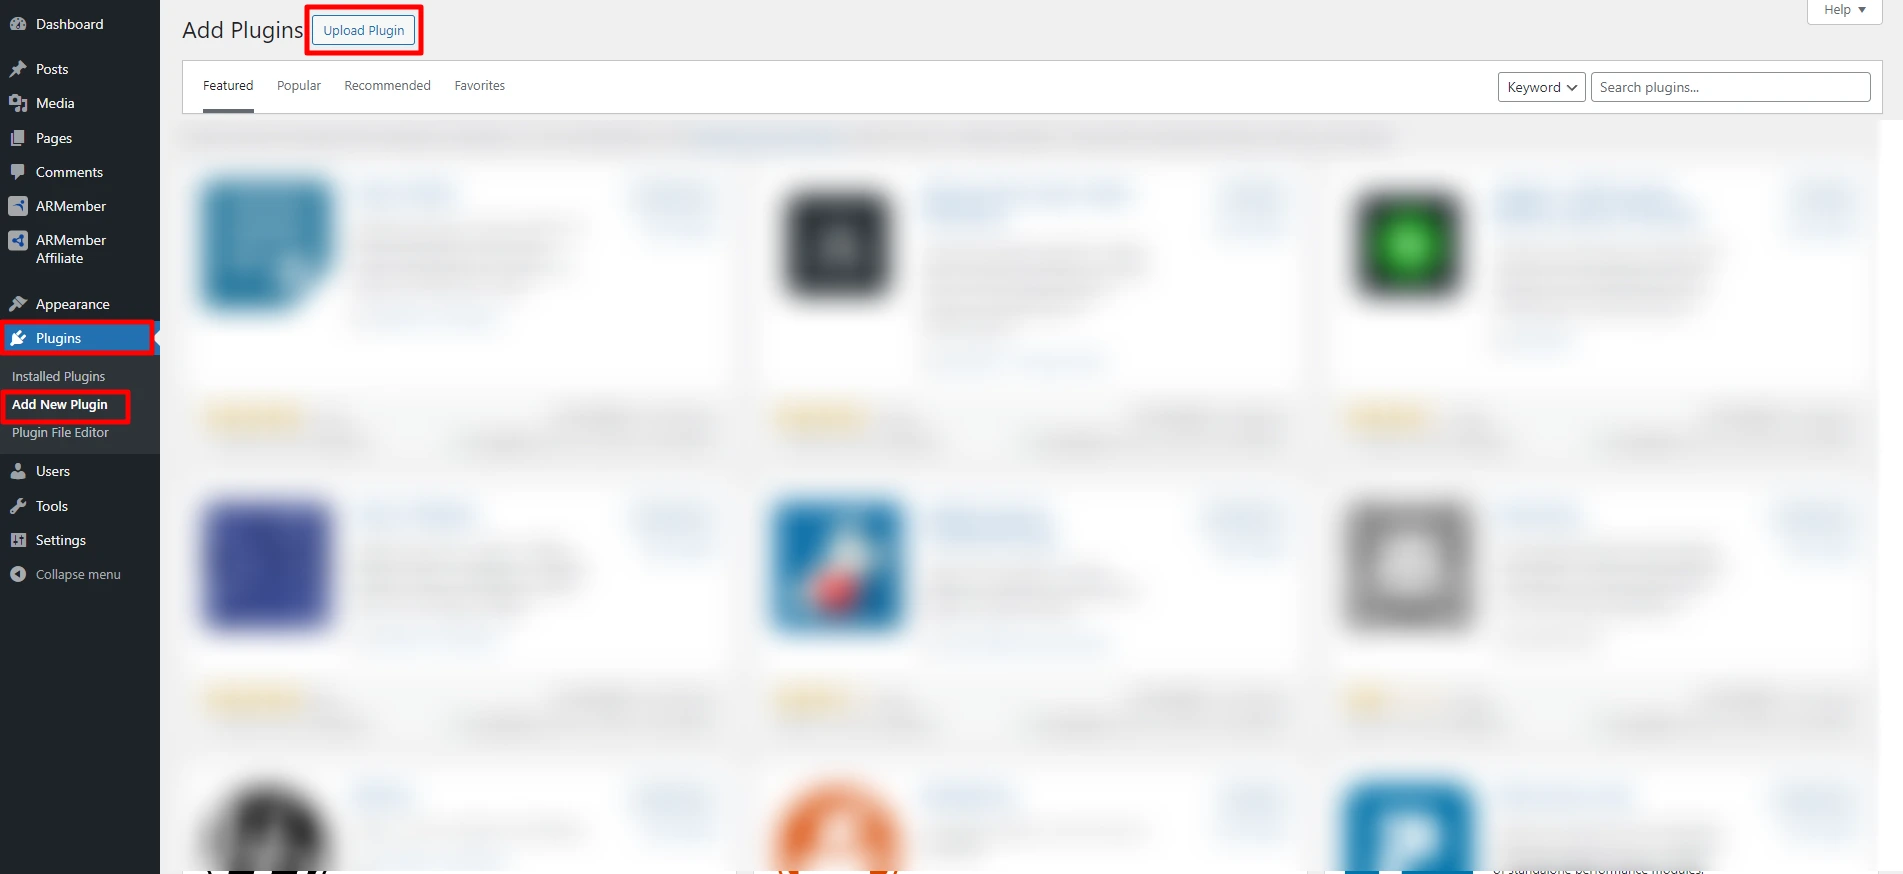
Plugins->Add New->Upload. - Once you click on the
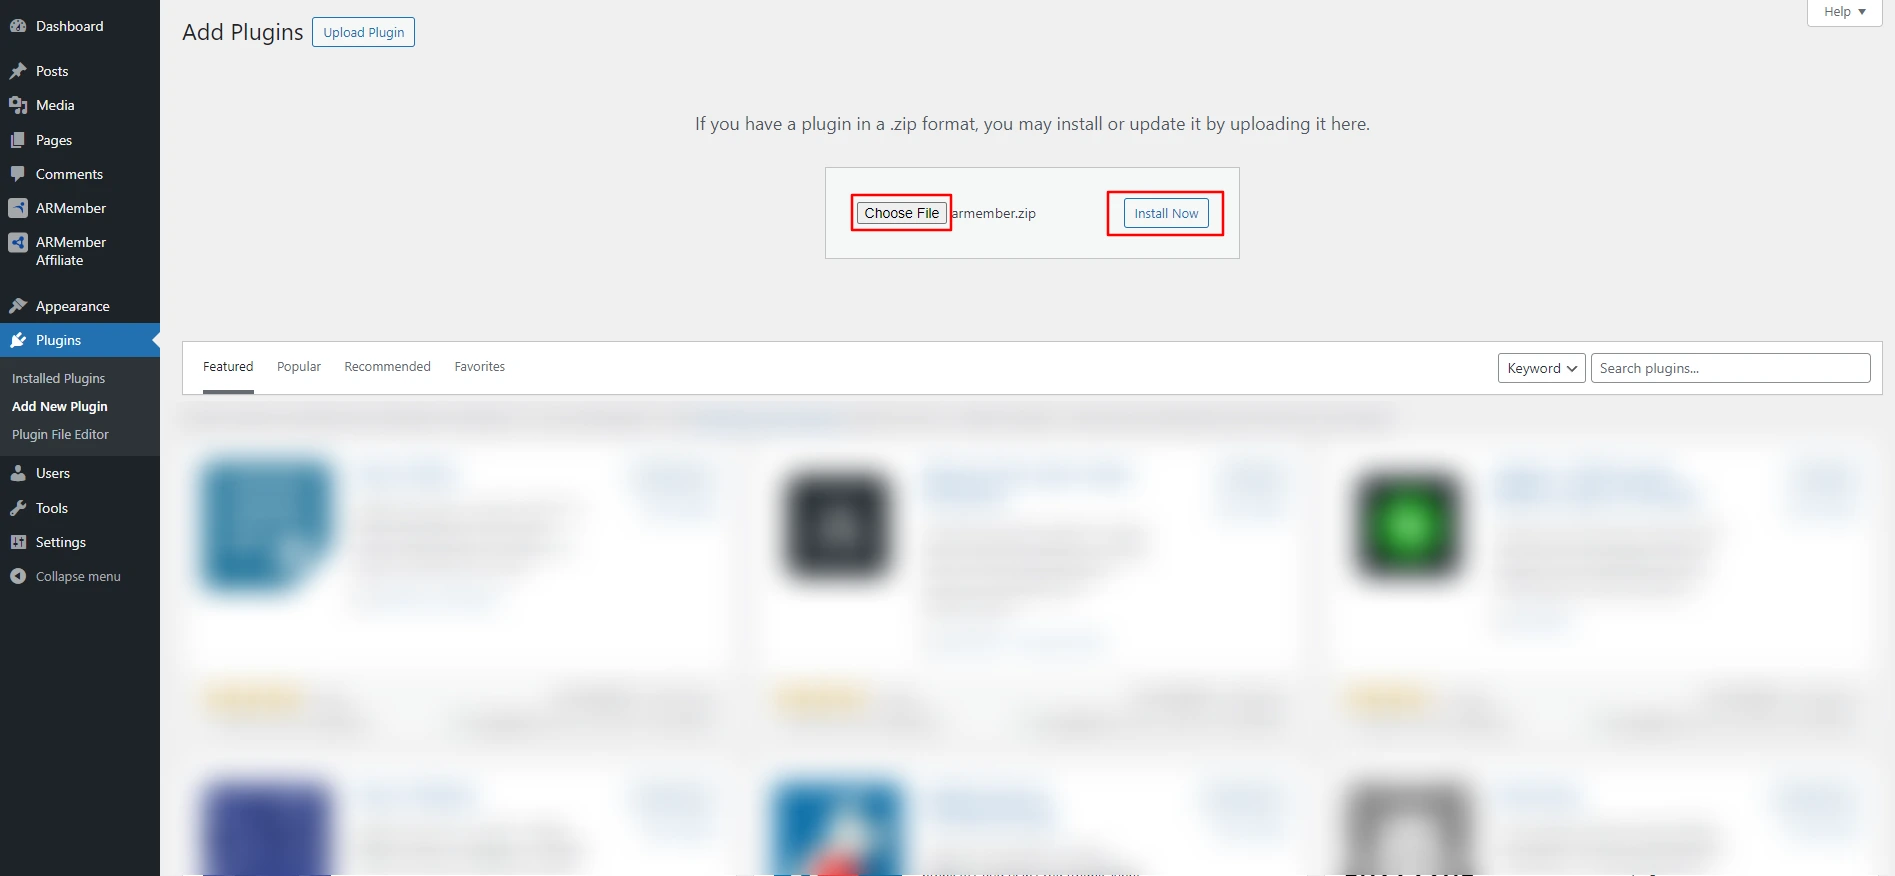
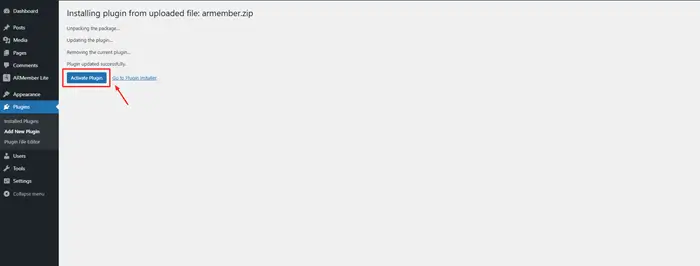
Upload plugin, select the zip file from your computer. After selecting the file, theInstall Nowbutton will be enabled. Click on it, and the ARMember installation process will start. - Click on the Activate Plugin button as soon as it is installed.
- How to Do ARMember Installation Manually?
-
Download the latest version of the ARMember.
If you have purchased the ARMember Pro from the ARMember Website, then to download the latest version, login to your account, navigate toMy Account->Purchase History/ Download History, and hit the download button.
If you have purchased the ARMember Pro from Code Canyon, then download the latest version by logging into yourEnvato account->My Account->Download. - Unzip the downloaded file to your computer.
- Upload the
/armember/directory to the/wp-content/plugins/directory of your site. - Activate the plugin through the
Pluginsmenu on WordPress.
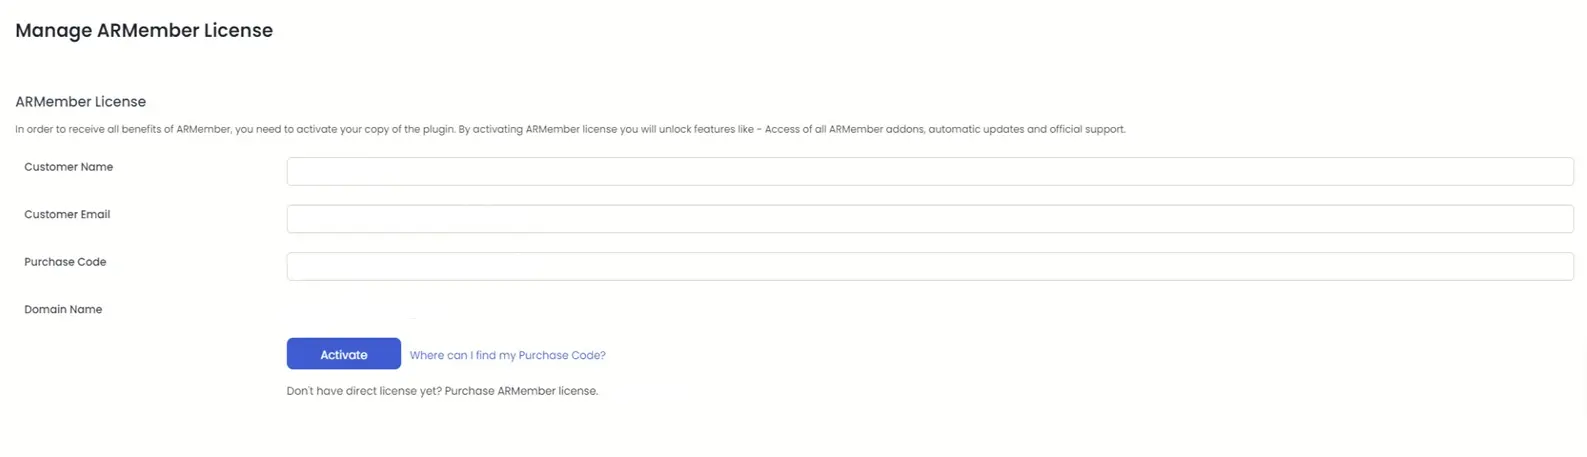
ARMember Pro License Activation through Code Canyon:
After installing the plugin, activate your license for support and enable the automatic upgrades. Additionally, without license activation, the inbuilt addons of ARMember cannot be used. Further, a license key can only be used for one installation of WordPress at a time. Thus, get the license key when purchased the ARMember Pro Plugin from the Code Canyon.
Step: 1
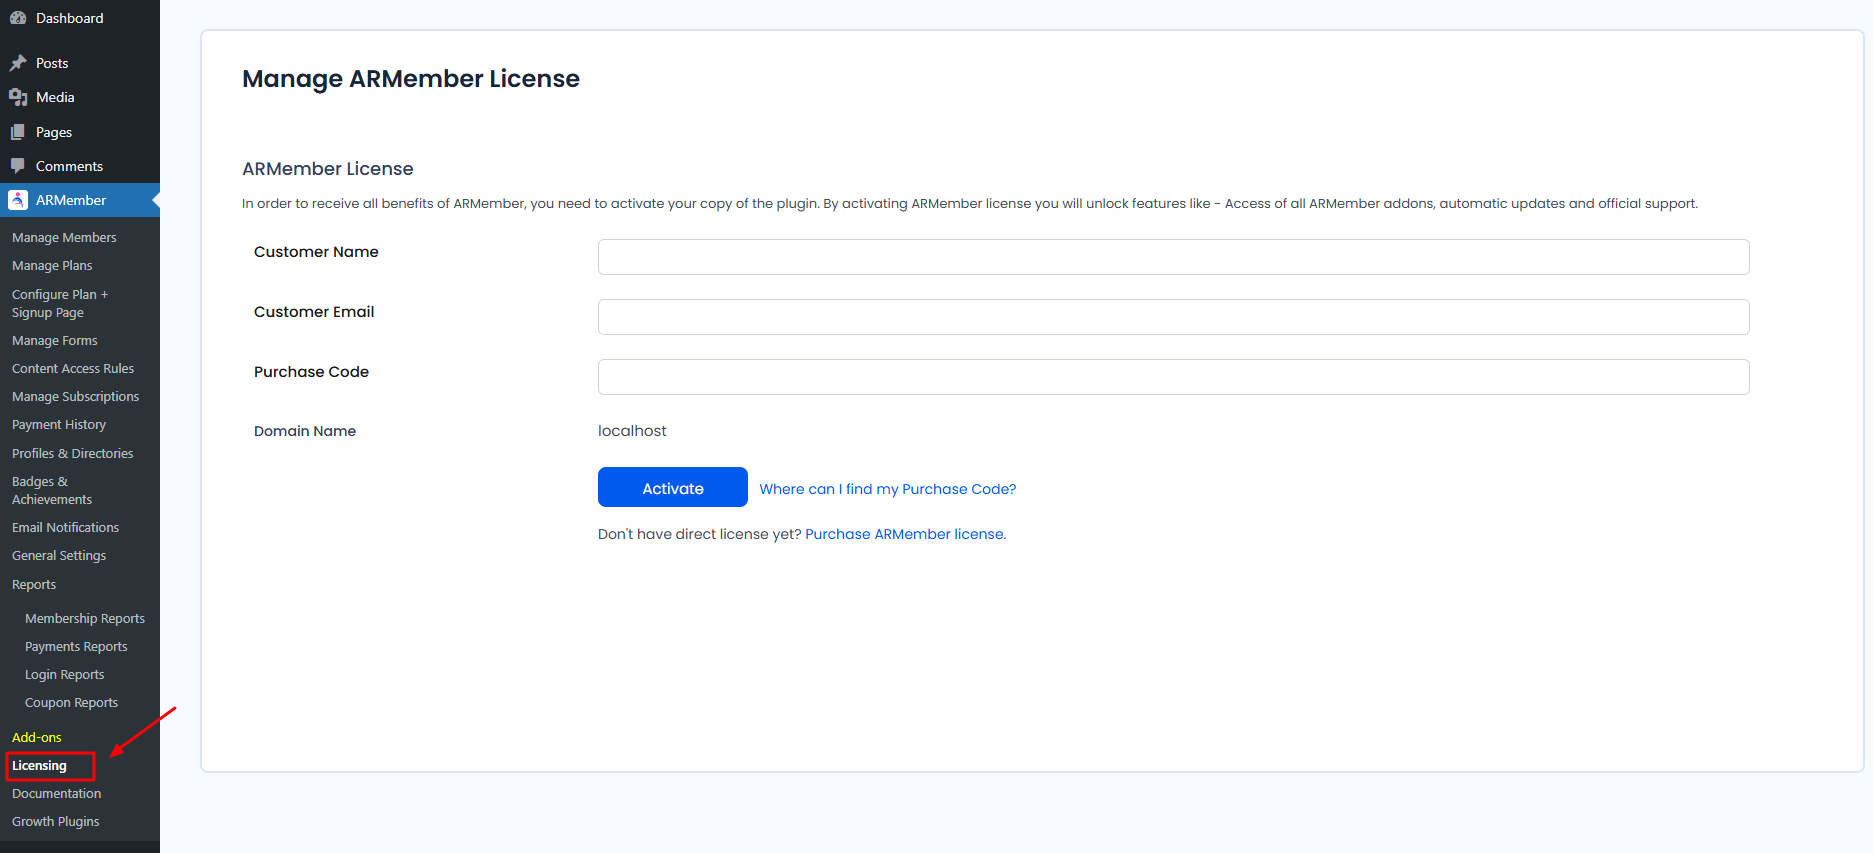
Click on the Licensing menu item for activating your license.
Step: 2
Firstly, you will see the section of Product License on that page. To activate your license, you will need to enter your Name, email address and purchase code (Unique code obtained while purchased this product).
Important Note: While adding all the information, make sure to use the same information that was filled at the time of purchasing ARMember in order to avoid the error of Invalid Request.
ARMember Pro License Activation through Website:
To activate the license when ARMember is purchased from the ARMember Website, follow the steps below:
Step 1: Login

Login to your account. If you have logged in to the account and then purchased the plugin, you can log in to the same account. If you haven’t created an account and purchased the plugin directly, use the details similar to those used at the time of purchase to log in successfully.
Step 2: My Account
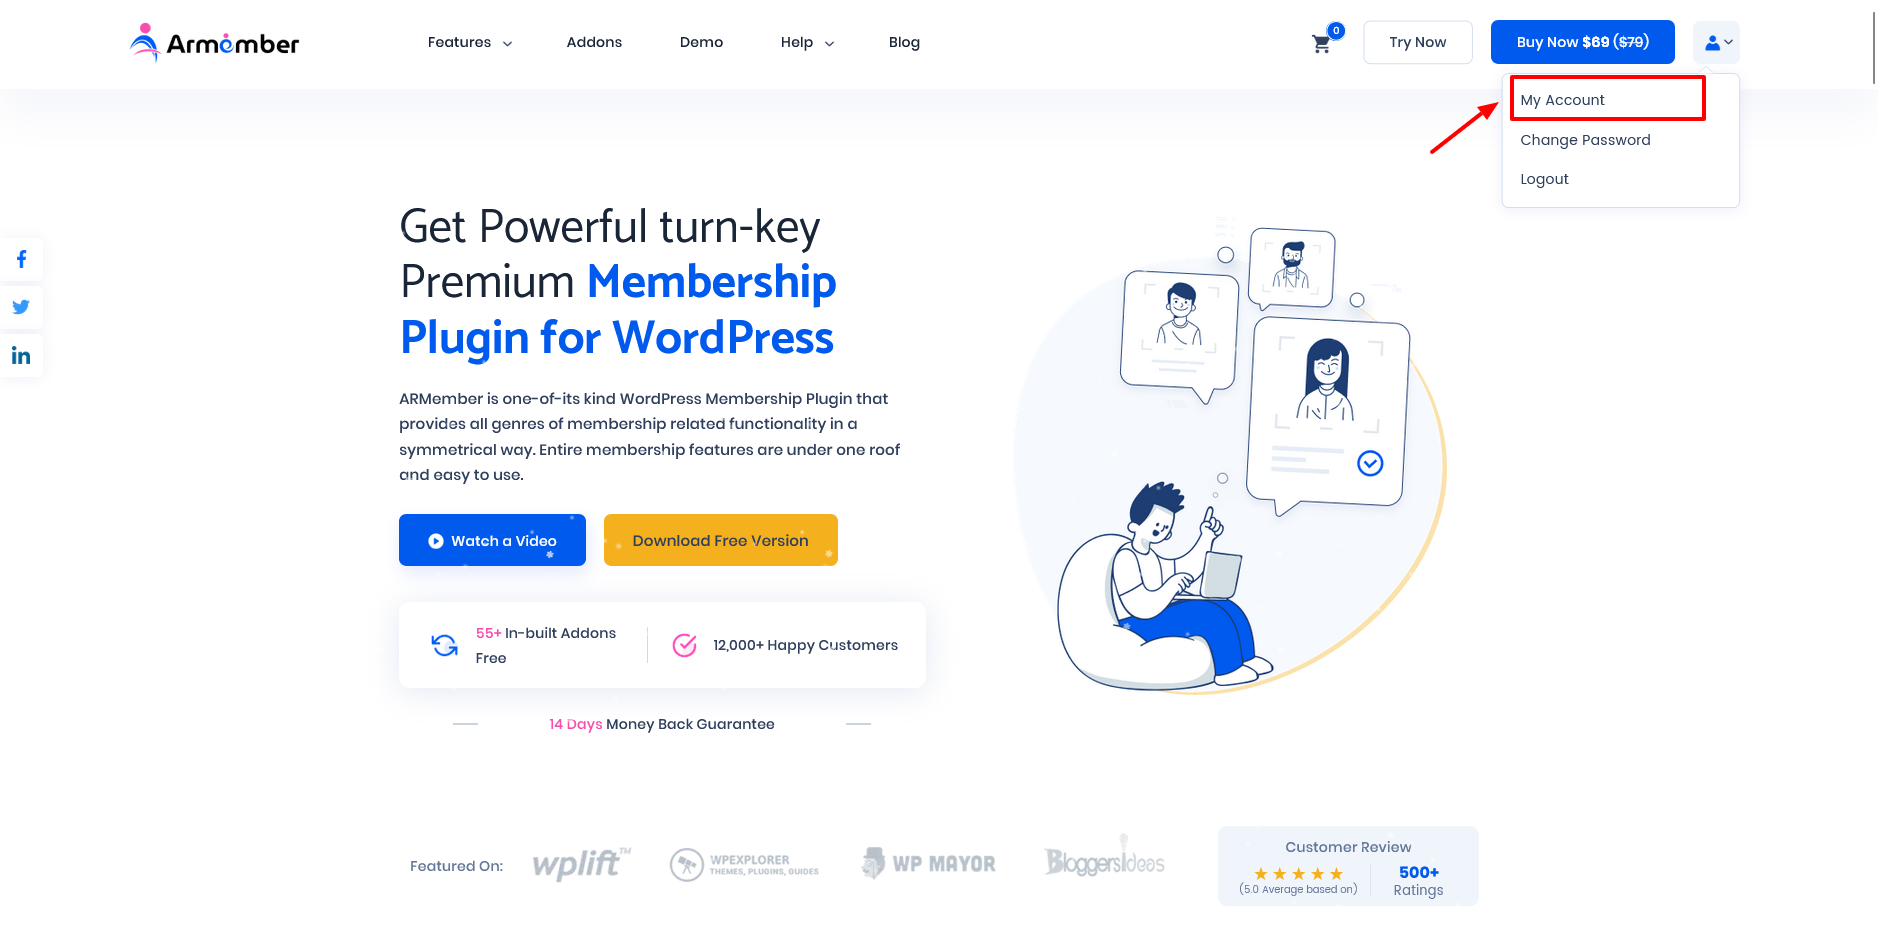
Once logged in successfully, check the dropdown beside the icon of a person at the right. Click on the icon, and then navigate to My Account.
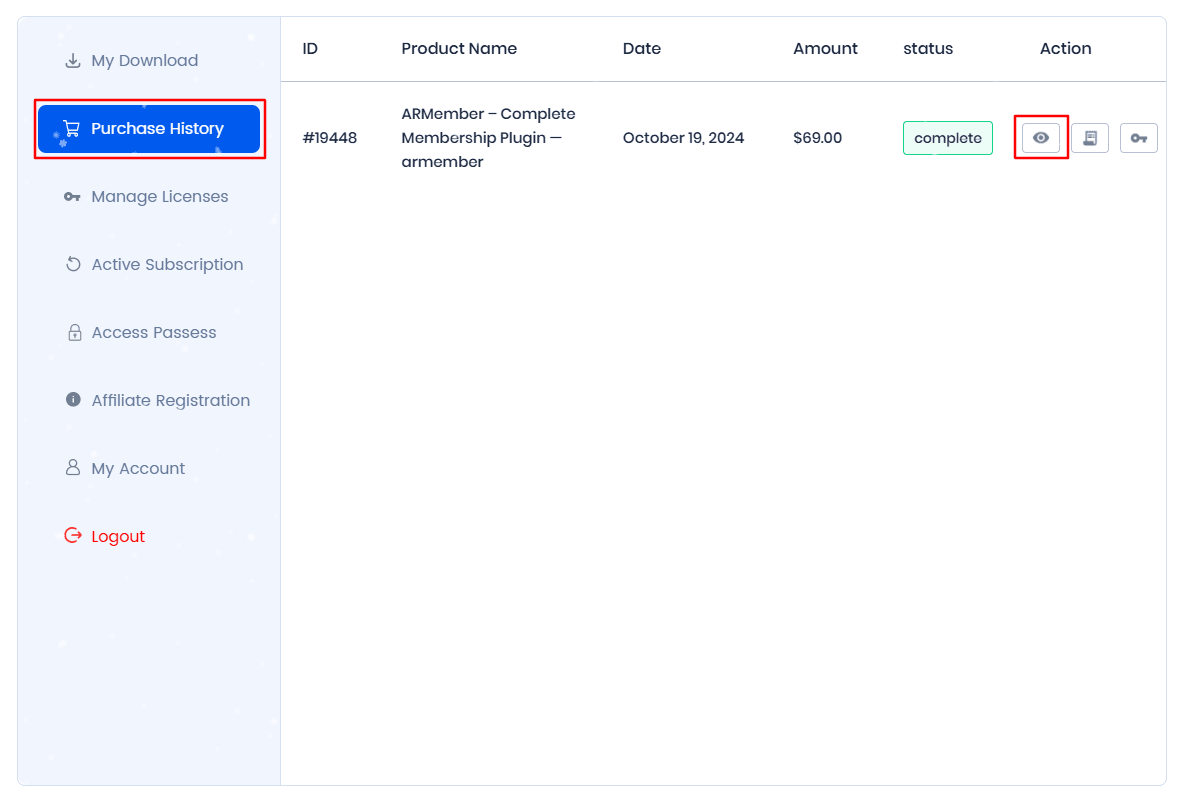
Step 3: Purchase History
Here you can check the history of purchased plugins. Look for the Eye Icon to get more details.
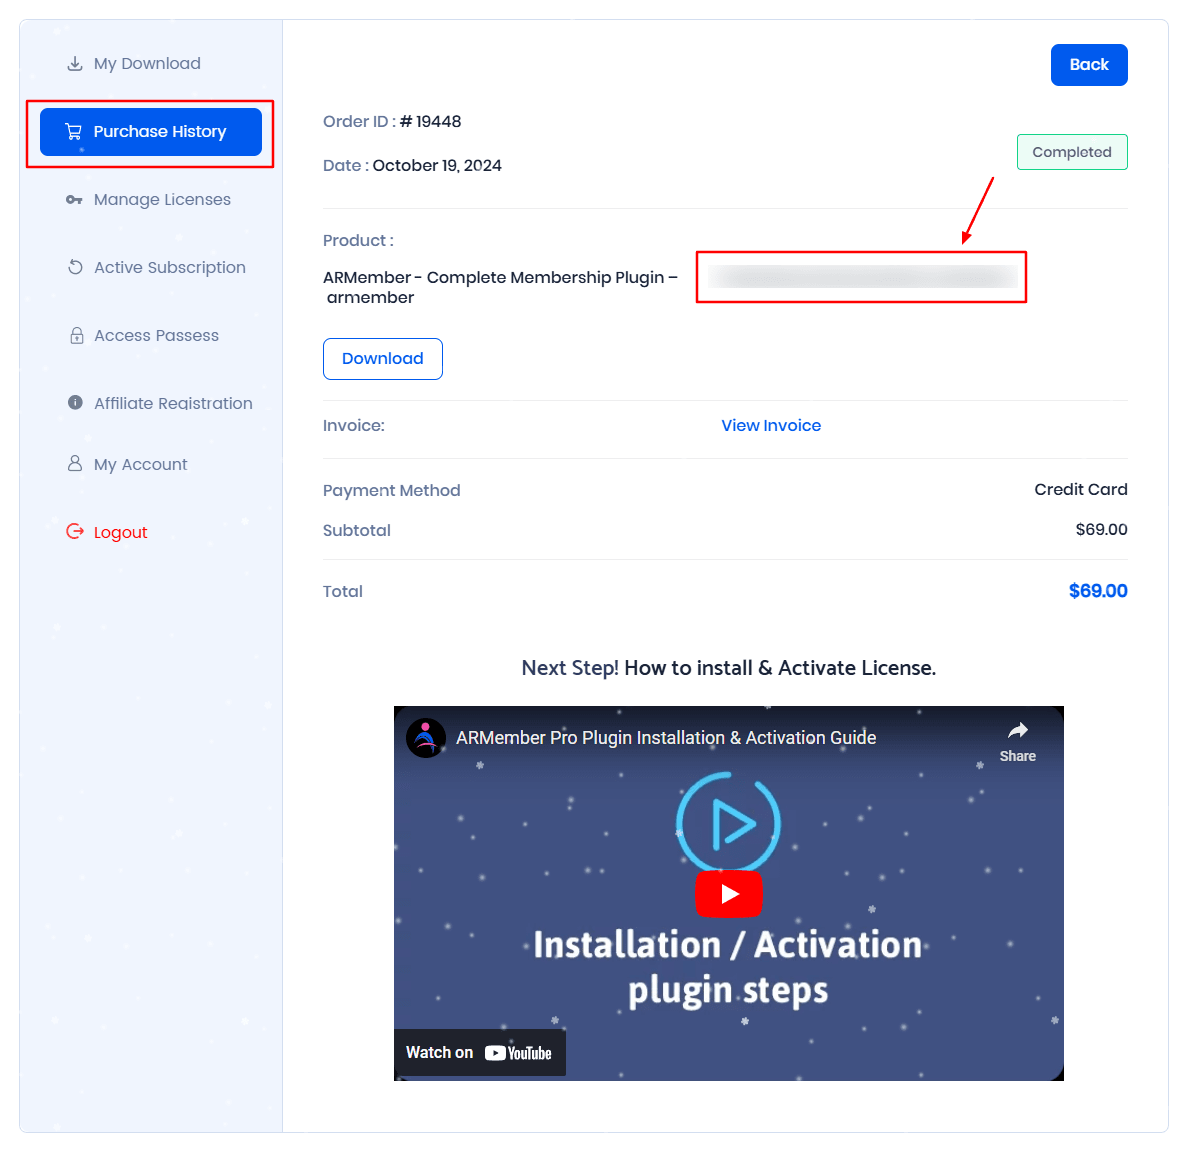
Step 4: License Key
Clicking on the Eye Icon will allow you to check the License Key and Invoice, and also you can Download the plugin from here.
Step 5: Activate License
Navigate to WordPress ⇾ Admin Panel ⇾ ARMember ⇾ Licensing, and here you will add the license key for the ARMember plugin.
ARMember Update:
ARMember provides a simple process to update both versions of ARMember. Follow these steps to update the plugin in different ways.
Important Note: Backup your data: Before proceeding with any update, it is recommended to create a backup of your website and database. This will ensure that you can restore the previous version if anything goes wrong during the update process.
- Auto Update:
- Manual Update:
-
Download the latest version of the plugin.
If you have purchased the ARMember Pro from the ARMember Website, login to your account, navigate toMy Account->Purchase History/ Download History, and hit the download button.
If you have purchased the ARMember Pro from Code Canyon, log in to yourEnvato account->My Account->Downloadto access the zip file. - Unzip the downloaded file to your computer.
- Take a backup of the ARMember directory.
- Upload the new plugin source code
/armember/directory to the/wp-content/plugins/directory of your site. - Activate the plugin through the ‘Plugins’ menu on WordPress.
- Update Via WordPress Uploader:
- Login to your site Admin Panel and navigate to
Plugins->Add New->Upload. - Once you click on the
Upload plugin, select the zip file from your computer. After selecting the file, theInstall Nowbutton will be enabled. Click on it to start the ARMember installation process. - After the plugin is installed, click on the Activate Plugin button to activate it.
In your WordPress admin, navigate to Plugins > Installed Plugins. If an update is available, you will see an update notification next to the plugin name. Click on the ‘Update Now’ button. Wait for the update to complete, and you will have the latest version of ARMember installed.
In order to update the ARMember Lite(free version) kindly download the latest version copy and then update the plugin similarly to updating the ARMember Pro.
FAQ’s
- How to download the purchased addons?
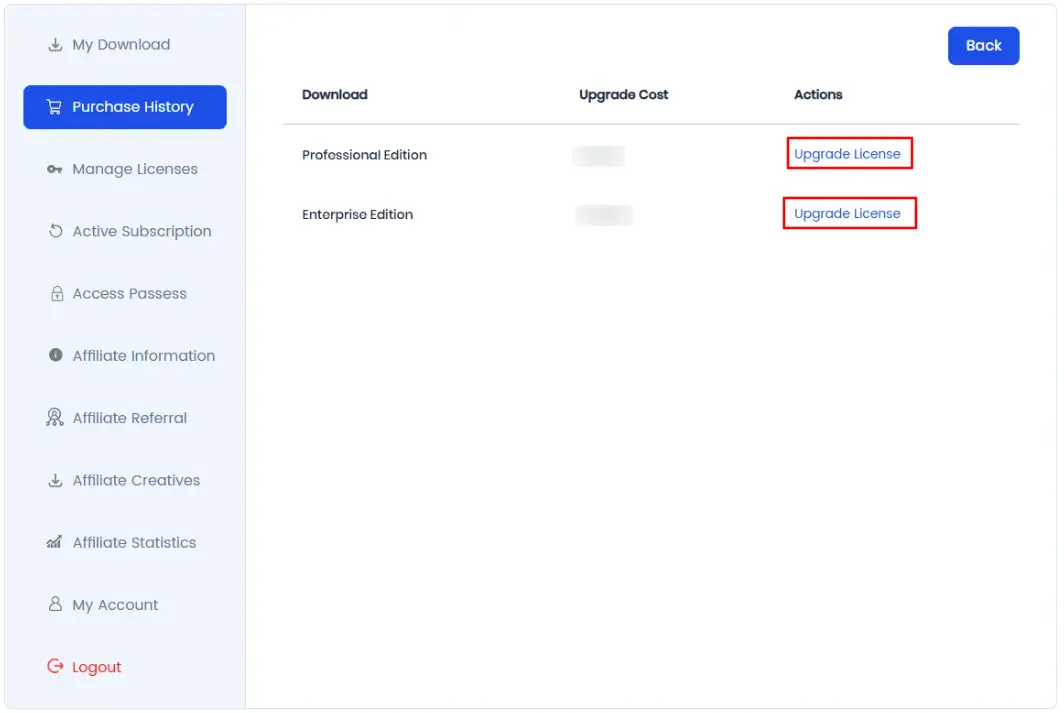
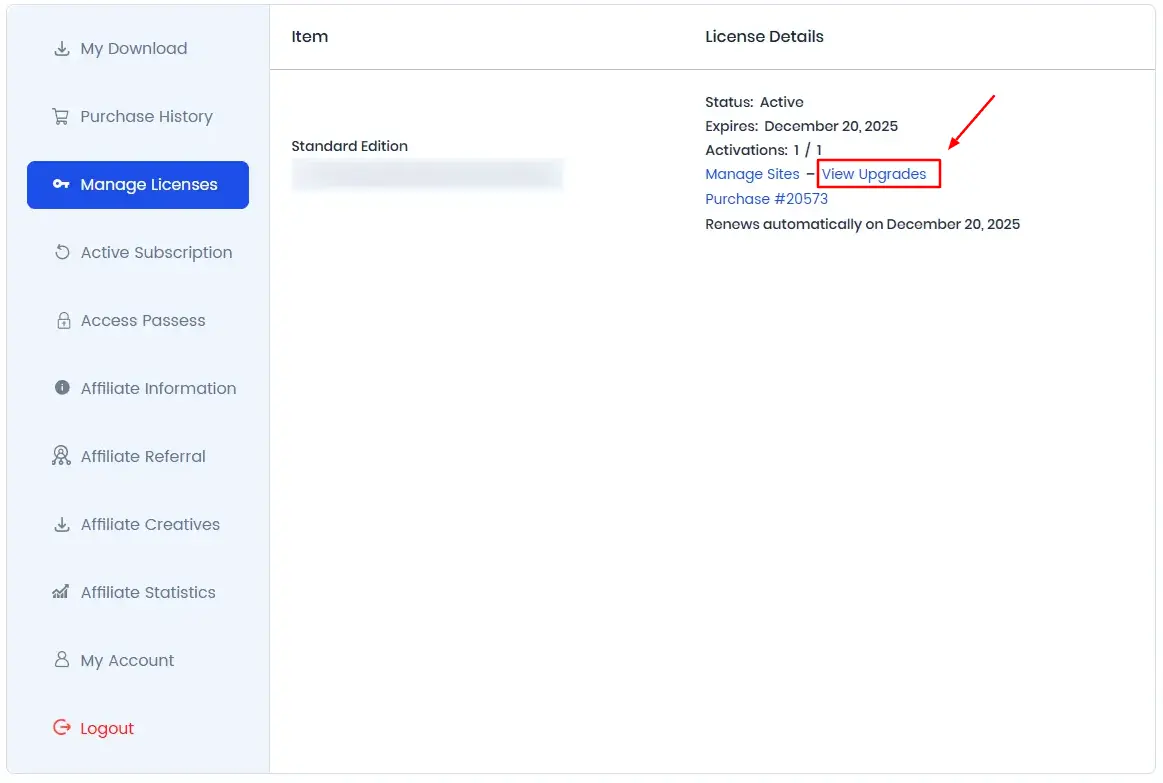
- How to upgrade the plan?
- Login to your account.
- Navigate to
My Accountsand then to theManage Licensespage. - On this page, you’ll find a link for
View Upgrades. Click on this link. - You’ll be directed to a page where you can choose to upgrade your license from
Standardto eitherProfessionalorEnterprise. - The price for the upgrade will be calculated on a pro-rata basis, so you’ll only need to pay the price difference.
- How to upgrade from ARMember Lite to ARMember Pro without losing any data?
- Keep the ARMember Lite Installed and Activated on your site.
- Add a copy of the ARMember Pro and activate the ARMember Pro Plugin.
- Once you install ARMember Pro, all data will be updated to ARMember Pro.
- Keep the ARMember Lite installed and activated even after adding ARMember Pro, as ARMember Pro is the extended version of ARMember Lite.
- How to transfer the license from one site to another?
To access your purchased addons, follow the steps provided in the addons installation guide.
Once all settings are configured in ARMember Lite, switching to ARMember Pro can be done without losing any data or changes made. Follow the steps below to sync the data with ARMember Pro:
ARMember allows for easy license transfer from a staging site to a production site. Check the detailed documentation on how to transfer the license.