Important Note: This Addon will only
work if ARMember plugin is installed with version 2.0 or higher
This plugin lets you run your own affiliate program and allows you to create and reward (pay commission) your
affiliates for referring other users to your website.
When a user pay for ARMember membership plan on your site, this addon will check to see if the user was referred
to your site by an affiliate. It will then give commission to the affiliate who referred the user.
Steps For Installation And Activation
You can installation plugin in following two ways.
New install via FTP
- Download the plugin and extract it. You will find a directory armemberaffiliate.
- In your WordPress installation directory, upload armemberaffiliate to
wp-content/plugins/ - Activate the
ARMember - Affiliateplugin through thePluginsmenu from WordPress
admin panel.
New install via the WordPress Uploader
- Download the plugin.
- Log in to your WordPress admin panel.
- Go to
Plugins->Add New->Upload - Click on “choose file” and browse the download package. When the plugin uploads successfully, click on
Activate Plugin.
ARMember – Affiliate Setup Wizard
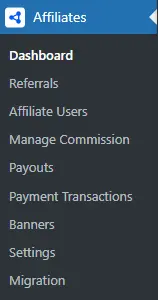
After activating the plugin, you will be able to see ARMember Affiliate
admin menu in left side.
Let’s setup ARMember – Affiliate for your website :
-
When plugin activated then Affiliate menu and pages will be display.
-
On the
Dashboardpage you can track site statistics like Total Referral Amount, Total
Accepted Referral Amount, Total Pending Referral Amount, Total Visitor, Total Referrals, Total
Affiliate User. -
To view list of all referrals with their details navigate to the
Referralsmenu from the admin
interface. -
For view list of all affiliate user with user details go to the
Affiliate Usersmenu from
the admin interface. -
To check all payouts with their details go to the
Payoutsmenu from the admin interface. -
To view list of all banners with their details go to the
Bannersmenu from the admin
interface. -
Affiliate basic settings are available in Affiliate Settings. Please see below at Affiliate Settings section to get more detail.
-
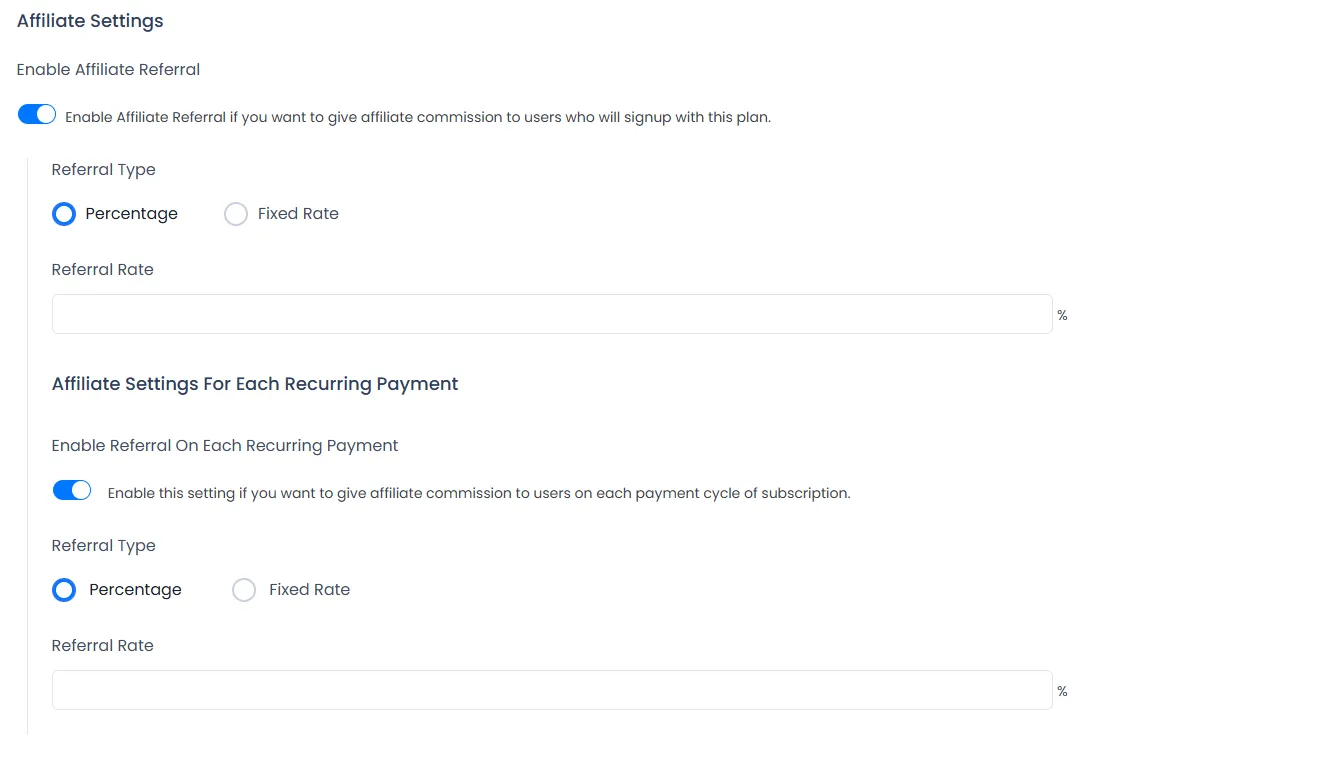
Also when plugin activated Affiliate section will be displayed in
ARMember->
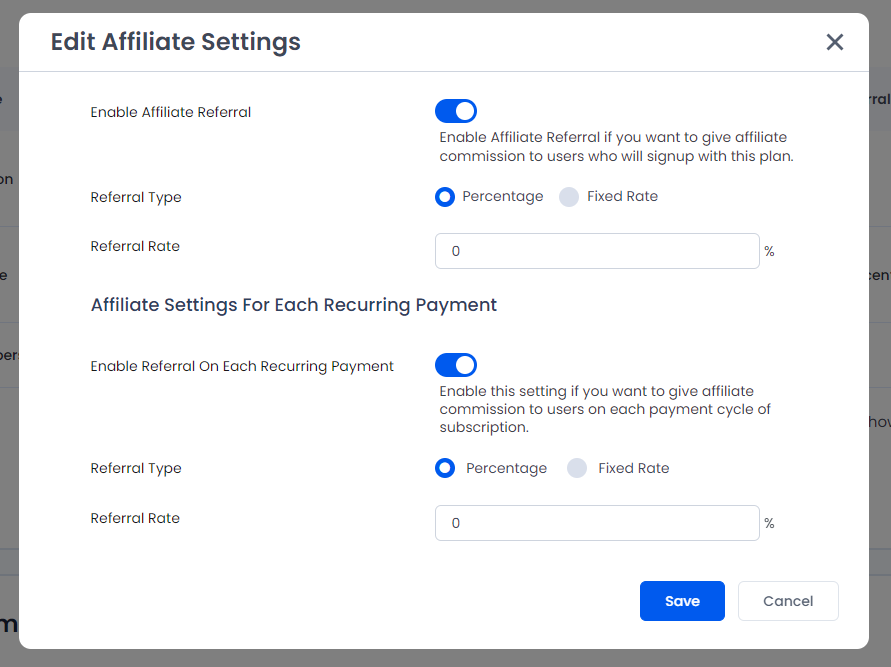
Manage Plans->Add / Edit Plan.Here Affiliate Settings On Recurring Payment will be displayed when Subscription / Recurring payment plan
type is selected.Important Note: Here referral
on recurring payment is supported from ARMember 2.2.1.Please see below screen.
-
You will be able to enable and disable referrals plan wise.
-
You can set referral rate in ‘Fixed Rate’ or ‘Percentage’ wise.
Also you need to set this settings for each plan.
For easy way to configure referral for each plan you may change directly at
Manage Commissionwhere all plans are available at ARMember Plans Affiliates section and
change affiliate settings for each plans easily. -
ARMember Affiliate supports data migration from AffiliateWP and Affiliate Pro plugins which helps you to
migrate affiliate accounts to the ARMember Affiliate plugin. -
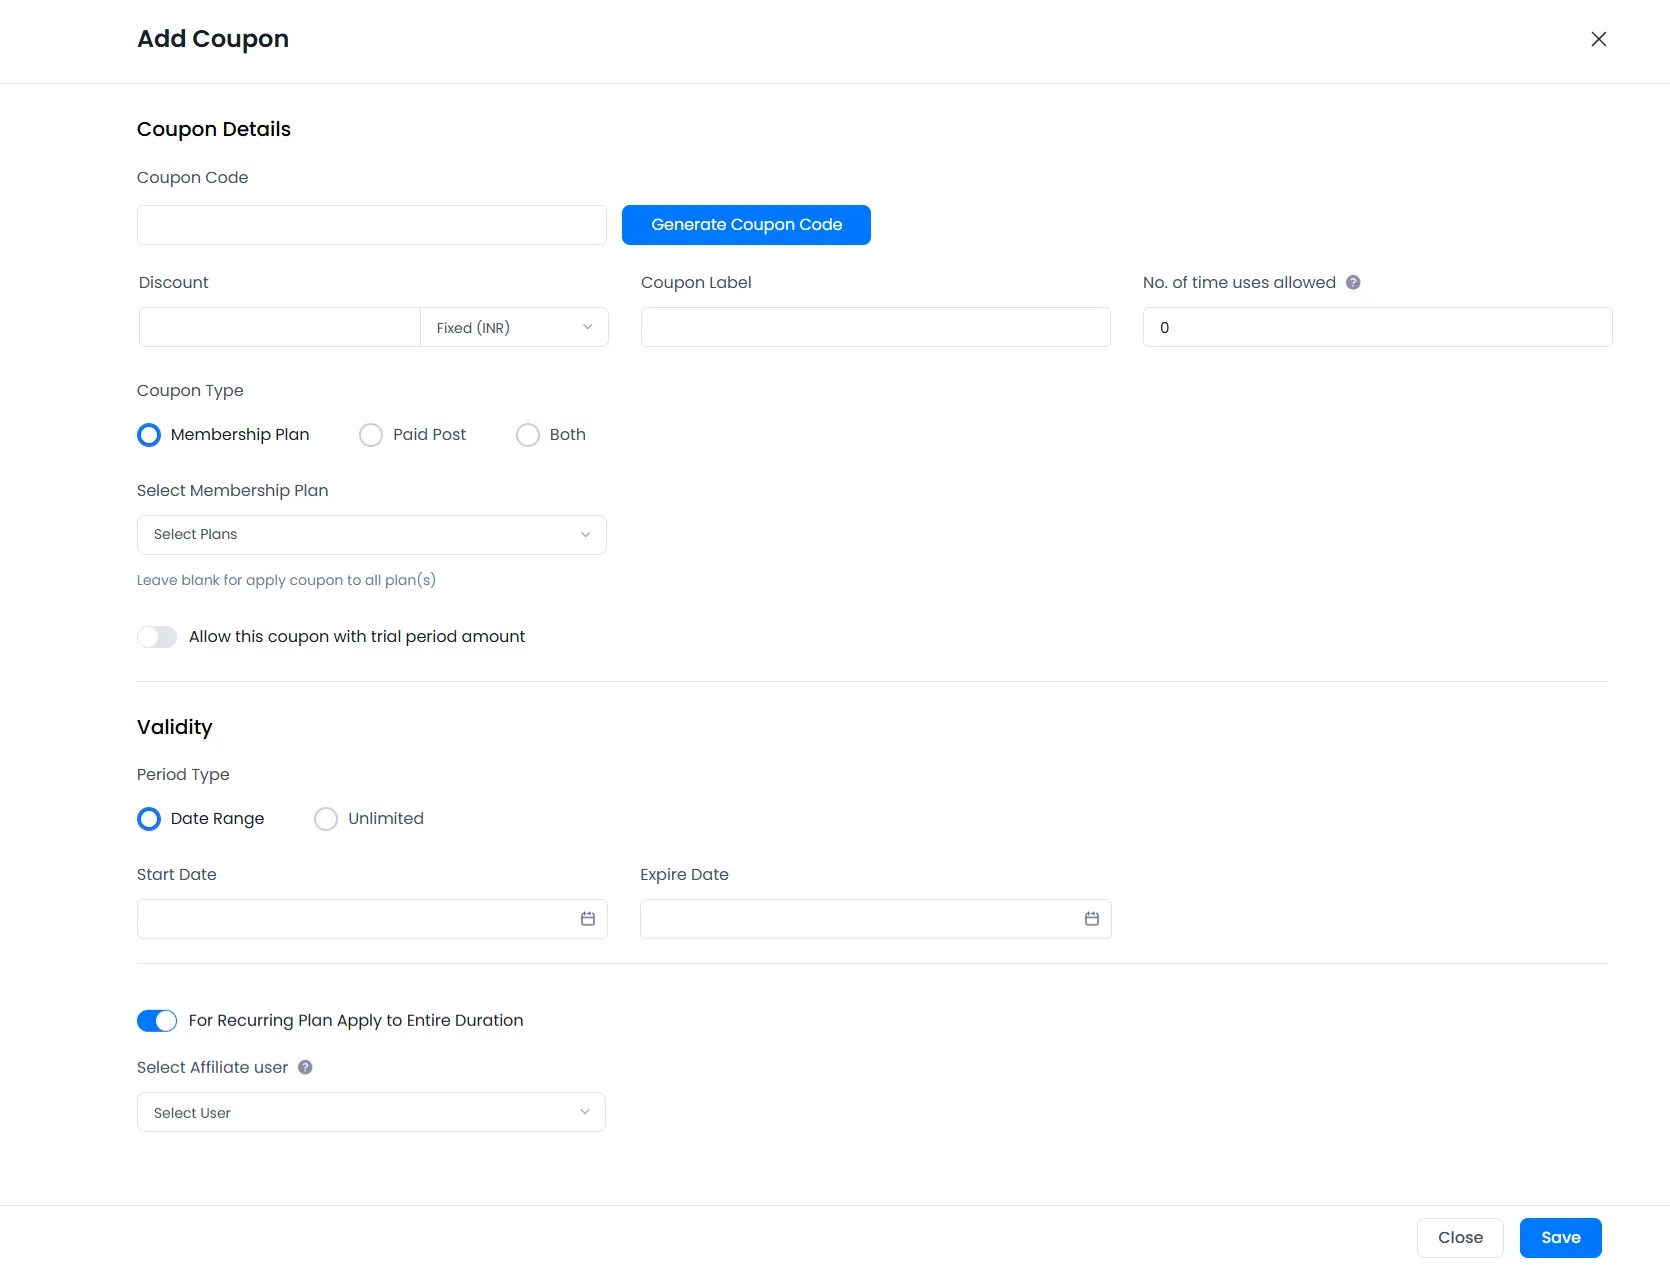
Allow to give referral to affiliates on purchase membership plan with coupon code.
An administrator can set an Affiliate user per coupon and when the membership plan is purchased from that
coupon, the affiliate will receive the reward. -
Allow Affiliate user to Refer or Invite friends by email.
Affiliate Users
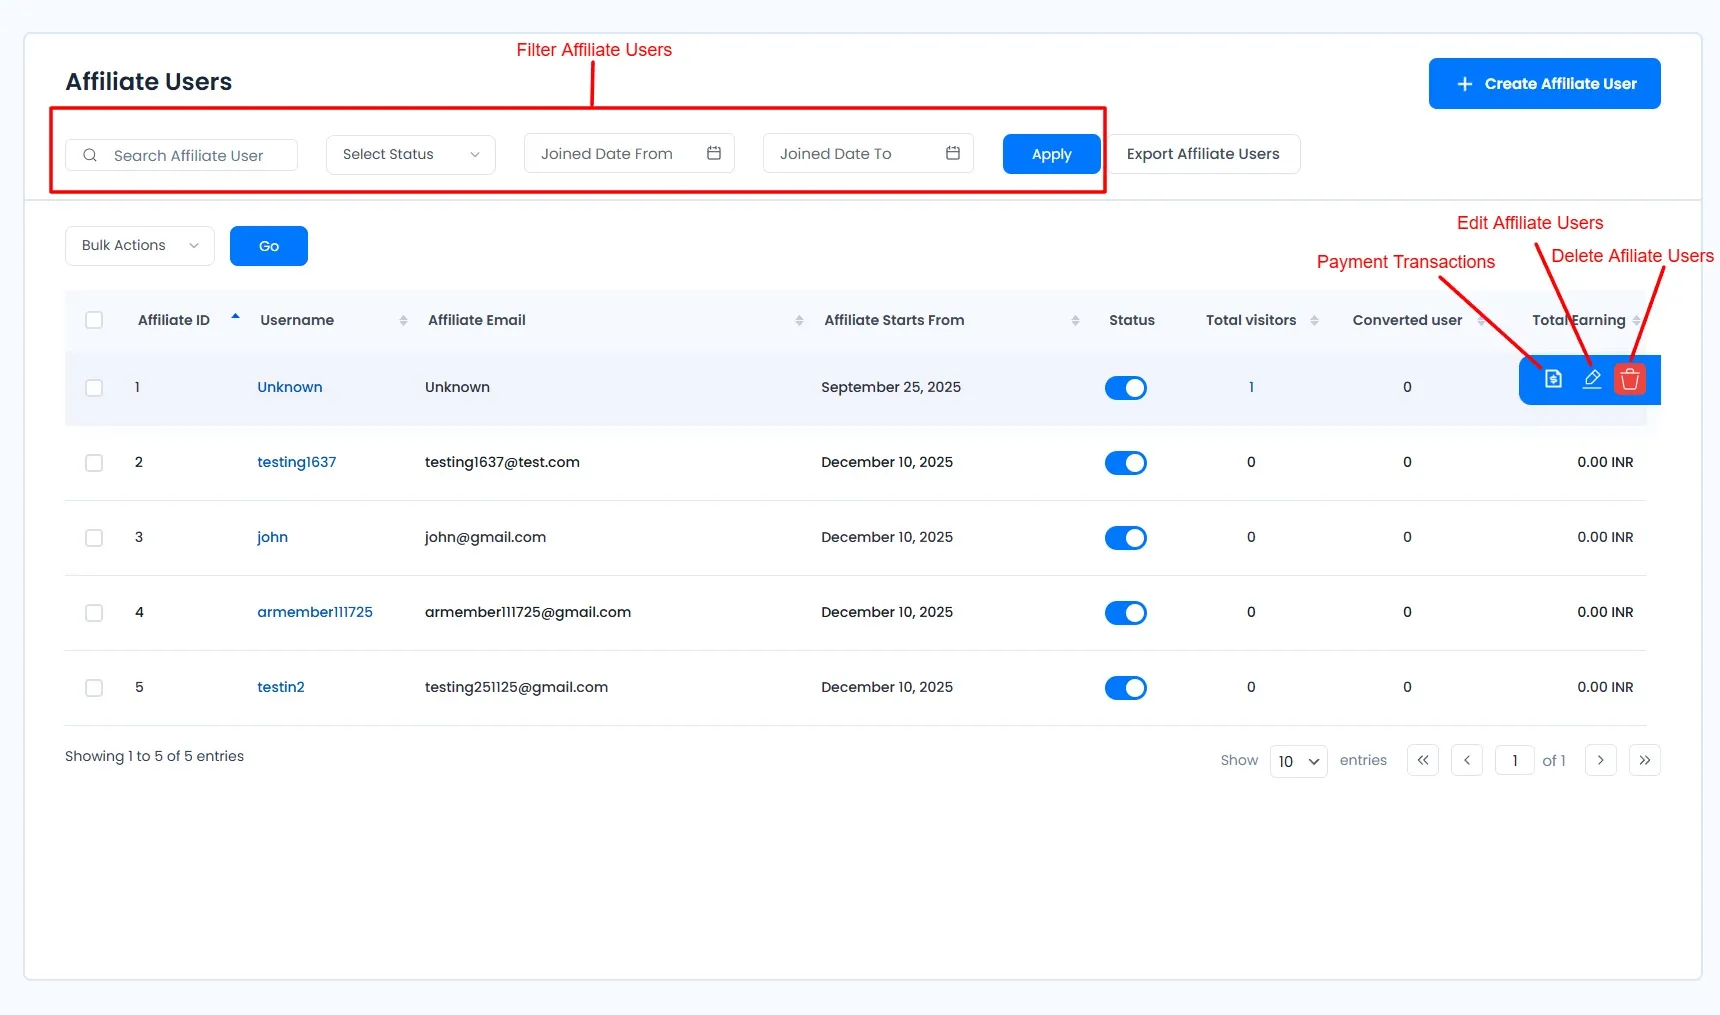
To view list of all Affiliate with their details go to the Manage Affiliate menu from the admin interface. Also
here you can track how many user visit your website using affiliate user referral link and Display how many
visitor converted as user through the affiliate user referral link.
Here you are able to see all affiliate users listed with individual details like affiliate id, Username, Email
Address (PayPal ID if enabled “PayPal Mass Payment Settings” from Settings), Affiliate Starts From, Affiliate
User Status, Number of Visitors, Total Converted User, and Total Revenue generated. Also columns Affiliate ID,
Username, Email Address, Affiliate Starts From, Total Visitors, Converted Users, and Total Amount are sortable.
Please see below screen.
Bulk Actions
This option will be helpful when same action need to be performed on multiple user rows at same time.
-
1. Delete
Select number of rows that you want to delete and select Delete Bulk Action then click on Go button.
Actions
For each row of grid there are some action options provided which are as following
-
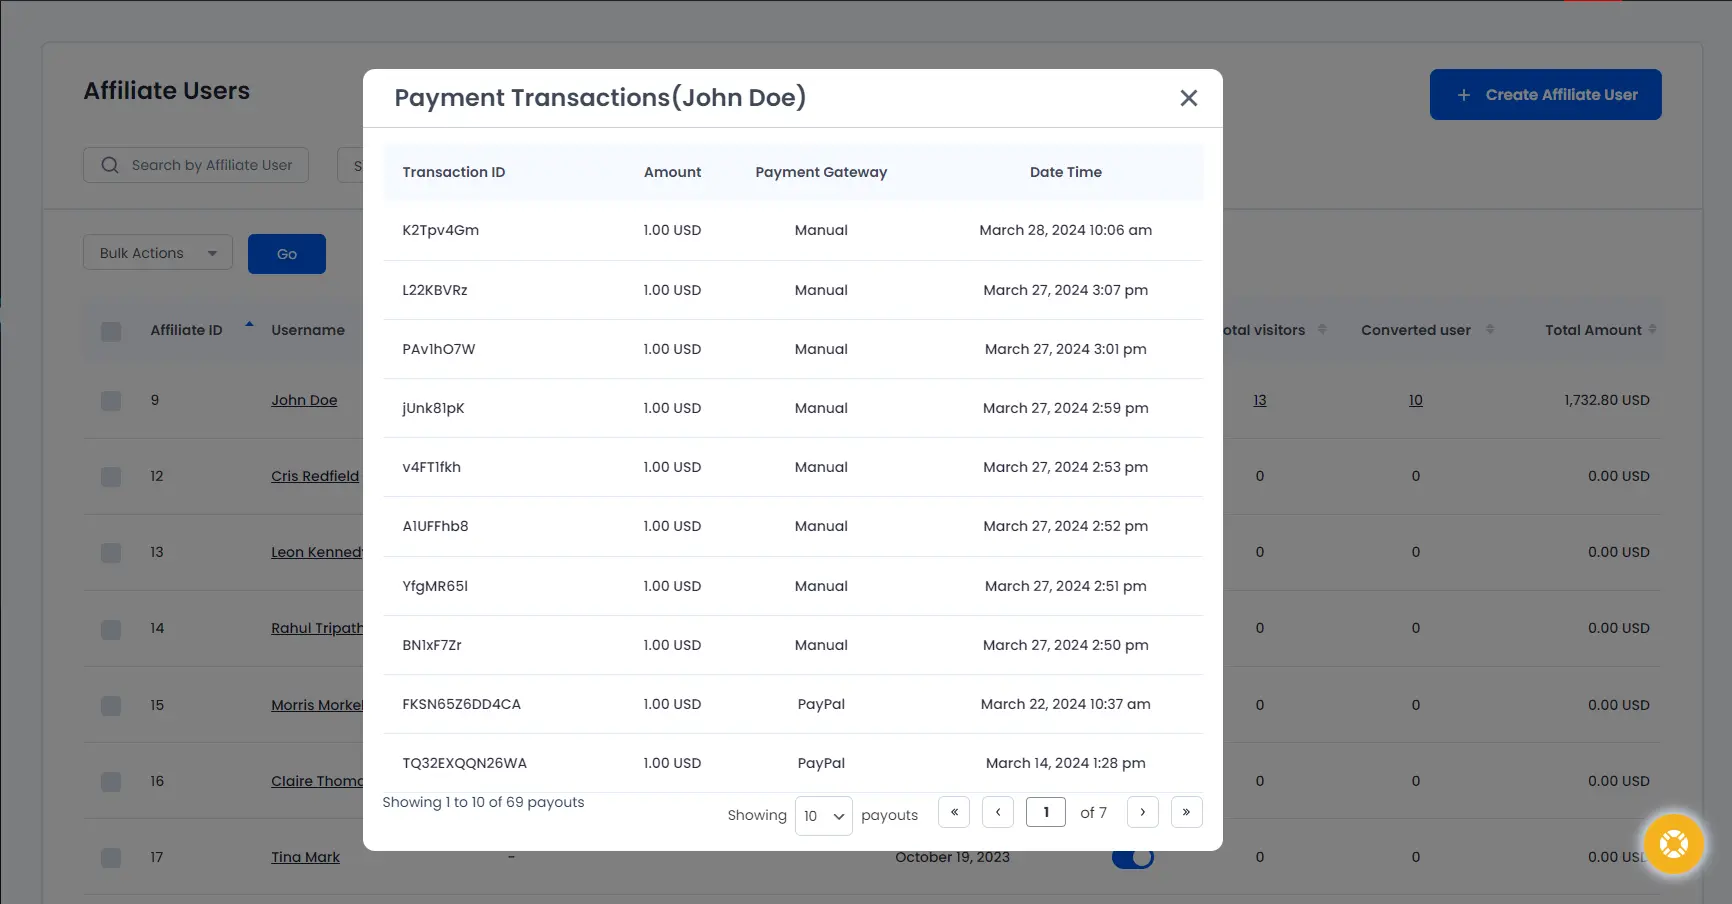
1. Payment transaction
You can check Affiliate Users Payment Transaction History by click on
Payment TransactionPlease see below screen.
-
2. Delete
Each Referral can be deleted by just one click on
DELETEIcon at right side. -
3. Active & Inactive
You can
ACTIVEorINACTIVEdirect login using single switch. -
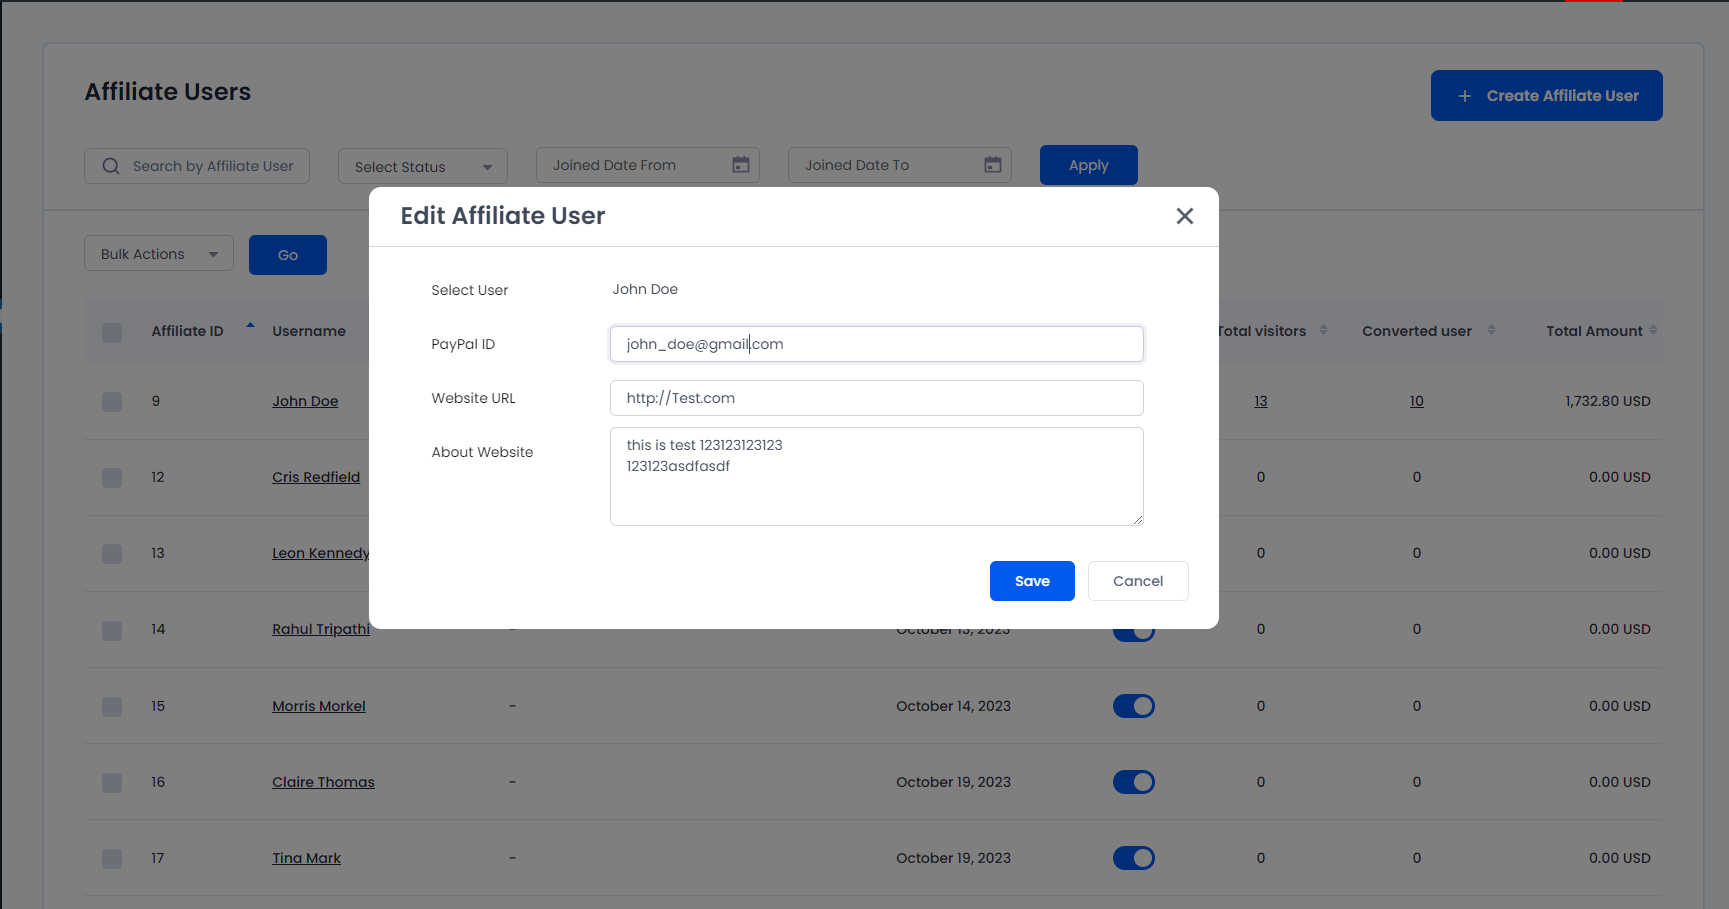
4. Edit Affiliate Users
For edit affiliate user data click on
Edit Affiliate userbutton. And update affiliate user’s
data such as site URL and description in popup and click on save.Please see below screen.
Search
You have Search Box at top of the grid plus other filter options are also available which are
FILTER BY STATUS.
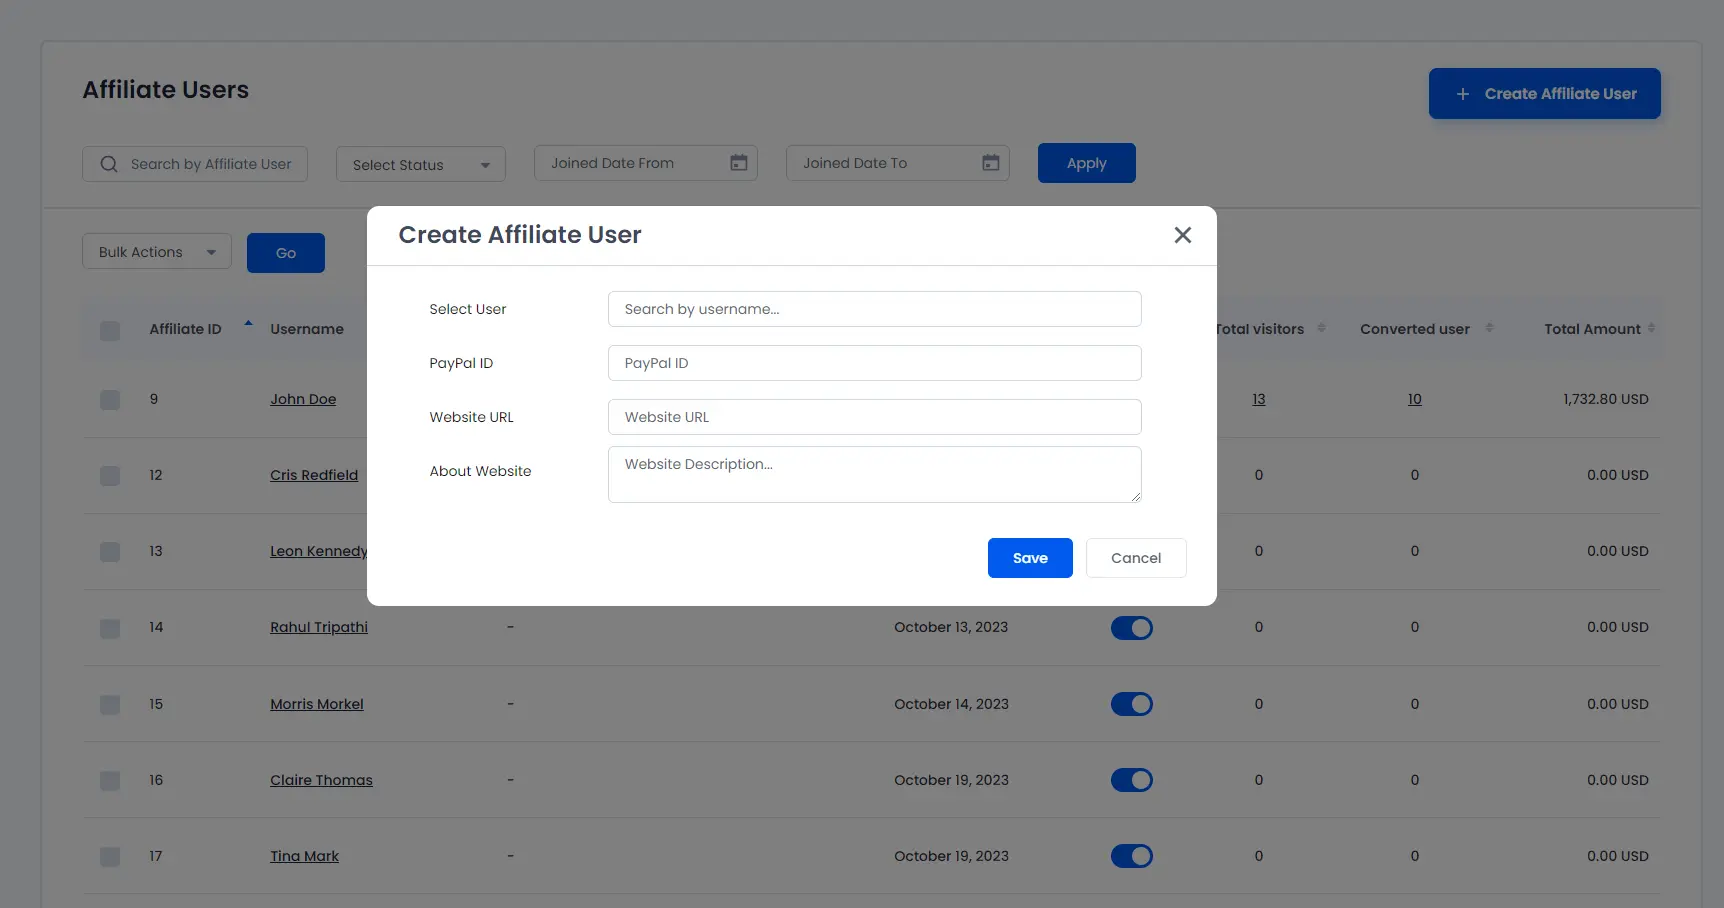
Create Affiliate User
For create affiliate user click on Create Affiliate User.
Please see below Screen.
You can select user that you want to create affiliate user.
click on Save button.
Referrals
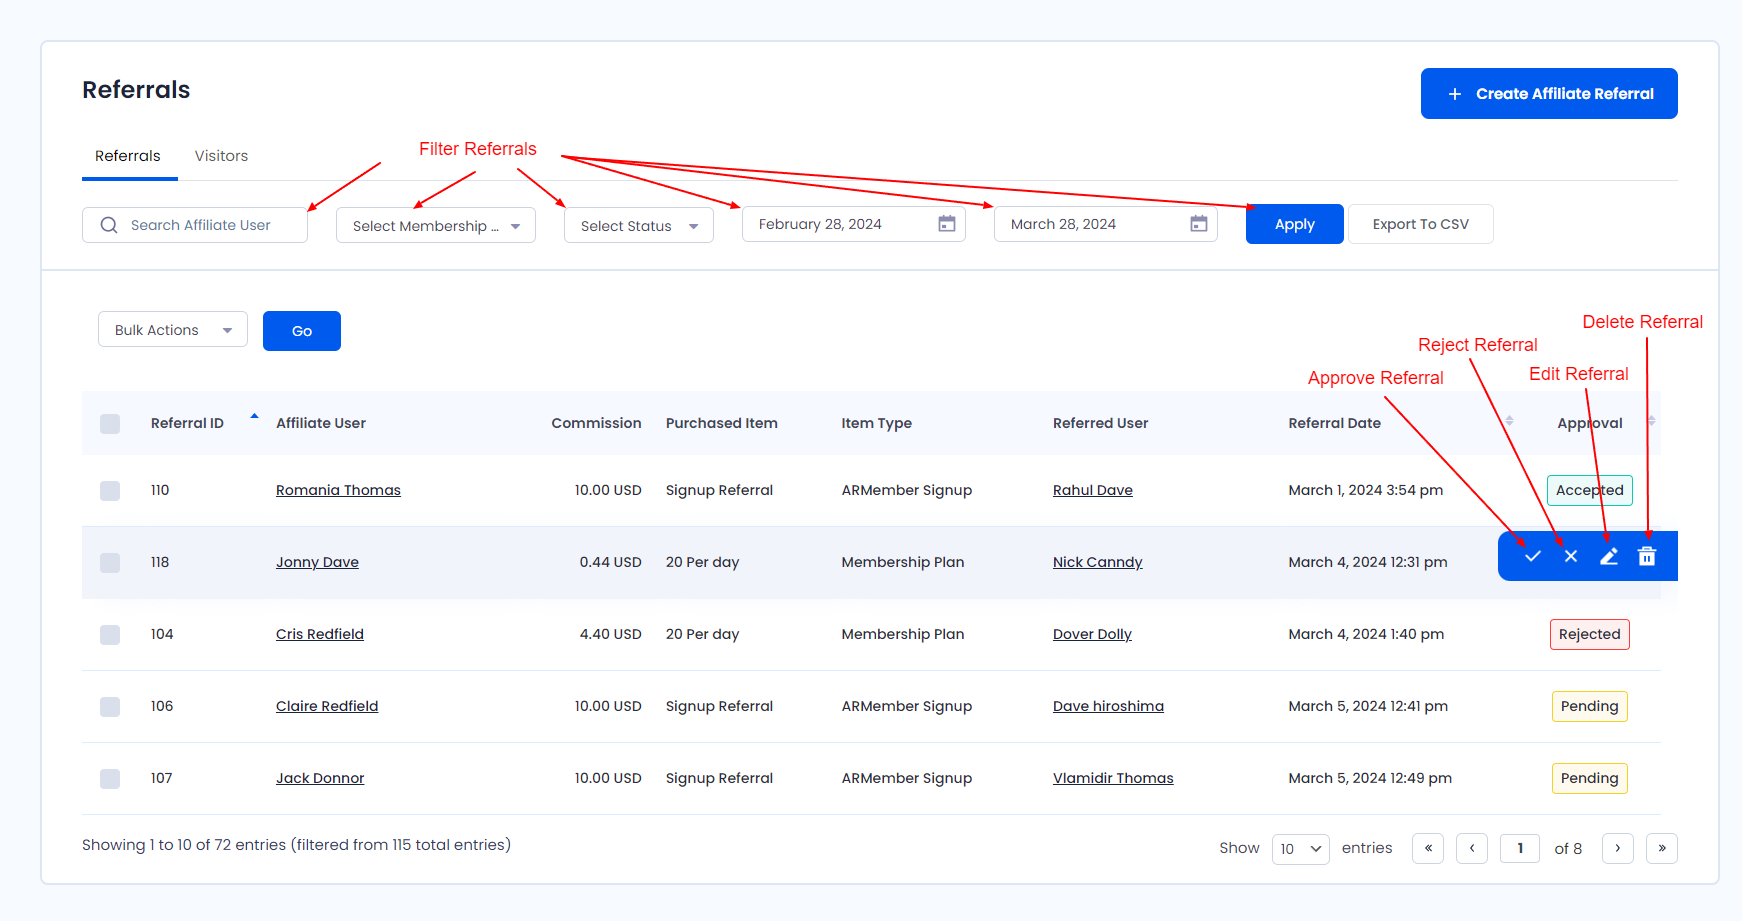
To view list of all Referrals with their details go to the Manage Referrals menu from the admin interface.
Here you are able to see all referral listed with their details like Affiliate User, Amount, Plan Name, Reference
User, Date, Status and Link. Also Affiliate user, Amount and date column is sortable here.
Please note that, if
affiliate user is referred with any payment transaction then referral will be added on purchased plan amount. If
plan has trial active and transact with trial amount then referral will be added on trial amount.
Please see below screen.
Bulk Actions
This option will be helpful when same action need to be performed on multiple user rows at same time.
-
1. Delete
Select number of rows that you want to delete and select Delete Bulk Action then click on Go button.
Actions
For each row of grid there are some action options provided which are as following
-
1. Accept
Each Referral Can be accepted by just one click on
ACCEPTIcon at right side. When you
accept any referral then status should be unpaid. -
2. Reject
If you see any bad Referral then you will be able to reject by just one click on
REJECTIcon
at right side -
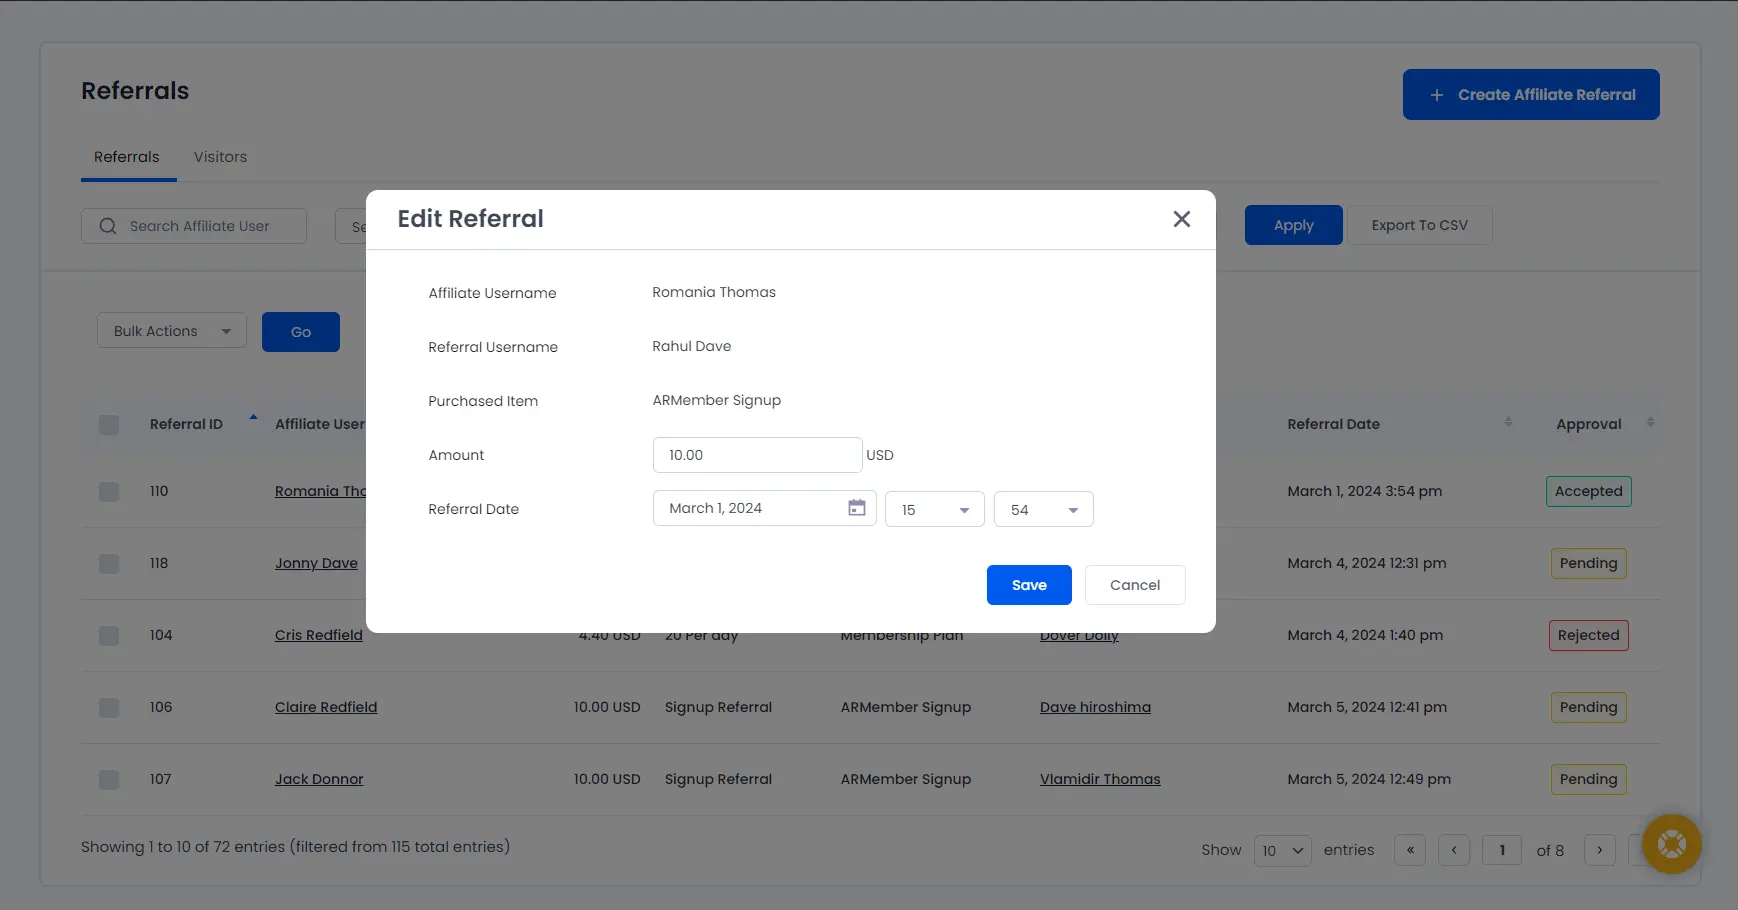
3. Edit Referral Amount
For edit referral amount click on
Edit Referral Amountbutton. And set your new amount in
popup amount text-box and click on save.Please see below screen.
-
4. Delete
Each Referral can be deleted by just one click on
DELETEIcon at right side.
Search
You have Search Box at top of the grid plus other filter options are also available which are
FILTER BY MEMBERSHIP PLAN, FILTER BY STATUS, FILTER BY DATE.
Export To CSV
This button provides the facility to export the records and display those records in the CSV file.
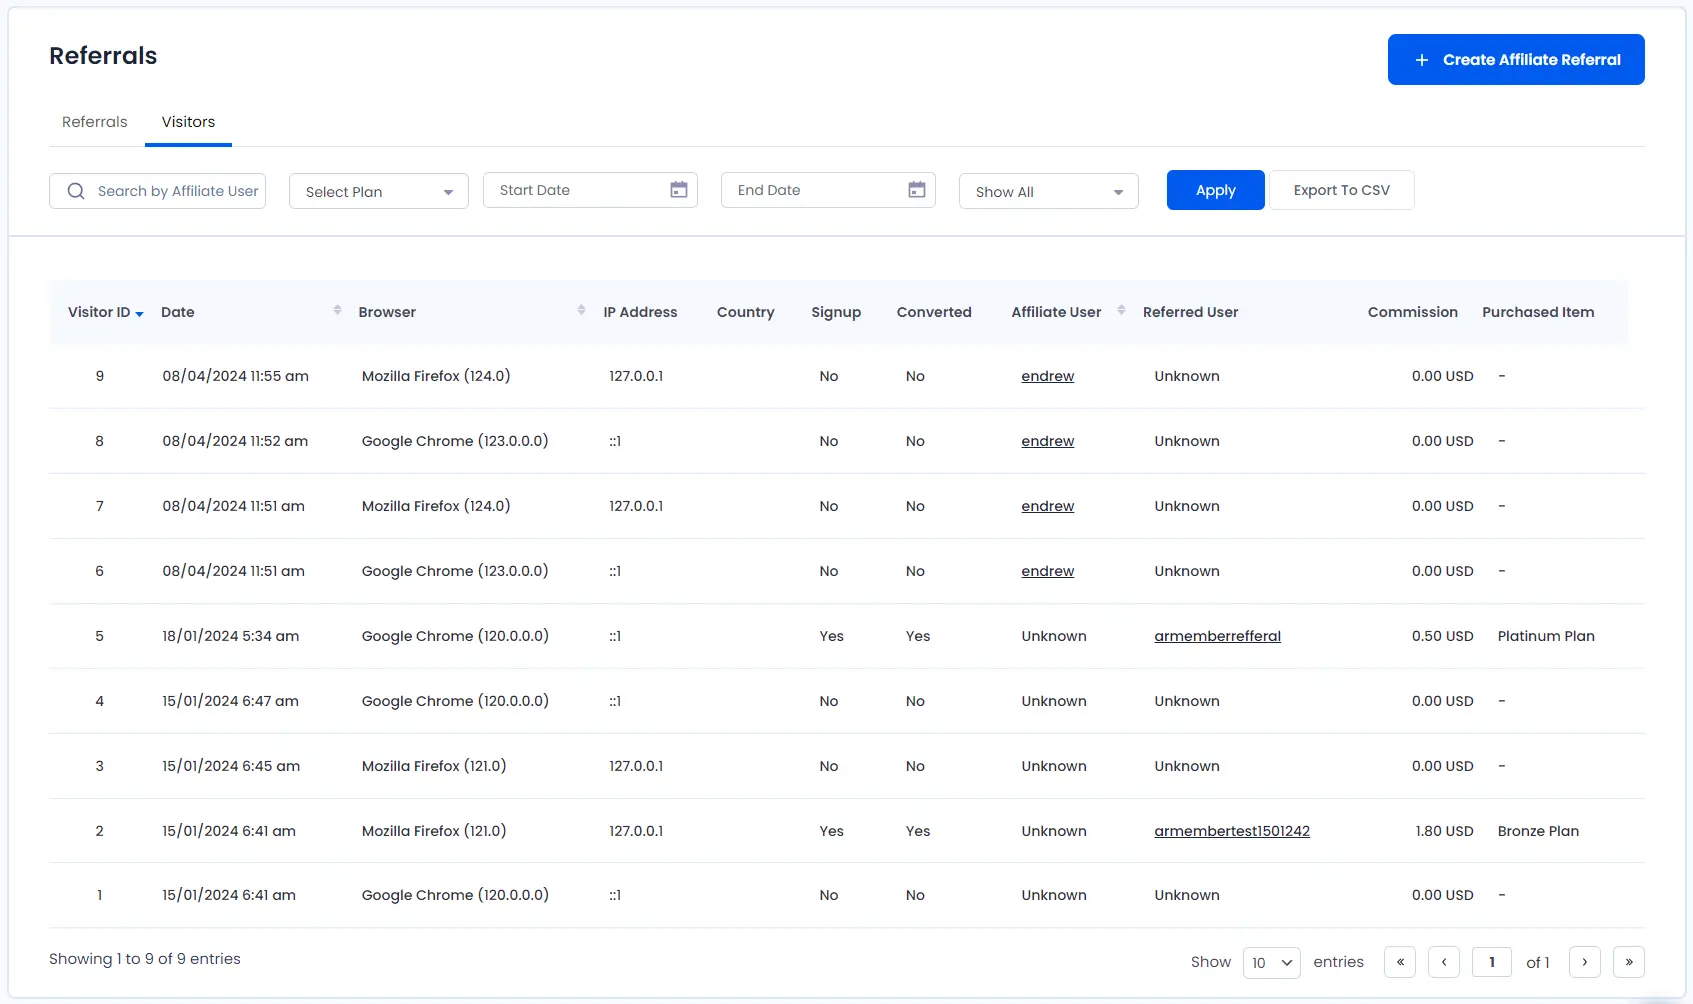
Visitor
ARMember does provide a facility to the admin to check the vistiors. The admin can check the visitors visited to the site and accordingly also can check that whether the visitor is converted as a user or not and also check other multiple information regarding to the “Visitor”.
Manage Commission
From this page you can set commission on individual affiliate accounts.
ARMember User Commissions
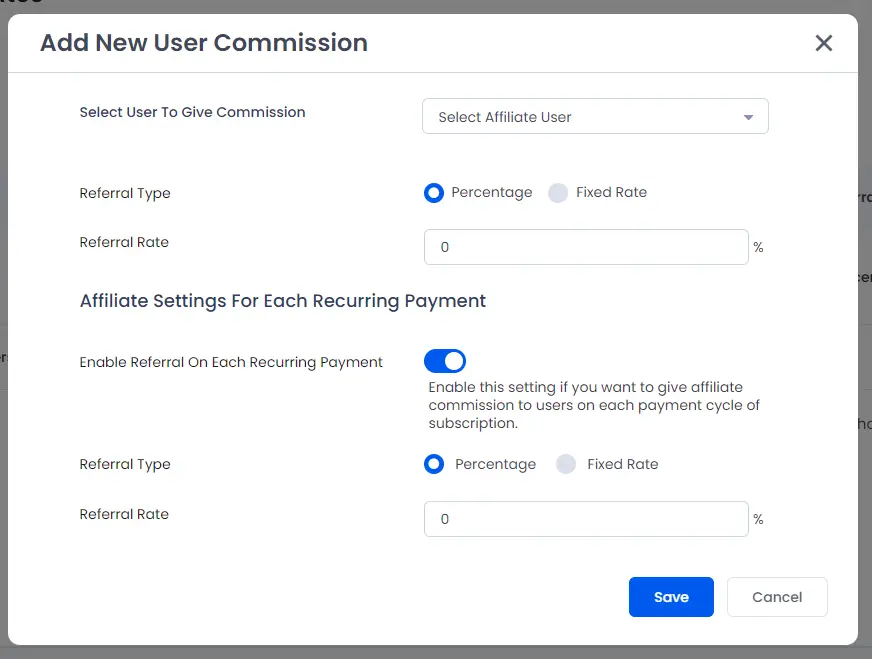
If you want to set different referral rate for particular affiliate account then here it is possible at
ARMember User Commissions.
Click on Add New User Commission button to add new affiliate account and different referral rate and
type. You will get popup where you can select your affiliate account and configure referral settings.
You will be able to update/delete affiliate settings for affiliates by click on action buttons displayed by
hovering on each row of affiliate accounts in grid.
- Edit : Click here to update referral setting for particular affiliate account.
- Delete : Click here to remove referral settings for particular affiliate account.
Please note that, When you add affiliate settings for particular affiliate account then it will overwrite
all other affiliate settings. User specific affiliate settings will have first priority always. Let’s
get understand by example below.
For example,
If you have Subscription Plan with affiliate referral enabled and referral rate is
5% for subscription plan. And an affiliate account ARM_Affiliate is added with
referral rate 15% at Manage User Commission.
Now whenever any user register with your Subscription Plan and refer
ARM_Affiliate then ARM_Affiliate will get 15% referral on plan amount instead
of 5%.
Please note that, when
affiliate is referred on registration without payment then Default Referral Amount will be
applied from Affiliate Settings.
ARMember Plans Affiliates
You may enable and configure referrals in particular plan at ARMember ->
Manage Plans -> Add / Edit Plan. Same things are available here to configure
referral settings on particular plan directly without edit plan in ARMember. Same affiliate settings are also
available here as you can see in screenshot.
Note: Affiliate Settings On
Recurring Payment will be available for subscription plans only.
Payouts
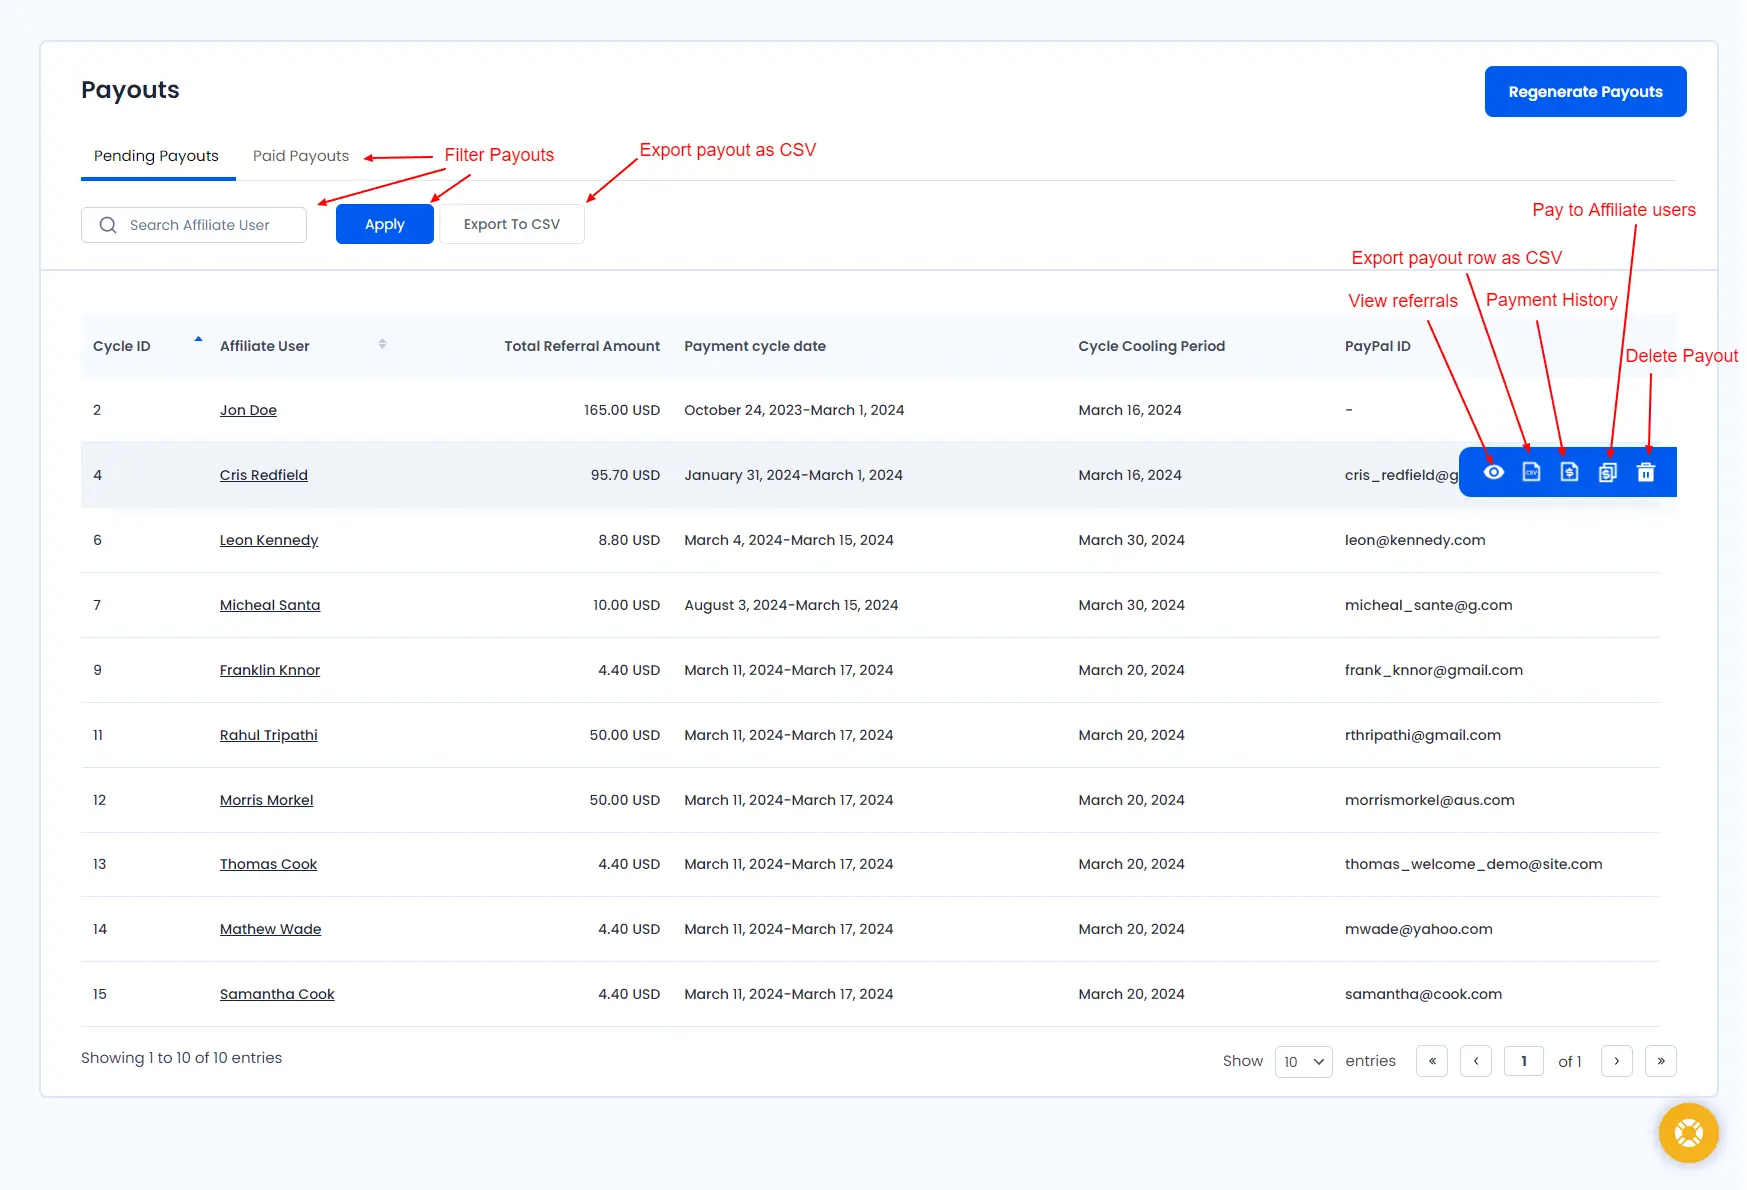
To view list of all payouts with their details go to the Payouts menu from the admin interface.
Here you are able to see all payouts listed with their details like Affiliate User, Total Referral Amount,
Payment cycle date, Cycle Cooling Period and PayPal ID. Also Cycle ID and Affiliate User columns are sortable.
By default it is sorted with ascending order of Cycle ID.
Please see below screen.
Regenerate Payouts
ARMember affiliate does provide a facility to regenerate a pending payout cycle if you have changed a cycle recently by clicking on Regenerate Payout button
Actions
For each row of grid there are some action options provided which are as following
-
1. View Referrals
Here you can check the all considered Refferals for creating Payment Cycle of Affiliate users, only
Accepted Referrals are counted -
2. Export To CSV
For Specific affiliate user payment history export by just one click on
EXPORT TO CSV
icon. -
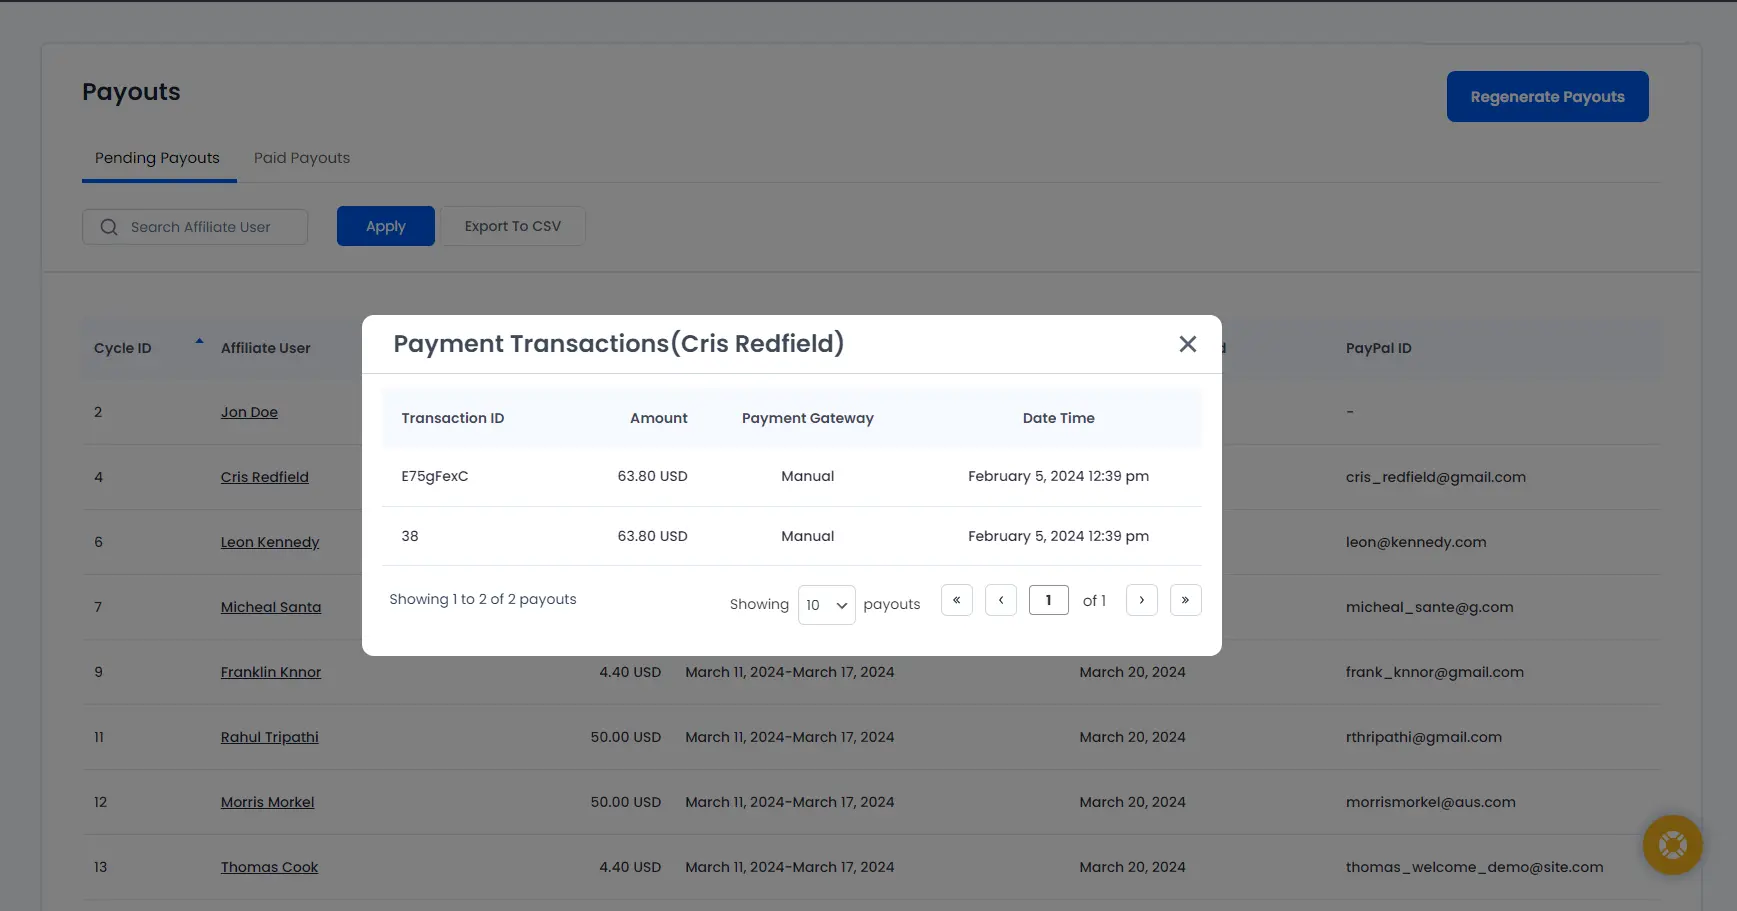
3. Payment Transactions
You will be able to see each affiliate user payment history by click on
PAYMENT TRANSACTIONSicon.Please see below screen.
-
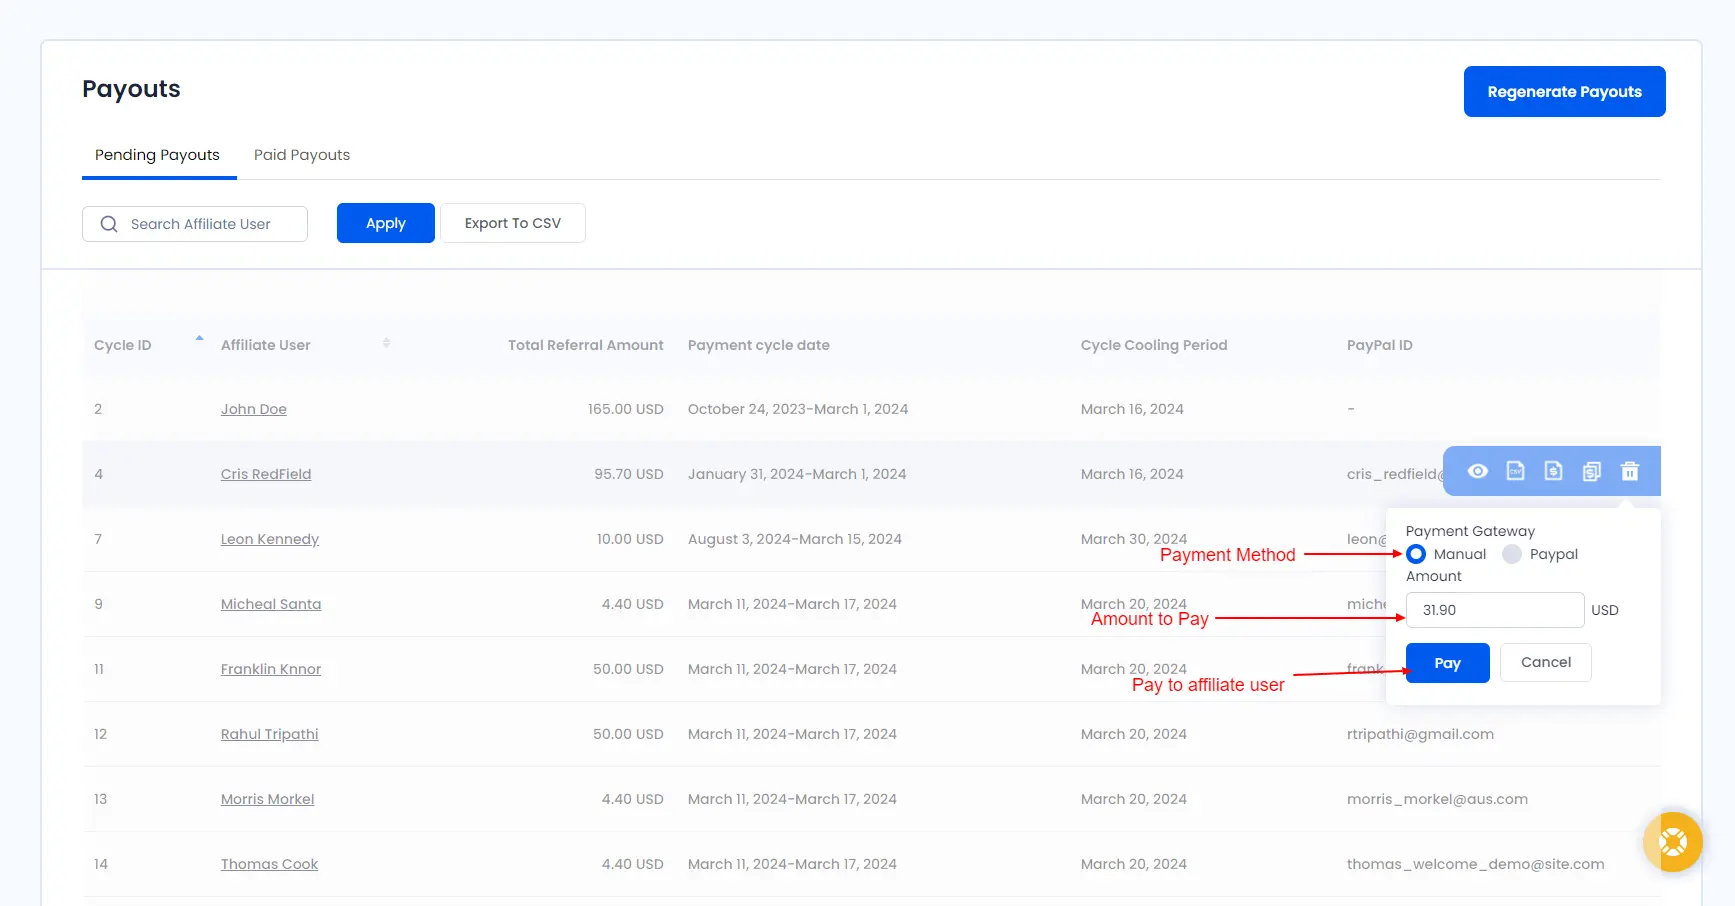
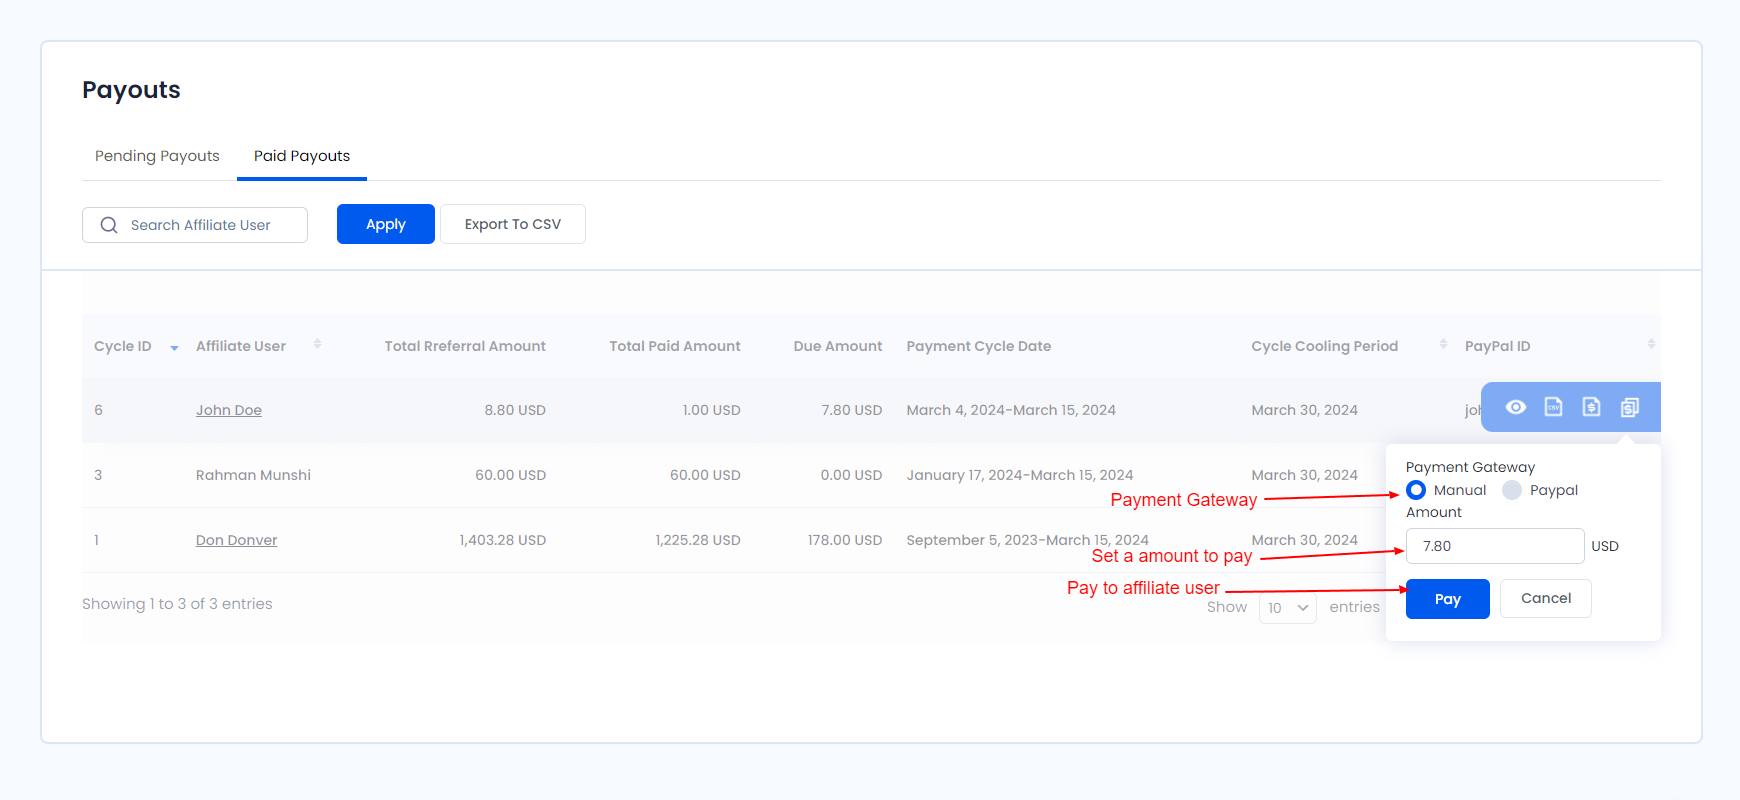
4. Pay to Affiliate User
For Pay to Affiliate user click on
PAY TO AFFILIATE USERbutton. And set amount that you
want to pay to user in popup text-box and click onPaybutton.If you have enabled the Paypal Mass Payment Settings from
Affiliate->Settingspage then you will pay to the user using PayPal Gateway by
select payment gatewayPaypal. There are display amount as per you setting in Settings ->
Paypal Mass Payment Settings. -
5. Delete
By click on the Delete icon you can delete the Payemnt Cycle for the Affiliate user. Note that once you
delete the Payment Cycle then all Referrals counted in Payment cycle will not be payable.
Search
You have Search Box at top of the grid.
Export To CSV
You will click on it the button and able to download displayed record in CSV file.
Paid payouts
Here you can check the Payment Cycle ID, Affiliate User, Total Referral Amount, Total Paid amount to affiliate
user, Due amount, Payment cycle Date, Cycle Cooling Period and PayPal ID. Here will display all Payment Cycle
which are either Partially paid of Full amount of cycle is paid to affiliate user. Also Cycle ID, Affiliate
User, Cycle Cooling Period and PayPal ID columns are sortable.
By default Grid is sorted by descending order of Cycle ID.
Actions
For each row of grid there are some action options provided which are as following
-
1. View Referrals
Here you can check the all considered Refferals for creating Payment Cycle of Affiliate users, only
Accepted Referrals are counted -
2. Export To CSV
For Specific affiliate user payment history export by just one click on
EXPORT TO CSV
icon. -
3. Payment Transactions
You will be able to see each affiliate user payment history by click on
PAYMENT TRANSACTIONSicon.Please see below screen.
-
4. Pay to Affiliate User
For Pay to Affiliate user click on
PAY TO AFFILIATE USERbutton. And set amount that you
want to pay to user in popup text-box and click onPaybutton.If you have enabled the Paypal Mass Payment Settings from
Affiliate->Settingspage then you will pay to the user using PayPal Gateway by
select payment gatewayPaypal. There are display amount as per you setting in Settings ->
Paypal Mass Payment Settings.The
Pay to Affiliate useroption will displays to only Payment Cycles have Due Amount
greater than 0. -
5. Delete
By click on the Delete icon you can delete the Payemnt Cycle for the Affiliate user. Note that once you
delete the Payment Cycle then all Referrals counted in Payment cycle will not be payable.
Search
You have Search Box at top of the grid.
Export To CSV
You will click on it the button and able to download displayed record in CSV file.
How Payout works:
-
Every day cron will executes twice and ARMember affiliate addon will fetch all referral member before a
cooling period and cycle period you have set from Affiliates->Affiliate settings -
Admin user will allowed to pay a payout after Cooling period date is crossed
-
Example : If you have set cooling period is 15 days and cycle period is Monthly and current date is 18
Feb 2023 so cooling period date will be 03 March 2023 and cycle date will be 01 Feb to 28 Feb 2023 so member
will able to pay a payout after 16 March 2023(After cooling Period) onward -
If last cycle end date is 29 Feb 2023 then any cron was run on or before 29 Feb 2023 then no payout will
be added and if cycle was run after last cycle end date then new Payout entries will be added and next
cycle run date will be updated. -
If admin user has paid a affiliate payout partially then that payout cycle will be moved to paid and
admin user can paid it from Paid section too.
Payment Transactions
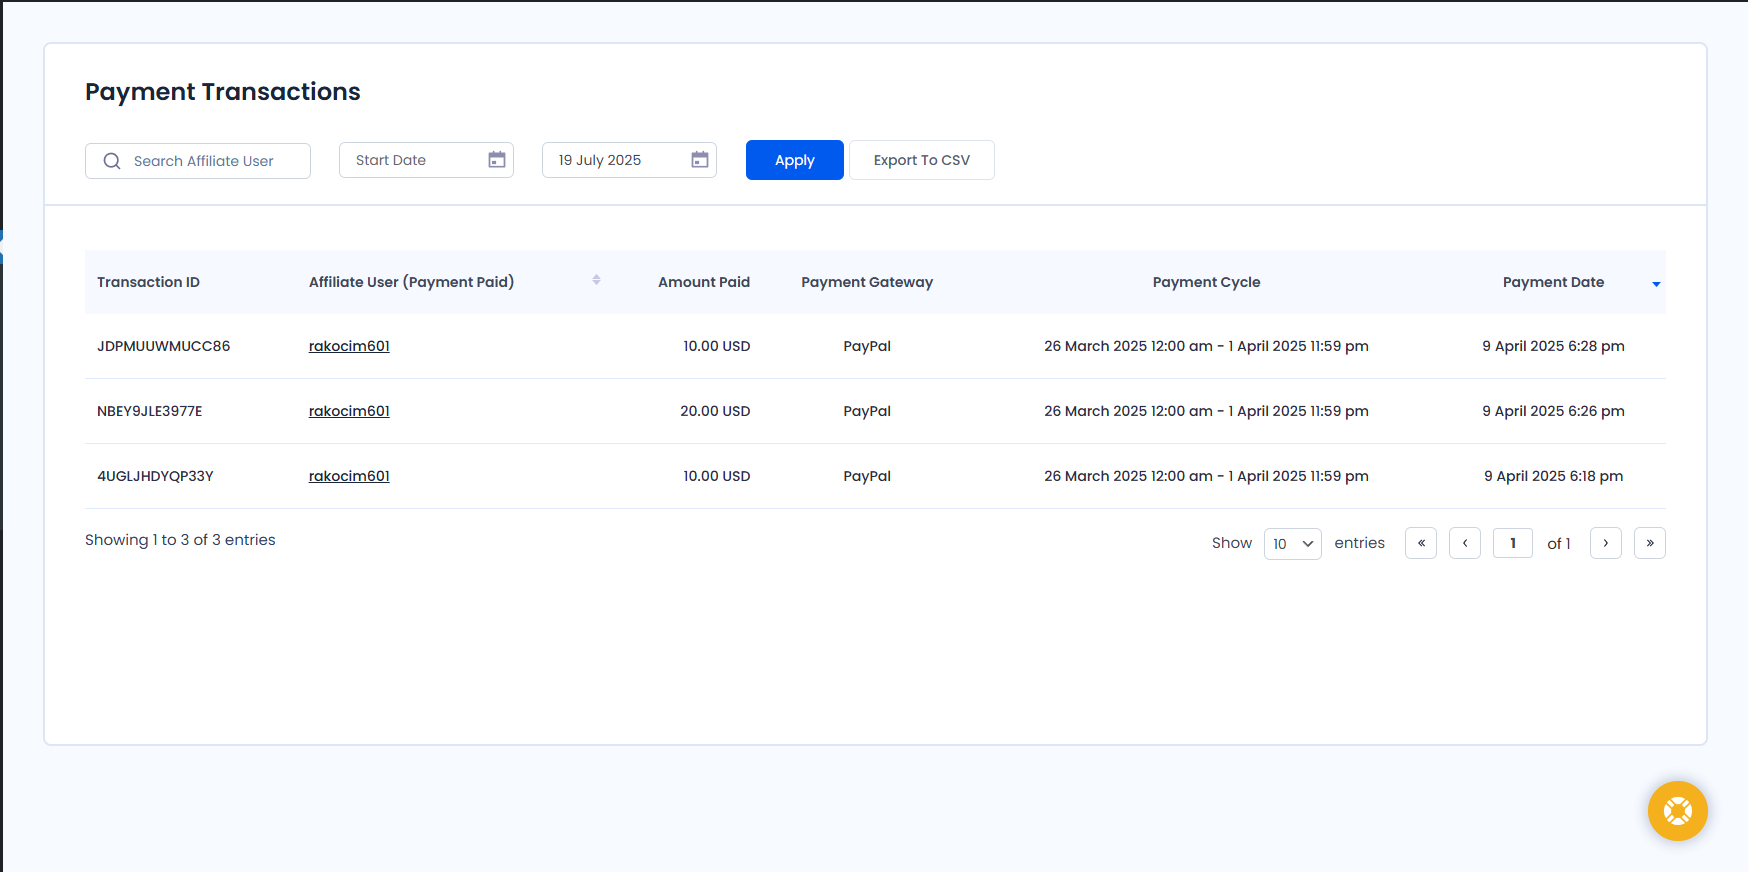
To view list of all payment history that you have paid to affiliate user.
Here you are able to see all payouts listed with their details like Transaction ID, Affiliate User, Amount Paid,
Payment Gateway, Payment Cycle, Payment Date. Also the all column is sortable here.
Please see below screen.
Search
You have Search Box at top of the grid to search by affiliate users.
Export To CSV
You will click on it the button and able to download displayed record in CSV file.
Date filters
You can filter a Payment Transactions records based on date ranges as default it will show last one month payment
records.
Banners
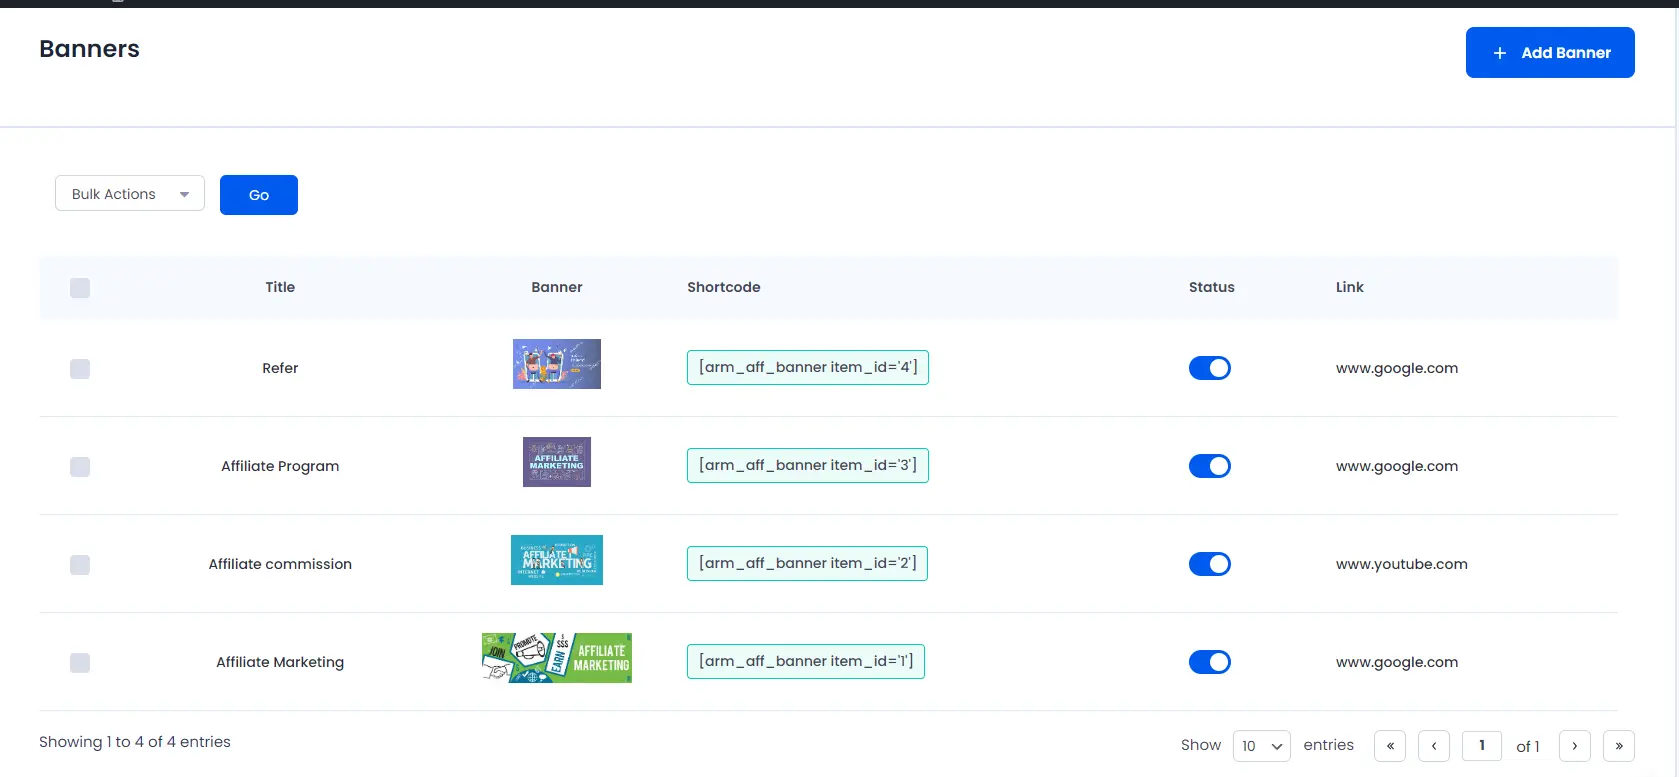
To view list of all Banners with their details go to the Manage Banners menu from the admin interface.
Banners or text links allows your affiliates user to easily promote your web site. The text or banner links your
affiliates will use to traffic to your web site.
This allows your affiliates user to log into their affiliate area and get the code for the advertisement.
Affiliate user can copy and paste the banner code to their site for send visitors to your web site
Bulk Actions
This option will be helpful when same action need to be performed on multiple user rows at same time.
-
1. Delete
Select number of rows that you want to delete and select Delete Bulk Action then click on Go button. When
you click on Go button then only visitor will be deleted.
Actions
For each row of grid there are some action options provided which are as following
-
1. Edit Banner
For edit Banner click on
EDIT BANNERbutton. And you can edit all banner details than click
on save button. -
2. Delete
Each Banner can be deleted by just one click on
DELETEIcon at right side.
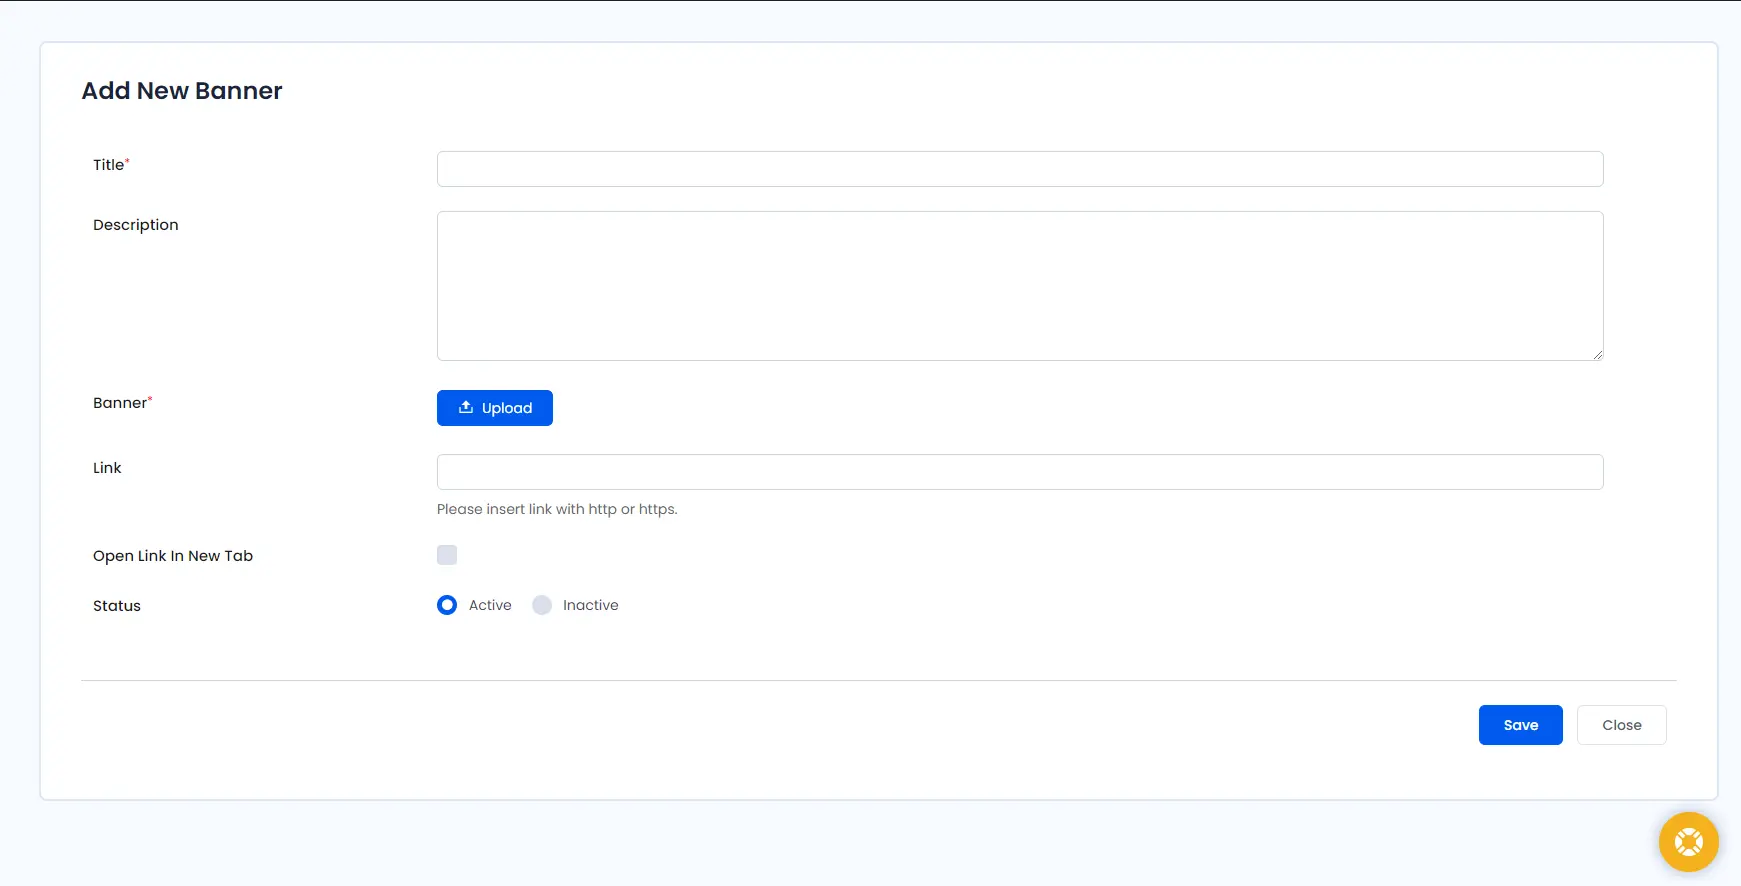
Add Banner
For create banner click on ADD BANNER Button.
Please see below Screen.
You can insert all details and click on SAVE button.
Dashboard
Here you are able to see current cycle wise your web site Total Visitor, Total Converted, Commission, Revenue
Amount.
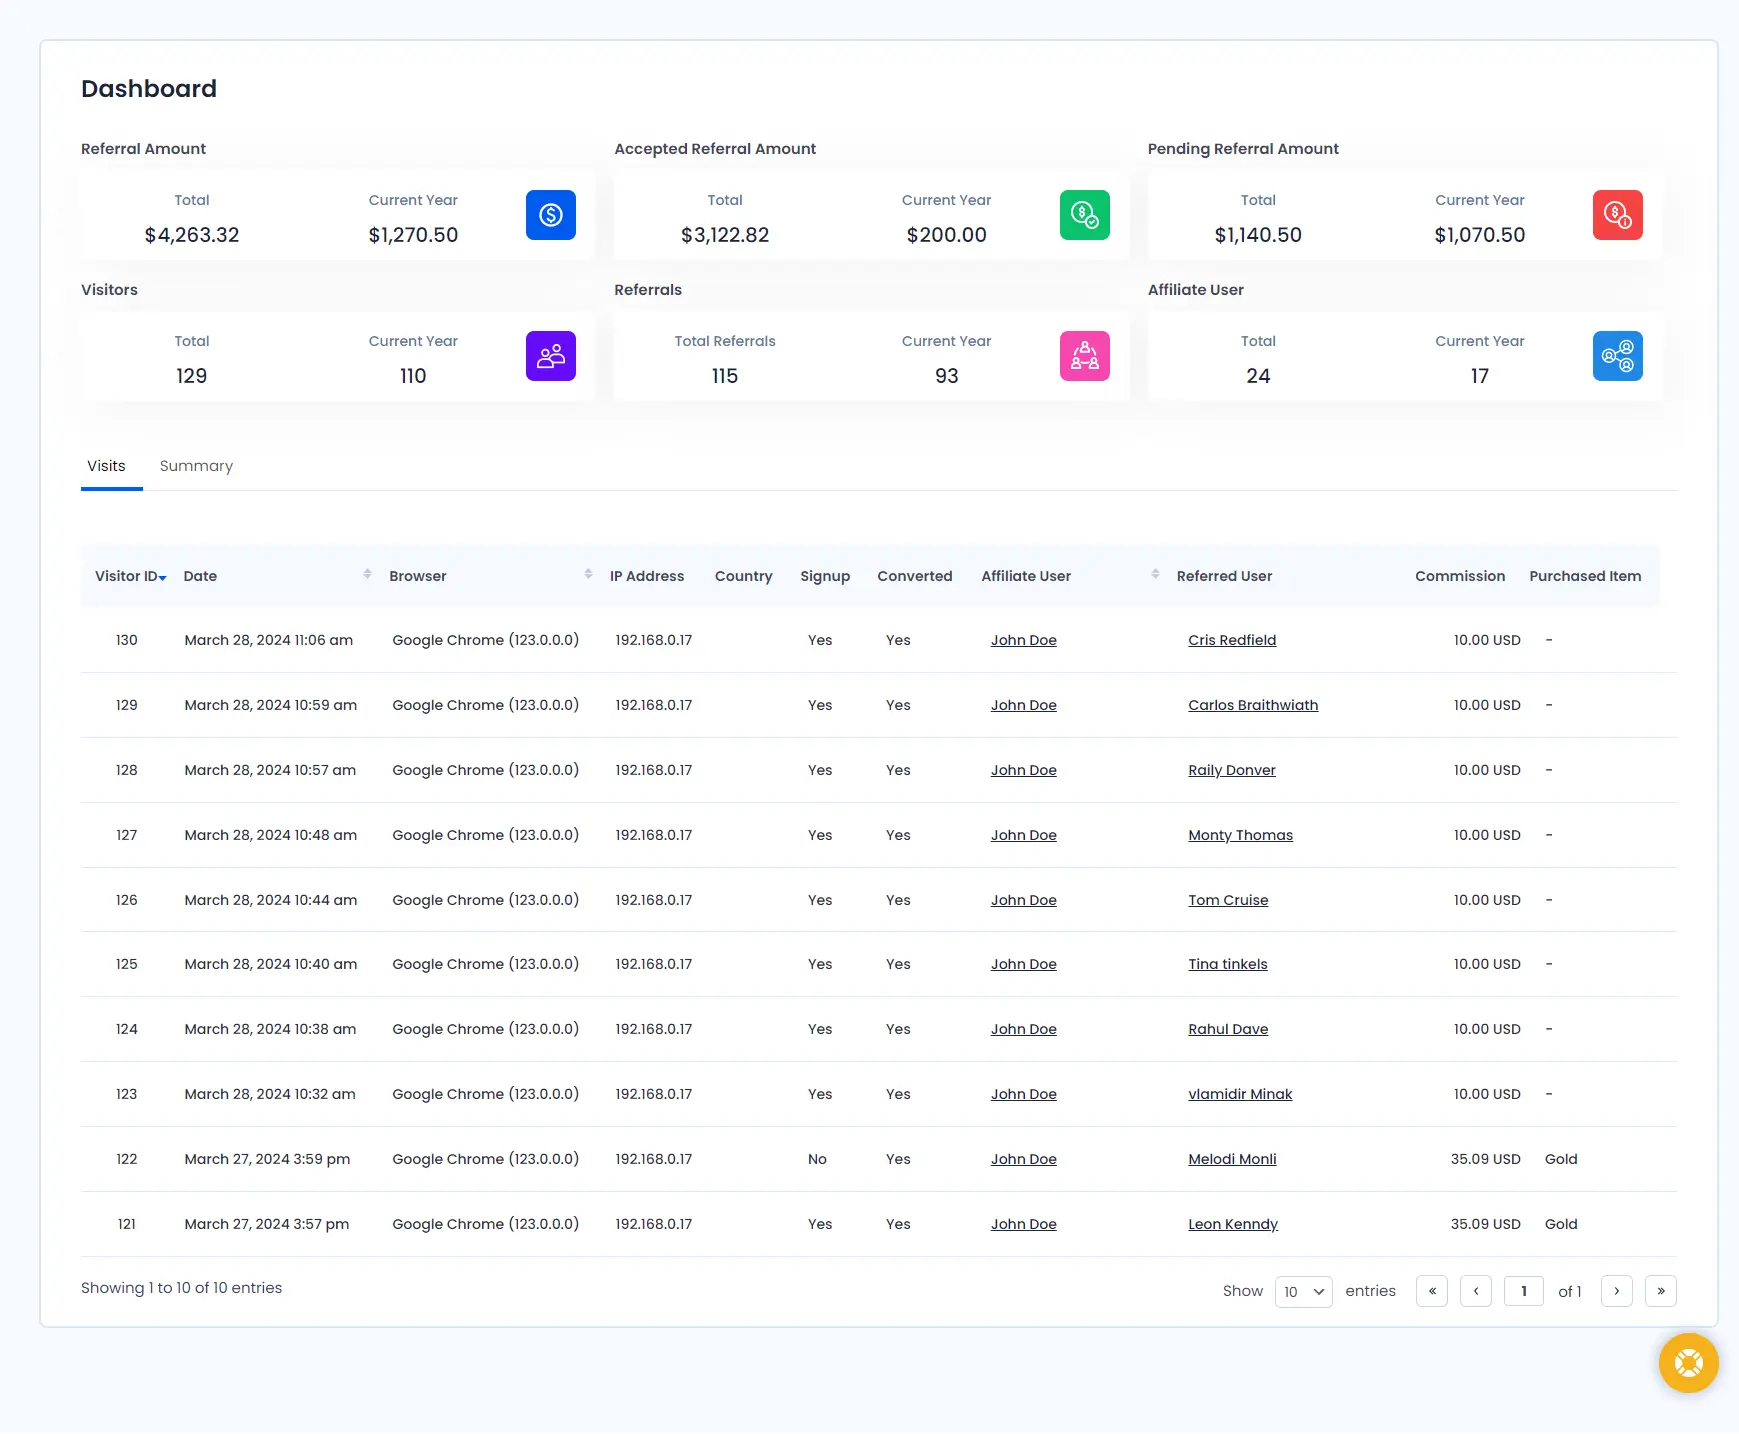
Visits
Here you are able to see your web site through affiliate users visits listed with their details like Date Time,
Browser, IP, Country, Visitor Converted as user, Affiliate user, Referred user(Display username if visitor
converted as user), Commission and Membership Plan.
Also Affiliate user, Referred user, Commission and membership plan column is sortable here.
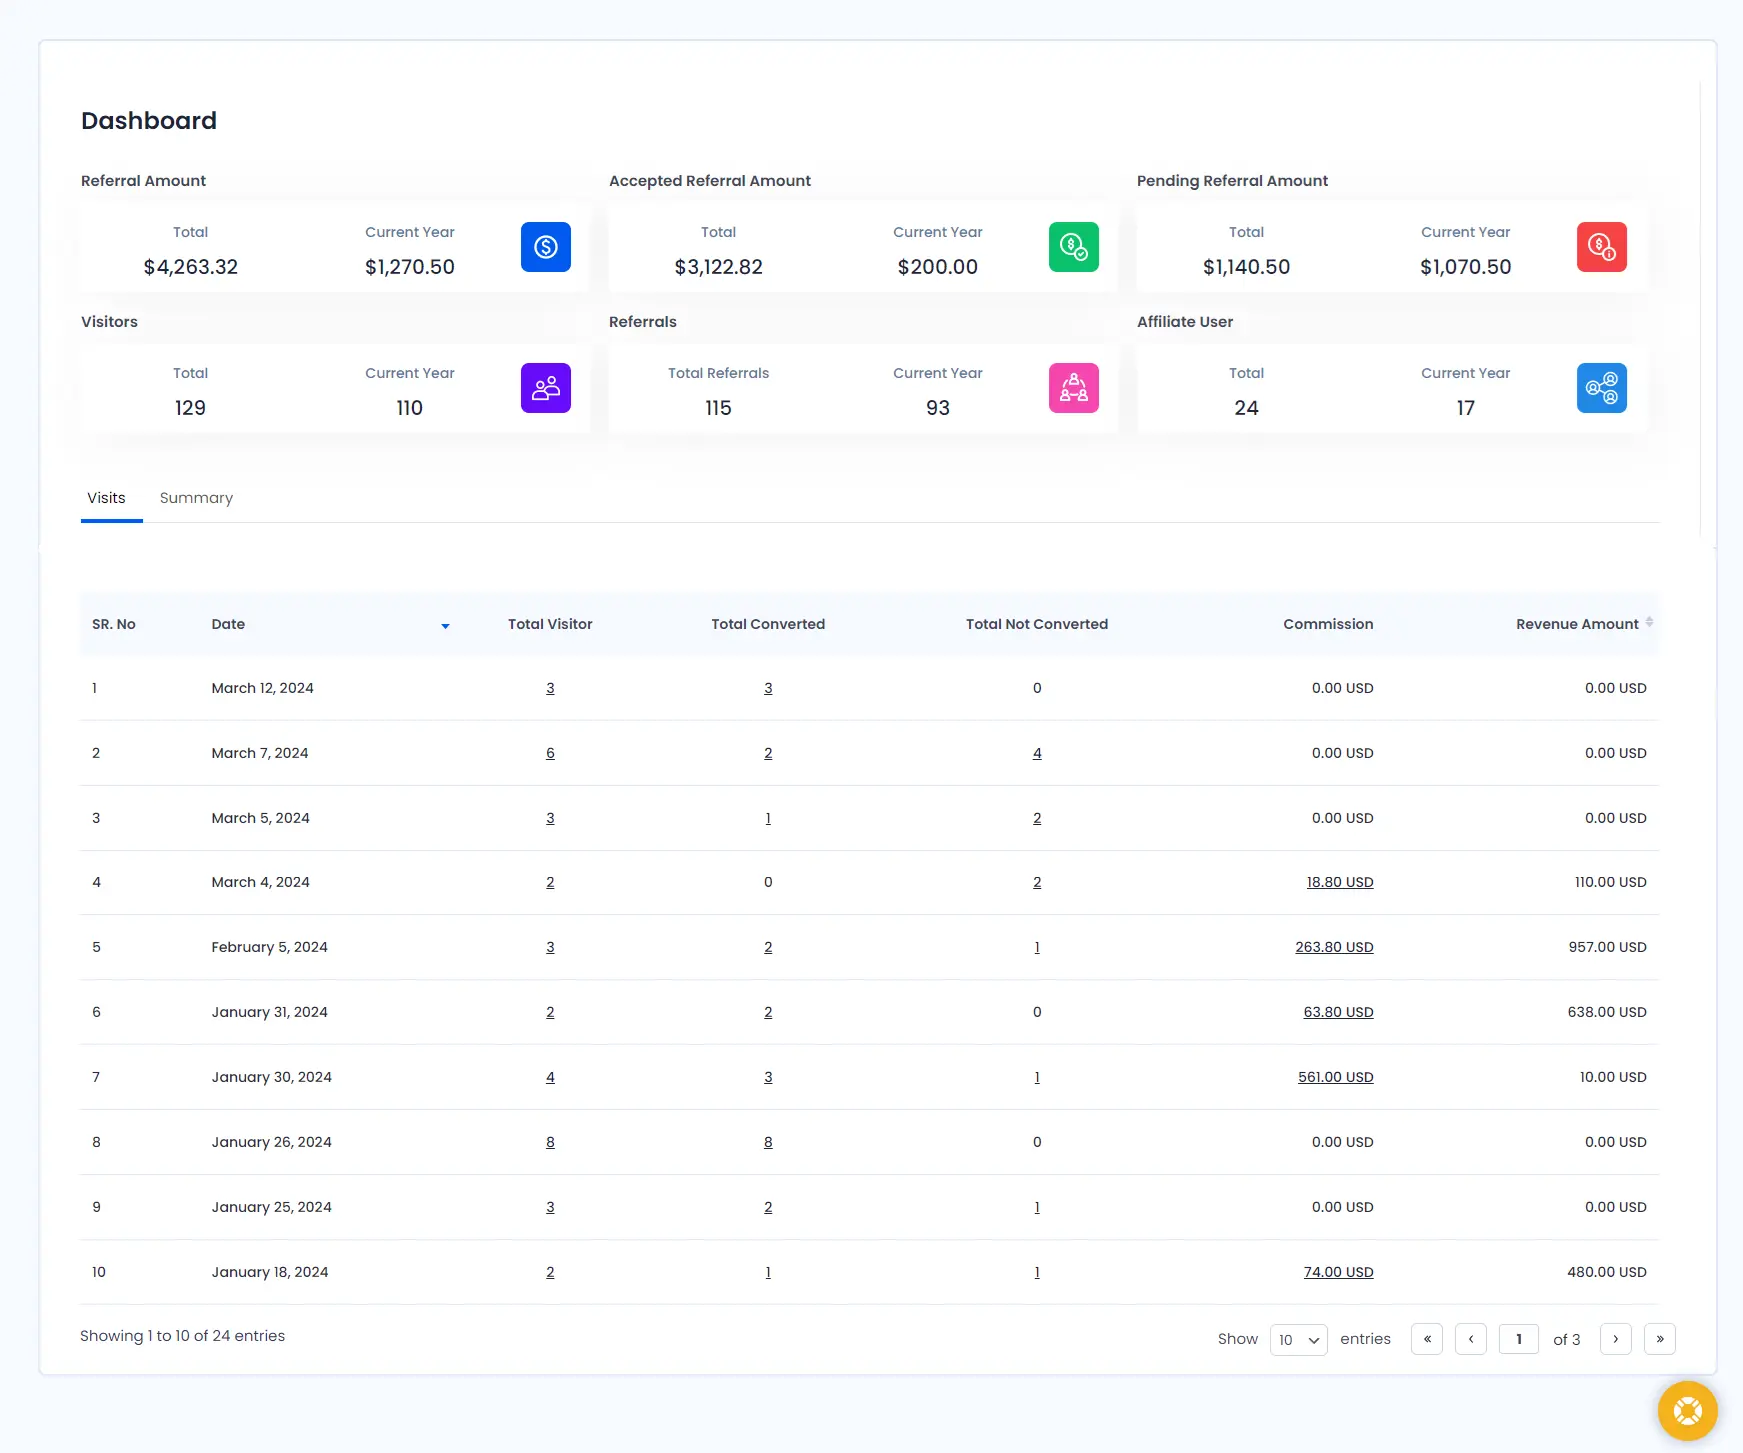
Summary
Here you are able to see day wise your web site Total Visitor, Total Converted, Commission, Revenue Amount.
Settings
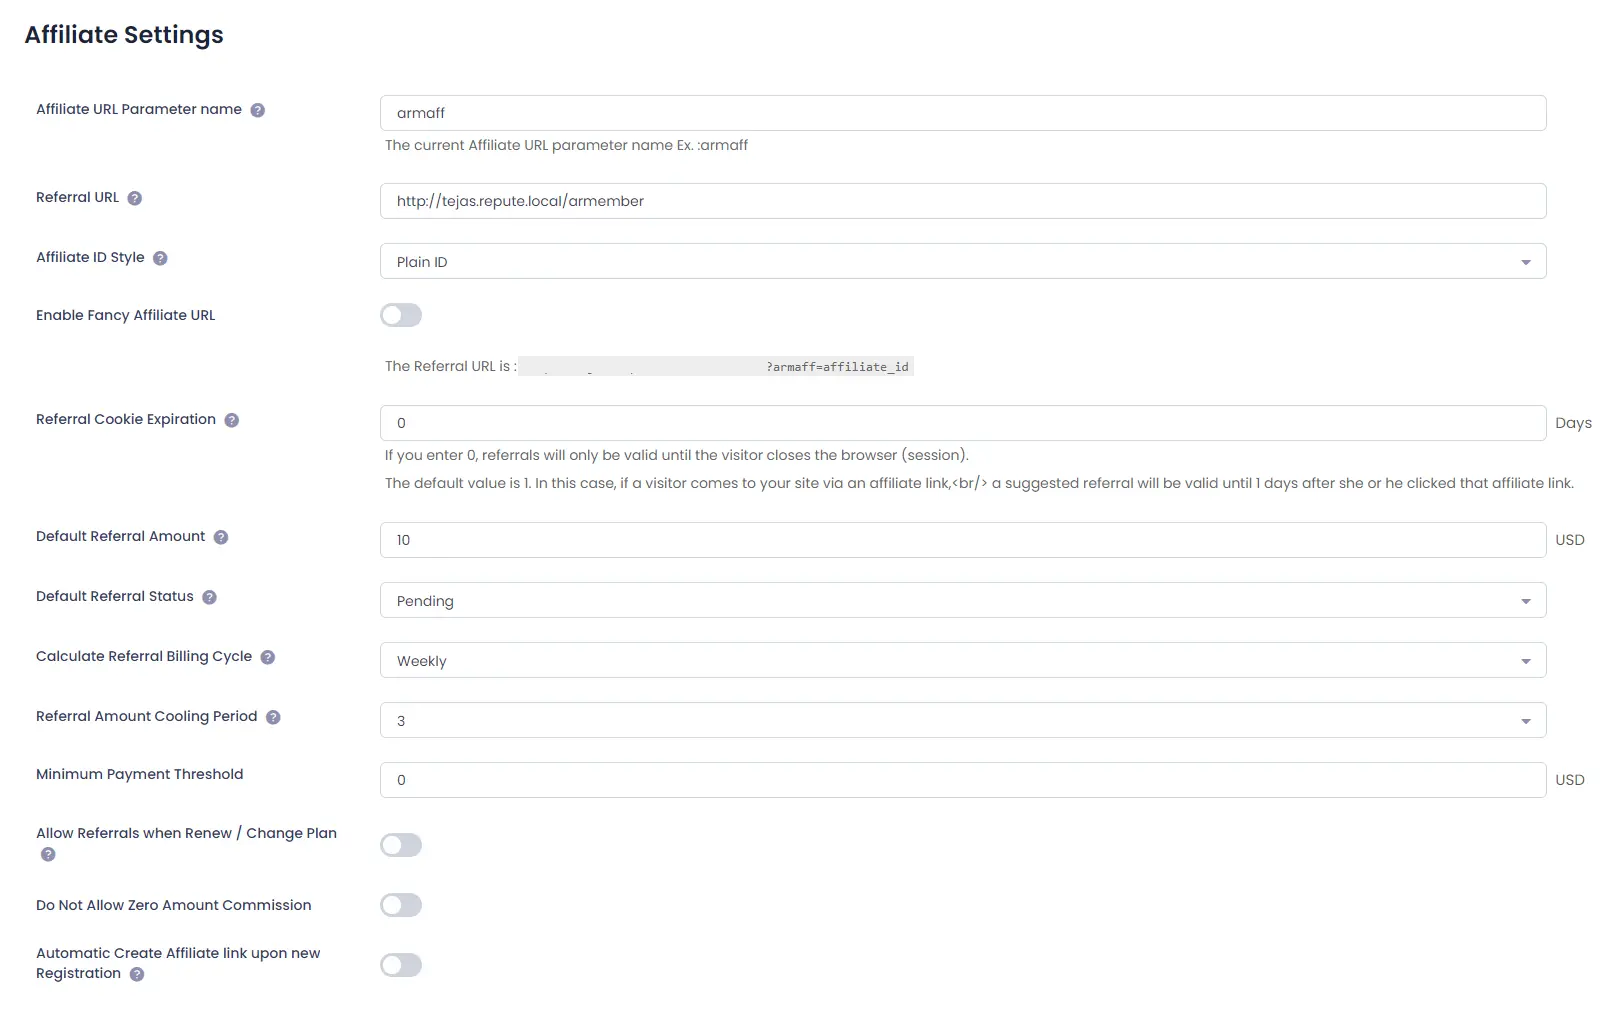
Go to the Affiliate Settings menu from the admin interface.
Let’s check each option in detail:
Please see below screenshot.
Affiliate URL Parameter Name
You can change the URL variable for referral URLs. The default value is armaff.
Referral Cookie Expiration
This option is for How many days should the referral tracking cookie be valid for?
If you enter 0, referrals will only be valid until the visitor closes the browser (session).
The default value is 1. In this case, if a visitor comes to your site via an affiliate link, a suggested referral
will be valid until 1 days after she or he clicked that affiliate link.
Default Referral Amount
If visitor visit the site using shared link and register using simple ARMember Registration page then this amount
should be commission.
Referral URL
The default referral URL will be your website’s URL. You will be able to change this URL to any page you want
your referrals to redirect when they sign-up.
Referral Status
You can able to set default referral status. So when new referral is create then the default status should be
selected.
By default referral status should be pending.
Calculate Referral Billing Cycle
You can set referral billing cycle based weekly,biweekly,monthly, half yearly,yearly
It will be executed based on cron which will entry a payout data in Affiliate payout page every cycle.
Select Day of Billing Cycle
You can set referral billing cycle based 1 to 31 or for weekly cycle you can set monday to sunday as start cycle date.
If you have set a day as 8th Day and billing cycle as Monthly/Quarterly/Half Yearly or Yearly then payment cycle will be considered to start from 8th day of the month.
If you set a day as Wednesday and billing cycle as Weekly then payment cycle will consider Wednesday is the start of the week day.
Referral Cooling Period Days
You can set referral billing cycle cooling period based on days if you have set cooling period as 15 days then
Admin user will able to pay a payout after 15 days of cycle end date
Minimum Payment Threshold
You can set referral cycle minimum amount how much you want to allow payout cycle
Allow Referrals on Renew / Change Plan
This option Allows you to give affiliate user commission when someone refer to affiliate and renew OR change plan
then affiliate user get the commission.
Do Not Allow Zero Amount Commission
This option Allows you to block zero amount referrals. This Option is default allow zero amount referrals.
Automatic Create Affiliate link upon new Registration
If this option is enable then. New user create in your wordpress site then automatic new affiliate user will be
create.
Affiliate Id Encoding
You can able to set encoding affiliate URL value using this option.
If you change Affiliate Id Encoding and Affiliate URL Parameter Name setting and have
distributed affiliate links or permalinks, make sure that these are updated. Unless the incoming affiliate links
reflect the current encoding, no affiliate hits, visits or referrals will be recorded.
Enable Fancy Affiliate URL
Enable this option to provide fancy URL to your affiliates to share their affiliate referral URLs.
Example: http://yoursite.com/armaff/affiliate_id
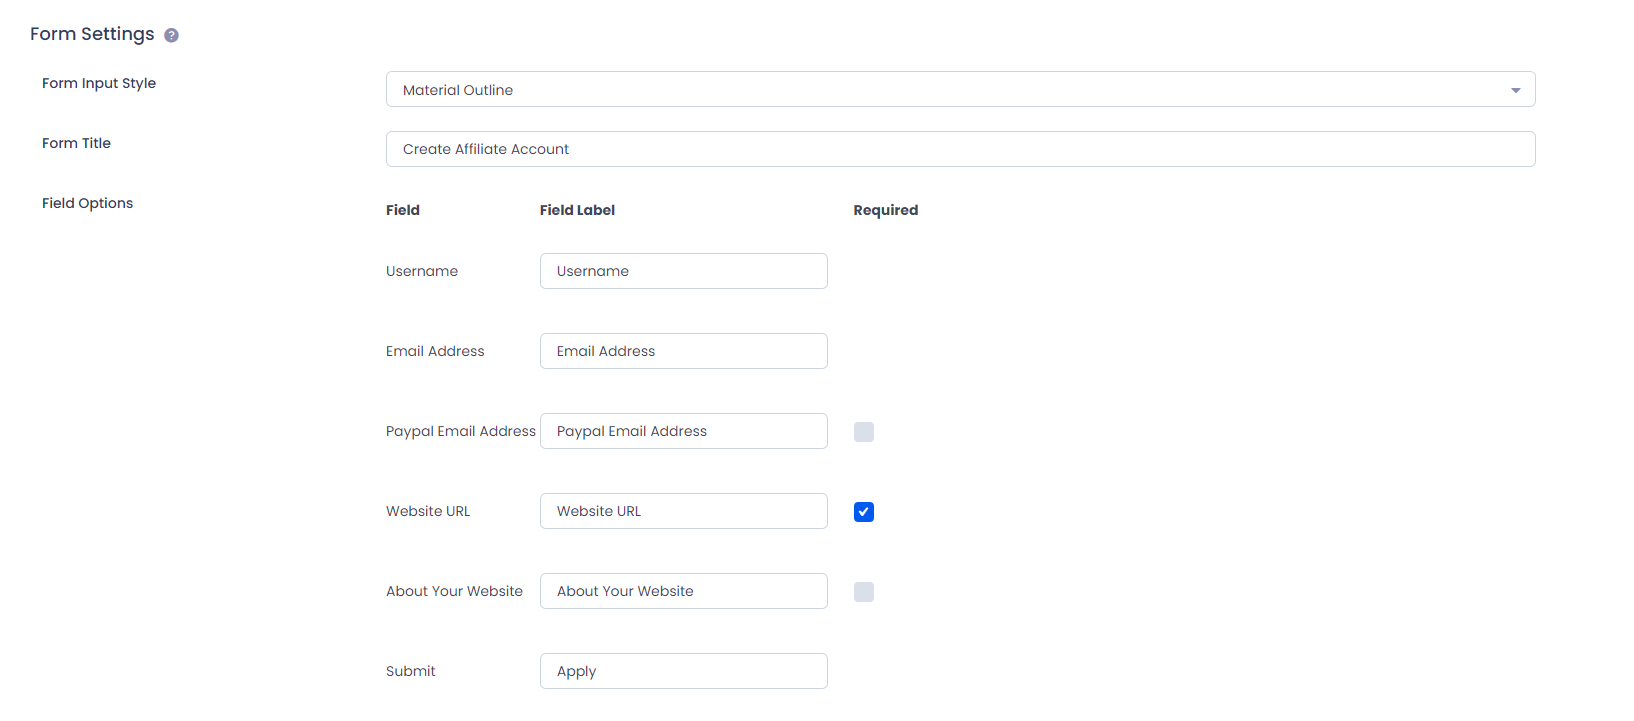
Form Settings
Form settings are available for form replaced with shortcode:
arm_affiliate_register
Following options are available to customize form.
Form Input Style
Here you have choice to set form input style from Material Outline Style,Material
Style,Rounded Style and Standard Style. Default Material Outline
Style will be applied.
All other form style such as field background, borders colors etc will be applied on form ID 101 from ARMember ->
Manage Forms page
Form Title
Here you are able to change form title to display at front form.
Field Options
You have field options where you are able change Label and Required status for
each fields and submit button in form.
For PayPal Mass Payment you will add PayPal ID field on register. there is option to field
display on form or not.
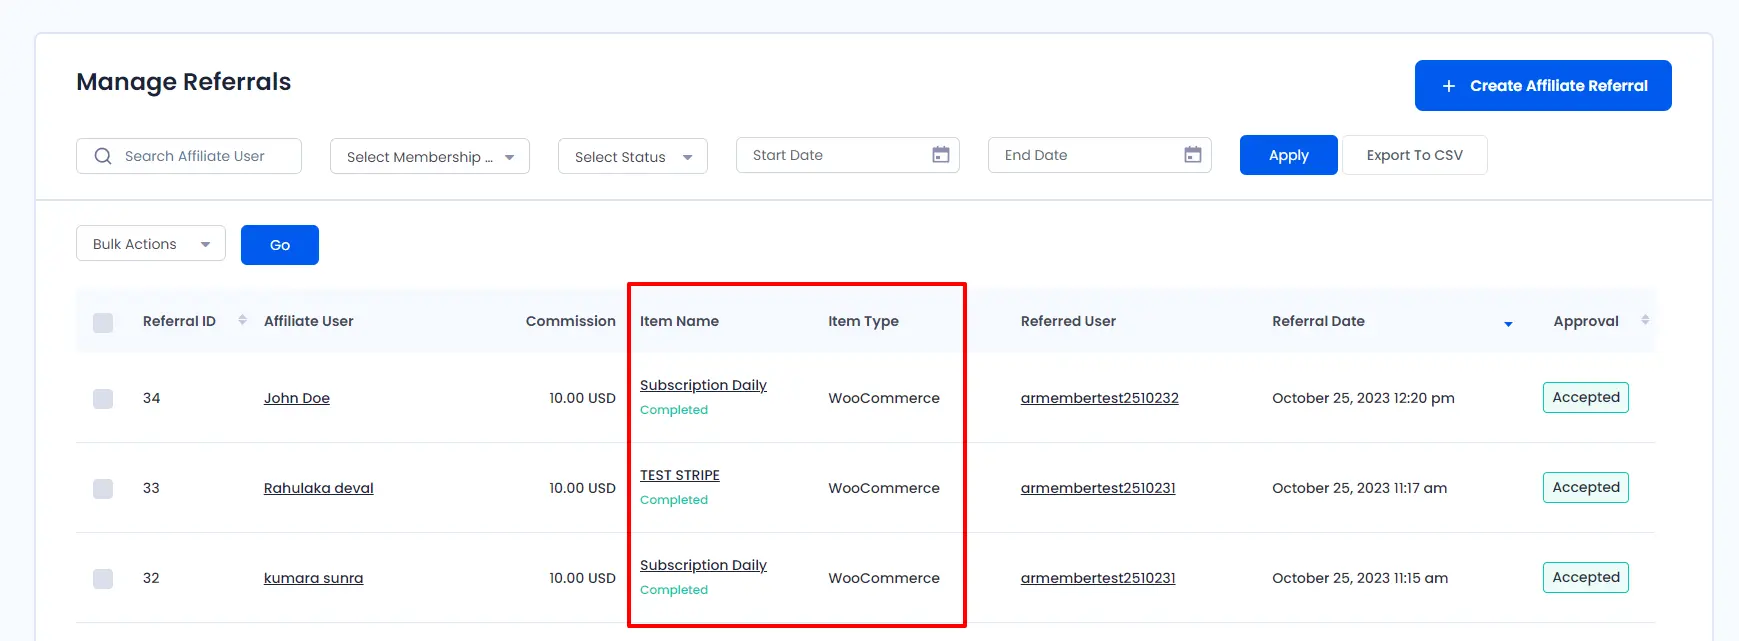
WooCommerce Integration
ARMember Affiliate supports WooCommerce Integration, you will have WooCommerce section visible at
affiliate settings if you have installed and activate WooCommerce plugin.
Enable Integration
Enable integration to get WooCommerce support in ARMember Affiliates. If you have enabled integration, affiliates
will get referrals created on each order of WooCommerce product if he/she is referred.
At Manage Referrals, you have Order column referring to the Order Id in
WooCommerce for which affiliate is referred.
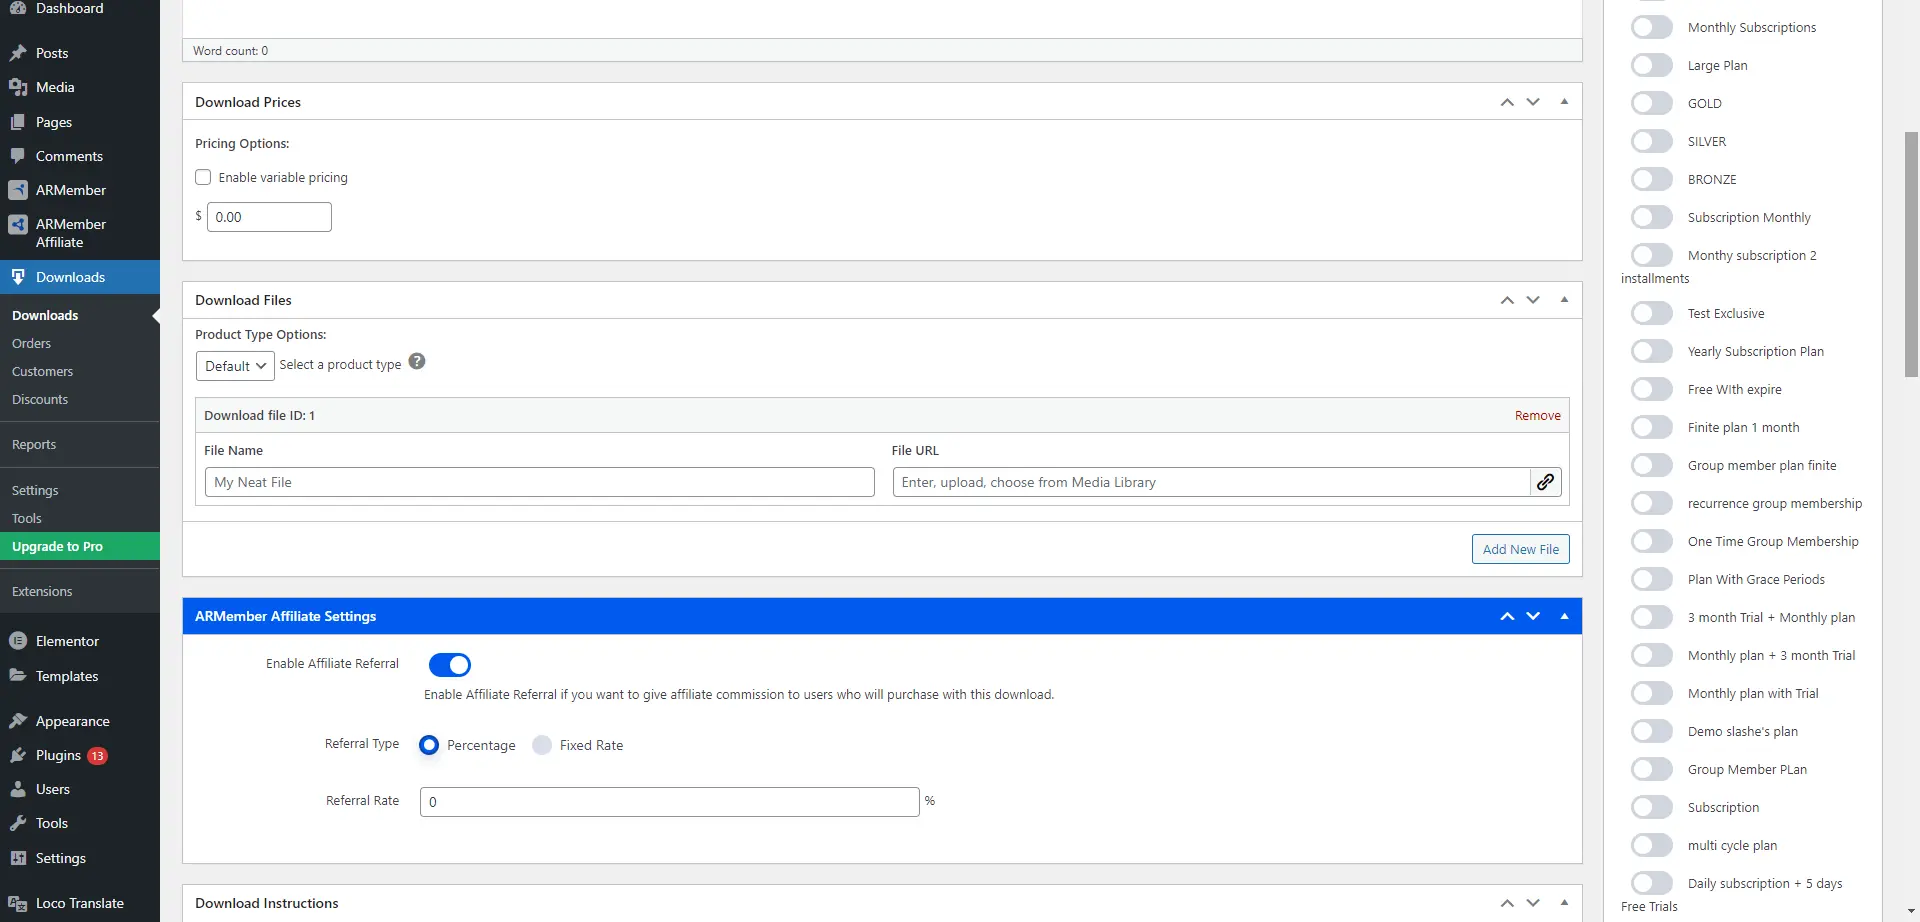
Support for Easy Digital Downloads Plugin
ARMember Affiliate supports Easy Digital Downloads Plugin.
Enable Referral for the EDD Downloadable Items
Enable Referral to get EDD support in ARMember Affiliates. If you have enabled referral, affiliates will get
referrals created on each order of Easy Digital Downloads items if he/she is referred.
At Manage Referrals, you have Order column referring to the Order Id in Easy
Digital Download for which affiliate is referred.
Migration tool
Here you need to Select Plugin from where you would like to migrate affiliate accounts, and then
click on Migrate button.
On click migrate, before start to migrate affiliate accounts you have following points to note and options to
check if you need to apply after complete migration.
- While migrating Banners / Creative with duplicate ID will be skipped as it is not possible
to migrate without duplicating an banner ID. - Deactivate
{AFFILIATE}plugin After Complete Migration.This will deactivate plugin from where you are migrating affiliate accounts after complete migration to
prevent conflicts with affiliate accounts when register new user. This is checked default. - Change affiliate parameter name
Affiliate URL parameter(variable) may different in plugin from where you are going to migrate affiliate
accounts, so to make all affiliates referral URL same you may need to change parameter name in ARMember
Affiliate. This is default checked. - Replace shortcodes after complete migration
Replace shortcodes of
{AFFILIATE}plugin from where you are migrating affiliate accounts
with ARMember affiliate supported shortcodes at all pages/posts. - Enable Fancy URL
Check this option to enable fancy URL after complete migration as this may needed if you have enabled
pretty URL in{AFFILIATE}plugin. - Enable Affiliate Id Encoding
Check this option if you need to enable affiliate id after complete migration.
Click on Continue to start migration of affiliate accounts.
Important Note:
If you
already have exist affiliate accounts in ARMember Affiliate then migration can be possible if last affiliate Id
exist in ARMember Affiliate is less then first affiliate Id in plugin from where you need to migrate.
Dashboard Widgets
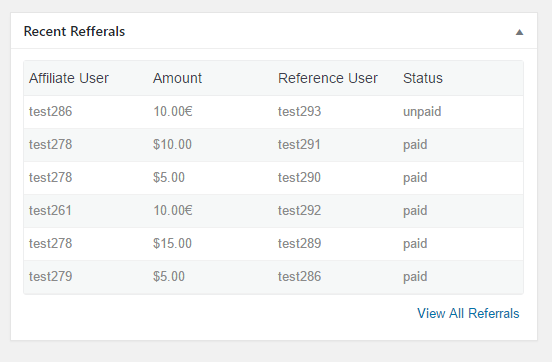
Recent Referrals
Here you have list of 6 recently added referrals with their Affiliate user, Amount and Referral User. You can
view all referral by clicking on View All Referrals link.
Email Notifications
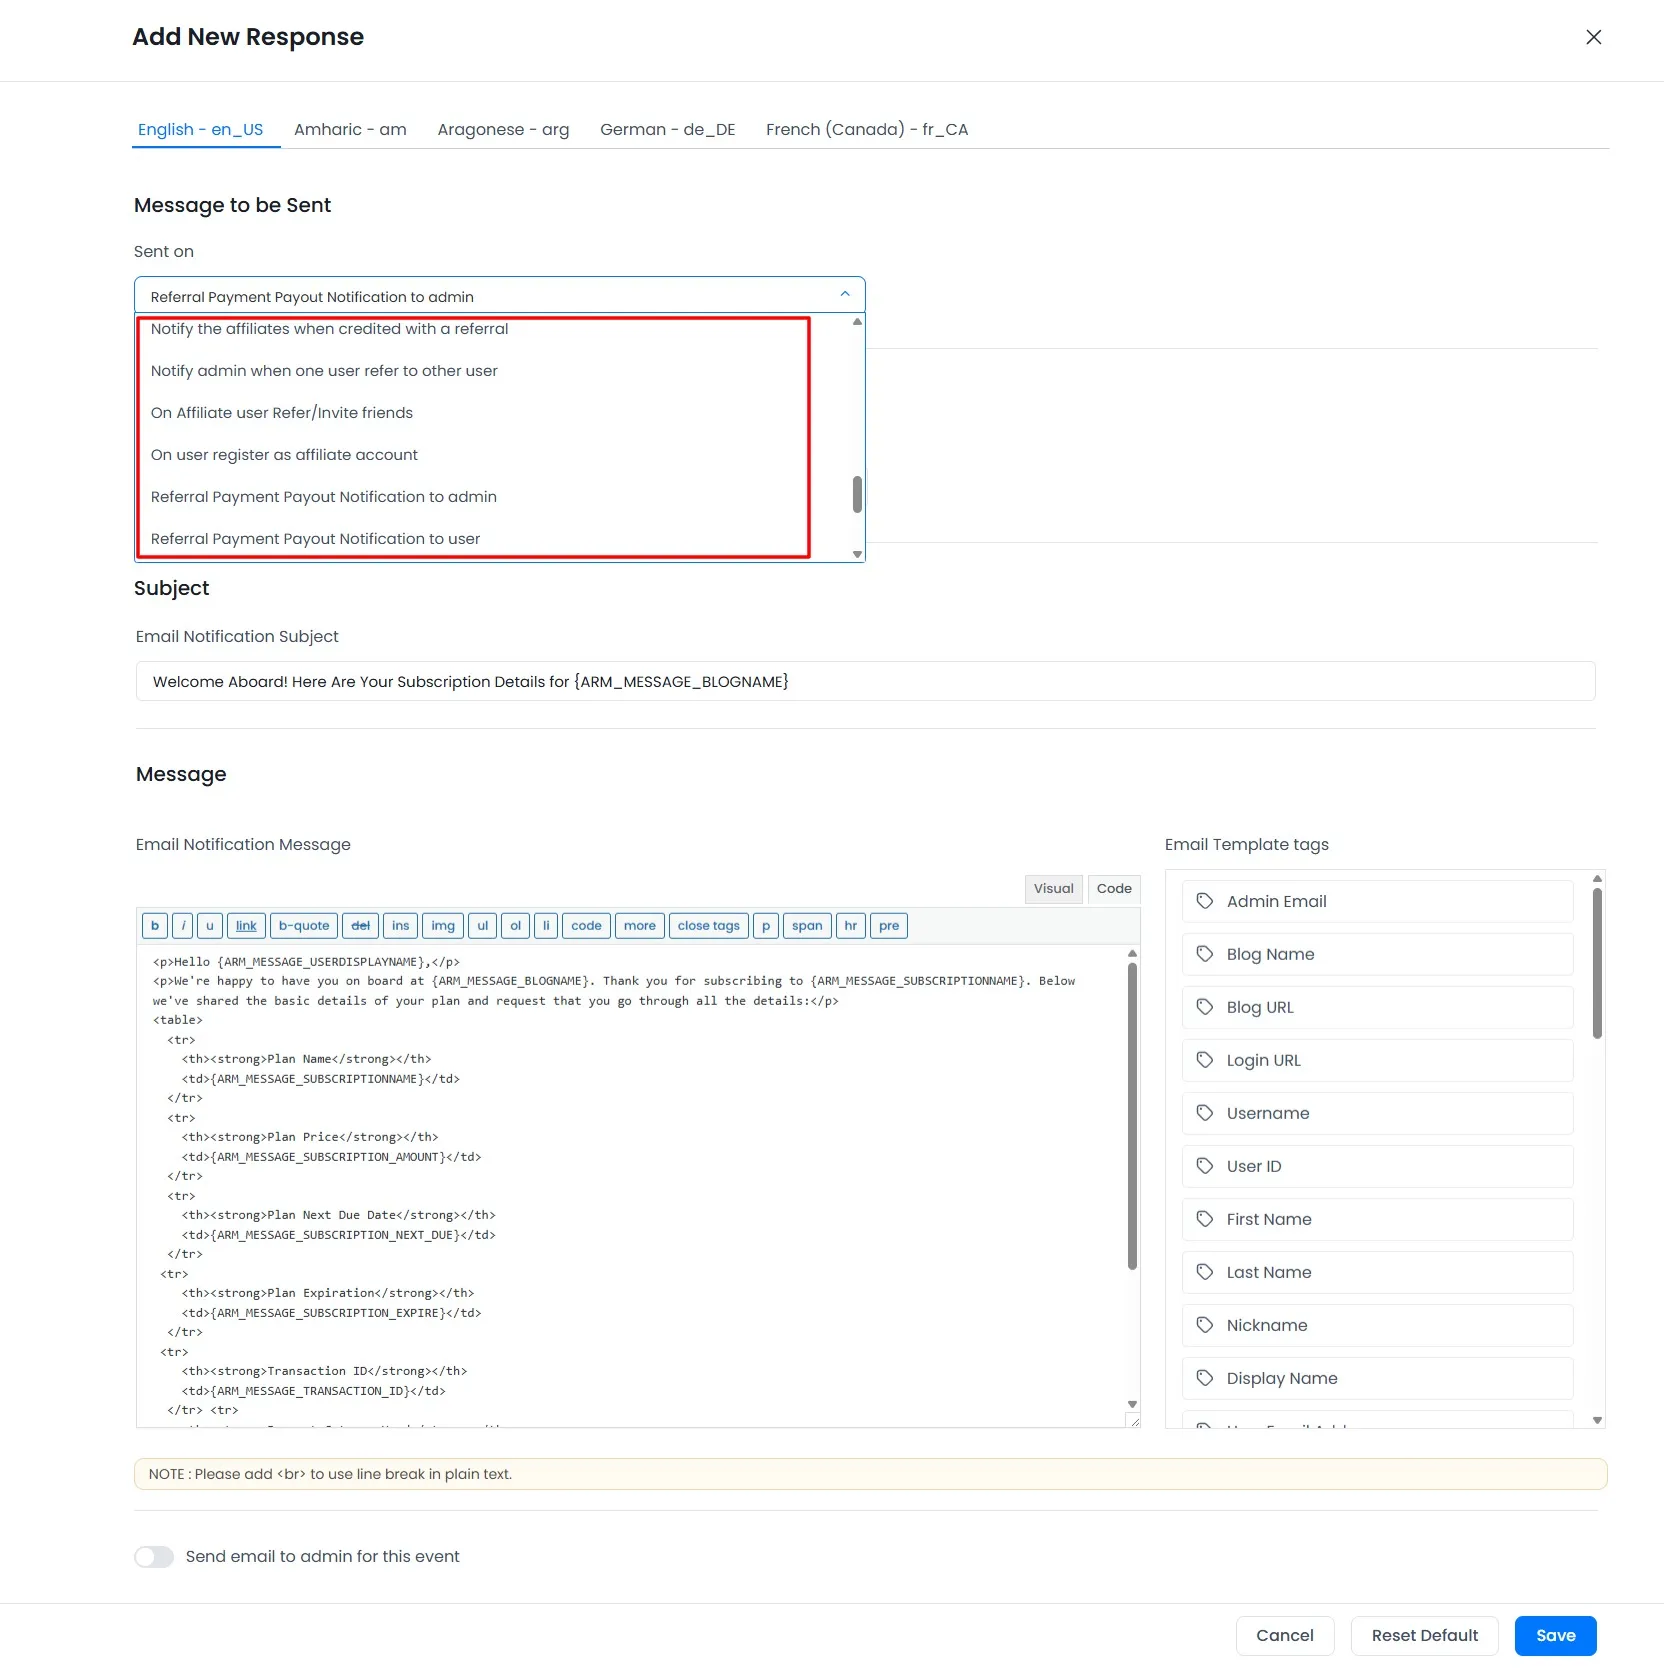
ARMember allows you to enable and configure email notification for different activities. To configure email for
community activities please go to ARMember -> Email Notification.
Click on Add New Response you will get popup open to configure email notification where you have
options of all community activities in Message To Be Sent input as you can see in following
image.
Now, after configuring email notification content you need to enable particular notification from Community
Settings. Following are community activities for which you can enable email notification.
On user register as affiliate account
This event will trigger when register new affiliate account. You can set individually event for each plan or
multiple plan.
On Affiliate user Refer/Invite friends
This event will trigger when affiliate user Refer/Invite friends. You can set individually event for each plan or
multiple plan.
Notify admin when one user refer to other user
This event will trigger when one user refer to other user. You can set individually event for each plan or
multiple plan.
Notify the affiliates when credited with a referral
This event will trigger when affiliates credited with a referral. You can set individually event for each plan or
multiple plan.
ARMember – Affiliate PayPal Mass Payouts
You can enable PayPal Payout Payment setting for auto pay to all affiliate users.
Enable PayPal Payout Payment
If you want to configure a Payout with PayPal Payment gateway then kindly enable Enable PayPal Payout
Payment option from Affiliates -> settings page at PayPal Mass
Payment Settings section
If you don’t have PayPal account then kindly create a PayPal account
For sandbox account you can create it from here
For Live account you can create it from here
Select your Payment Mode(Sandbox Or Live) and add the PayPal details (Client ID, and Secret key), after add
paypal details need to verify that by clicking the ‘Verify’ link.
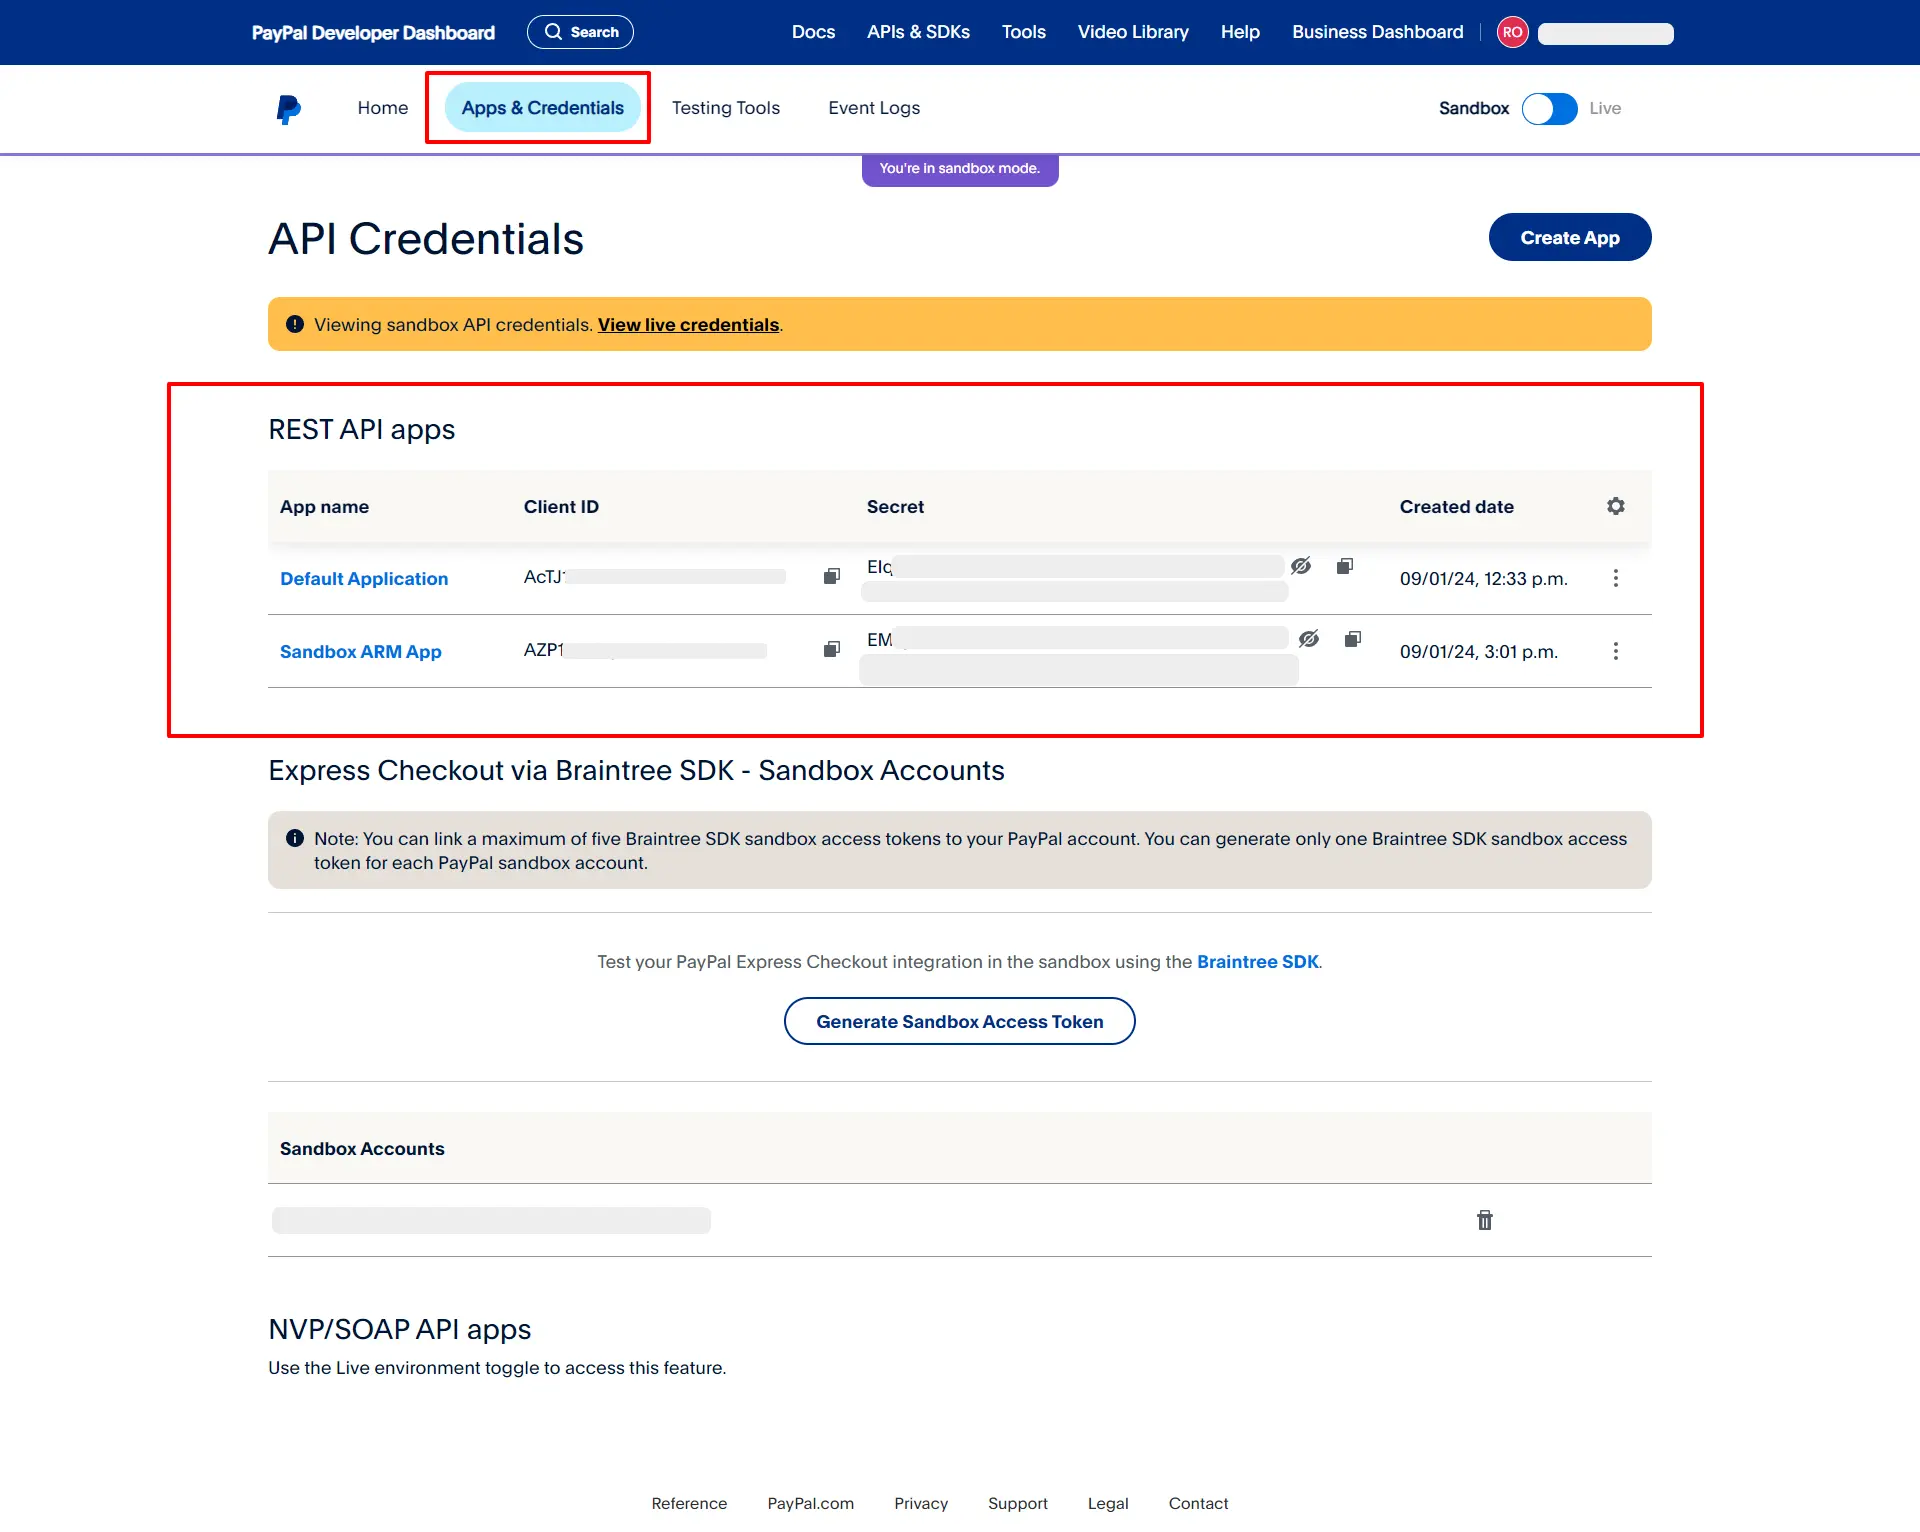
How to configure PayPal Mass Payout
-
Login into Paypal Developer account
-
Click on Apps & Credentials
-
Copy Client ID and Secret key and paste at
Affiliates->Afiliate settingspage
at “PayPal Mass Payment Settings” -
Click on verify button
After verified a PayPal Mass configuration admin user can pay a payout to affiliate user through PayPal from
Affiliates -> Payouts page.
Affiliate Widget
Recent Referrals
Here you have list of 6 recently added referrals with their Affiliate user, Amount and Referral User. You can
view all referral by clicking on View All Referrals link.
Affiliate Shortcodes
arm_aff_dashboard
Place this shortcode to display the Affiliate Dashboard. This shortcode only accessible for affiliate users.
This shortcode display Statistics of affiliate user in Dashboard tab, Profile tab has user’s affiliate detail,
affiliate’s detail like display referral URL for current logged in affiliate and shocial network, form for Refer
or Invite friend by email, Banners tab has specific banner with embed code for affiliates, Referrals tab has
display your affiliate users to get their referrals detail in your site, and Payments tab has containing payout
transactions for current logged in affiliate user.
| Possible Arguments (Optional): | |
|---|---|
dashboard_allowed_tabs |
Display only allowed tabs only (ex: “dashboard,profile,banners,referrals,payments”) |
dashboard_title |
Change display Dashboard tab title. |
earning_back_color |
Display earnings background color |
paid_payment_back_color |
Display paid payment background color |
unpaid_payment_back_color |
Display unpaid payment background color |
visitor_back_color |
Display visitor background color |
referral_back_color |
Display referral background color |
earning_title |
Display earning title |
payment_paid_title |
Display paid payment title |
payment_unpaid_title |
Display unpaid payment title |
visitor_title |
Display visitor title |
referral_title |
Display referral title |
dashboard_affiliate_reports_title |
Change display Dashboard tab Affiliate report title. |
dashboard_profile_title |
Change display Profile tab title. |
dashboard_social_share_title |
Change display Profile tab Social share title. |
information_social_fields |
display Profile tab Social network name(ex: facebook/twitter/linkedin/vkontakt/email) |
affiliate_text |
Affiliate text that you want to display in affiliate area for affiliate user. Use : {URL} (For display referral URL.) |
dashboard_referrals_friend_title |
Change display Profile tab Refer a friend title. |
referrals_friend_form_id |
Display Form id |
email_label |
Label for email field |
submit_button_text |
Form submit button text label |
success_msg |
Form submited after success message |
dashboard_banner_title |
Change display Banners tab title. |
item_id |
Affiliate Banner Id(Enter Banner id with comma(,) separate). |
dashboard_referral_title |
Change display Refferals tab title. |
per_page |
Number of Records per Page |
message_referral_no_record |
record Display Message if no records found. |
dashboard_referral_label |
Referrals – Grid Column Label |
dashboard_payout_value |
Referrals – Grid Column Label Value |
dashboard_payout_title |
Change display Payouts tab title. |
per_page |
Number of Records per Page |
message_payout_no_record |
record Display Message if no records found. |
dashboard_payout_label |
Payouts Transaction – Grid Column Label |
dashboard_payout_value |
Payouts Transaction – Grid Column Label Value |
arm_affiliate
Place this shortcode to display affiliate’s detail in your page like display referral URL for current logged in
affiliate. Make sure to add {URL} in your content to display affiliate’s referral URL.
| Possible Arguments: | |
|---|---|
social_fields |
Social network name(ex: facebook / twitter / linkedin / vkontakt / email) |
affiliate_text |
Affiliate text that you want to display in affiliate area for affiliate user. Use : {URL} (For display referral URL.) |
arm_user_referral
Use this shortcode to allow your affiliate users to get their referrals detail in your site.
| Possible Arguments: | |
|---|---|
title |
Section Heading. |
per_page |
Number of Records per Page |
message_no_record |
record Display Message if no records found. |
label |
Referrals – Grid Column Label |
value |
Referrals – Grid Column Label Value |
arm_user_payout_transaction
This shortcode will be replaced with the grid containing payout transactions for current logged in affiliate
user.
| Possible Arguments: | |
|---|---|
title |
Section Heading. |
per_page |
Number of Records per Page |
message_no_record |
record Display Message if no records found. |
label |
Payouts Transaction – Grid Column Label |
value |
Payouts Transaction – Grid Column Label Value |
arm_aff_banner
Place this shortcode in your page where you want to display your specific banner with embed code for affiliates.
| Possible Arguments: | |
|---|---|
item_id |
Id of affiliate banner. |
arm_affiliate_register
You may have users who does not have created affiliate or you may disabled
Automatic Create Affiliate link upon new Registration then users can create affiliate from where
you have placed this shortcode in your site while they are logged in.
While user who has no affiliate account is logged in this shortcode will be replaced with form having some
required fields and while user who has affiliate account is logged in this shortcode will be replaced with
user’s affiliate detail.
You are also able to change form title, form input style and field options from
Affiliate Settings > Form Settings.
arm_aff_visits
This shortcode will be replaced with the total number of visits for current logged in affiliate.
[arm_if_affiliate]…[/arm_if_affiliate]
You may want to add specific content in your page which should be visible only for affiliates. This shortcode can
be useful for that case.
For Example,
[arm_if_affiliate]
    This content will be visible only for affiliates.
[/arm_if_affiliate]
[arm_if_non_affiliate]…[/arm_if_non_affiliate]
Using this shortcode you are also able to add specific content in your page which should be visible only for non
affiliates.
For Example,
[arm_if_non_affiliate]
    This content will be visible only for non affiliates.
[/arm_if_non_affiliate]
arm_referrals_friend_invite
Place this shortcode to display form for Refer or Invite friend by email and you can enter multiple email by
comma separate in email field. This shortcode only accessible for affiliate users.
| Possible Arguments: | |
|---|---|
form_id |
Display Form Design from signup form Default: 101 |
title |
Section Heading Default: Refer a Friend |
email_label |
Label for email field Default: Email Address |
submit_button_text |
Form submit button text label Default: Send Email |
success_msg |
Form submited after success message Default: Mail sent successfully |
arm_aff_statistics
Place this shortcode to display statistics. This shortcode only accessible for affiliate users.
| Possible Arguments: | |
|---|---|
earning_back_color |
Display earnings background color |
paid_payment_back_color |
Display paid payment background color |
unpaid_payment_back_color |
Display unpaid payment background color |
visitor_back_color |
Display visitor background color |
referral_back_color |
Display referral background color |
earning_title |
Display earning title |
payment_paid_title |
Display paid payment title |
payment_unpaid_title |
Display unpaid payment title |
visitor_title |
Display visitor title |
referral_title |
Display referral title |
arm_aff_earning
Place this shortcode to display earning. This shortcode only accessible for affiliate users.
| Possible Arguments: | |
|---|---|
duration |
(Optional) Display last month earning (value:1) |
arm_aff_payment_paid
Place this shortcode to display paid payment. This shortcode only accessible for affiliate users.
| Possible Arguments: | |
|---|---|
duration |
(Optional) Display last month paid payment (value:1) |
arm_aff_payment_unpaid
Place this shortcode to display unpaid payment. This shortcode only accessible for affiliate users.
| Possible Arguments: | |
|---|---|
duration |
(Optional) Display last month unpaid payment (value:1) |
arm_aff_referral
Place this shortcode to display referral. This shortcode only accessible for affiliate users.
| Possible Arguments: | |
|---|---|
duration |
(Optional) Display last month referral (value:1) |
