PayPal supports maximum 90 days of trial duration for Auto Debit Subscription method.
Please note that while uninstalling ARMember, if any user has auto recurring subscription, then that will be canceled from payment gateways.
ARMember PayPal Payment Gateway offers to use Legacy (NVP/SOAP) Method, this allows both the sandbox mode and live mode payments.
Sandbox Mode allows checking the with the test payments for the plans you have created and make sure that everything works fine before shifting to live payments.
With ARMember you can have both Auto-debit Payment and Semi-Automatic Payments, you can bend any of these options as per your site requirements also you can allow a member to choose any of the provided options.
Let’s check each step in detail to configure PayPal easily
Choose Your Currency
The very first step is to select the desired currency of your choice in to set the currency navigate to the ARMember ⇾ General Settings page and here you will be able to check Default currency and select the currency that works for you. ARMember does provide a wide range of currencies list to select from, however if you feel to add your desired currency then you can add the custom currency too, for more information click here.
PayPal Supported Currencies
Although ARMember offers a comprehensive list of the all the currencies, it is very important to verify the currencies supported by the PayPal Payment Gateway.
PayPal frequently updates its list of supported currencies, so it’s a good idea to check their official website or help resources for the most current information regarding supported currencies and any specific limitations or conditions that may apply. Checkout this reference article.
- 1. Australian dollar:
AUD - 2. Brazilian real:
BRL - 3. Canadian dollar:
CAD - 4. Chinese Renmenbi:
CNY - 5. Czech koruna:
CZK - 6. Danish krone:
DKK - 7. Euro:
EUR - 8. Hong Kong dollar:
HKD - 9. Hungarian forint:
HUF - 10. Israeli new shekel:
ILS - 11. Japanese yen:
JPY - 12. Malaysian ringgit:
MYR
- 13. Mexican peso:
MXN - 14. New Taiwan dollar:
TWD - 15. New Zealand dollar:
NZD - 16. Norwegian krone:
NOK - 17. Philippine peso:
PHP - 18. Polish złoty:
PLN - 19. Pound sterling:
GBP - 20. Singapore dollar:
SGD - 21. Swedish krona:
SEK - 22. Swiss franc:
CHF - 23. Thai baht:
THB - 24. United States dollar:
USD
Setup PayPal Payment Gateway
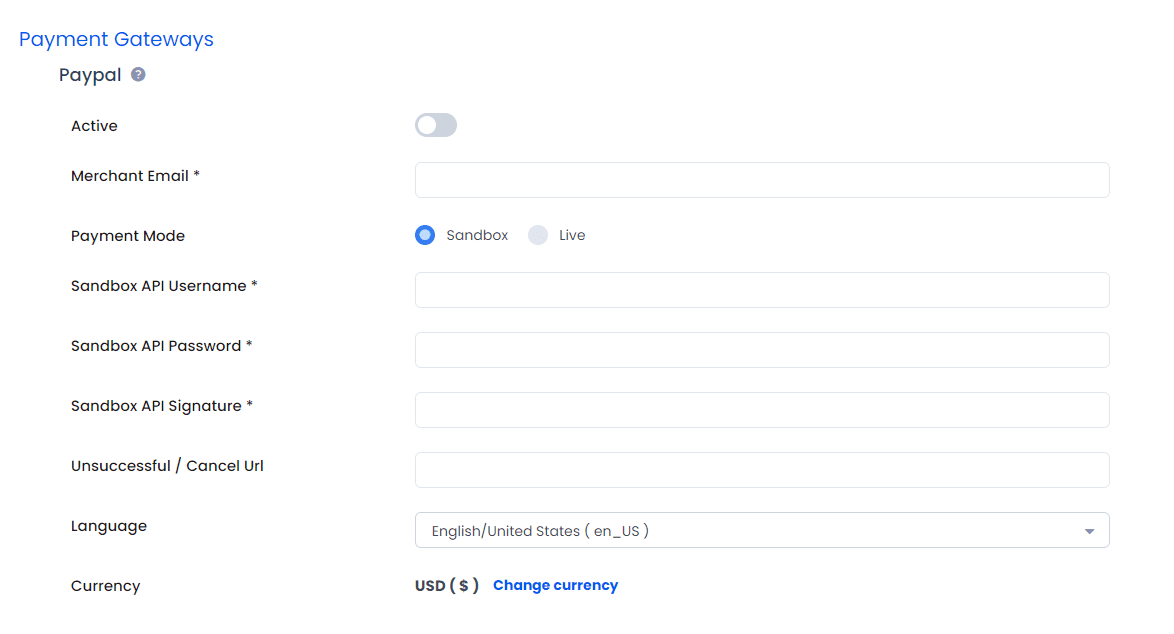
In order to enable the PayPal Payment Gateway, first navigate to the ARMember ⇾ General Settings ⇾ Payment Gateways page and here enable the switch for the payment gateway.
You will need API Username, API Password, and API Signature to use the PayPal Payment method. You can follow the steps below to fetch the same.
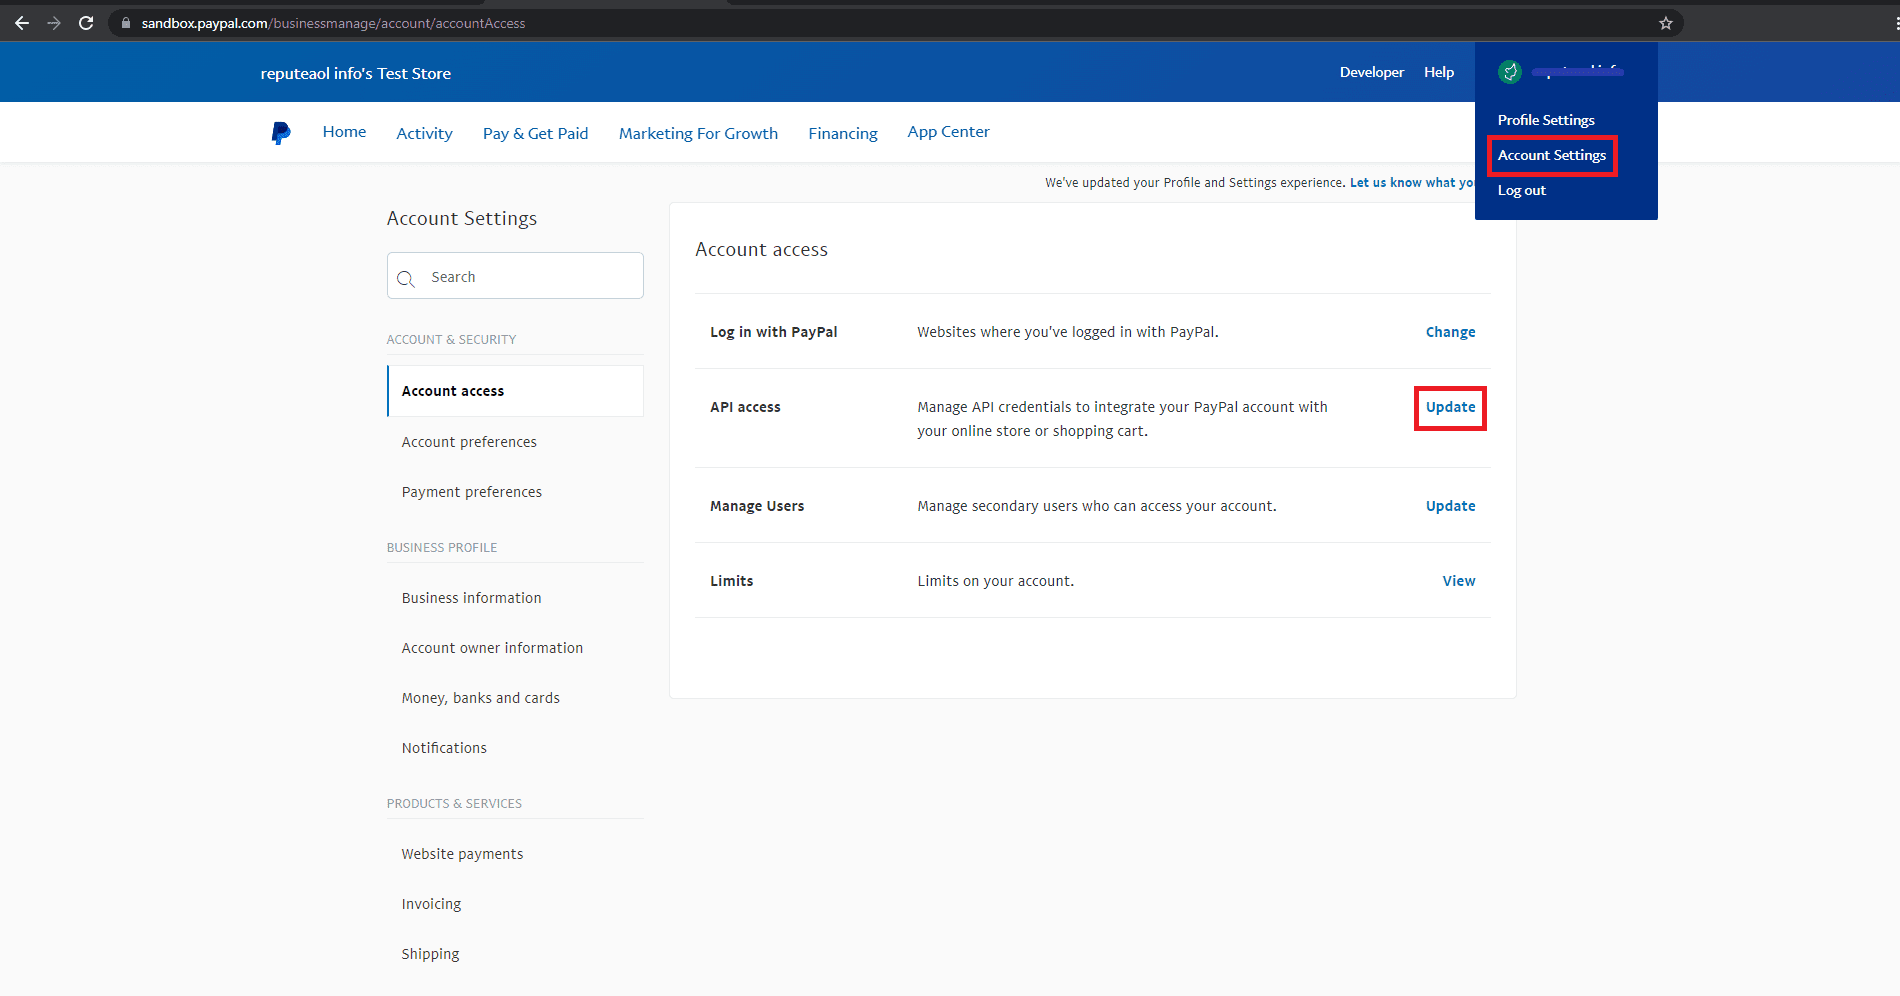
Follow below steps to get API Keys:
- Log in to your
PayPal PremierorBusinessaccount. - Click the Profile sub-tab located in the top navigation area.
- Click My selling preferences sub-option in the left sidebar.
- Click the API Access link under the Account Information header.
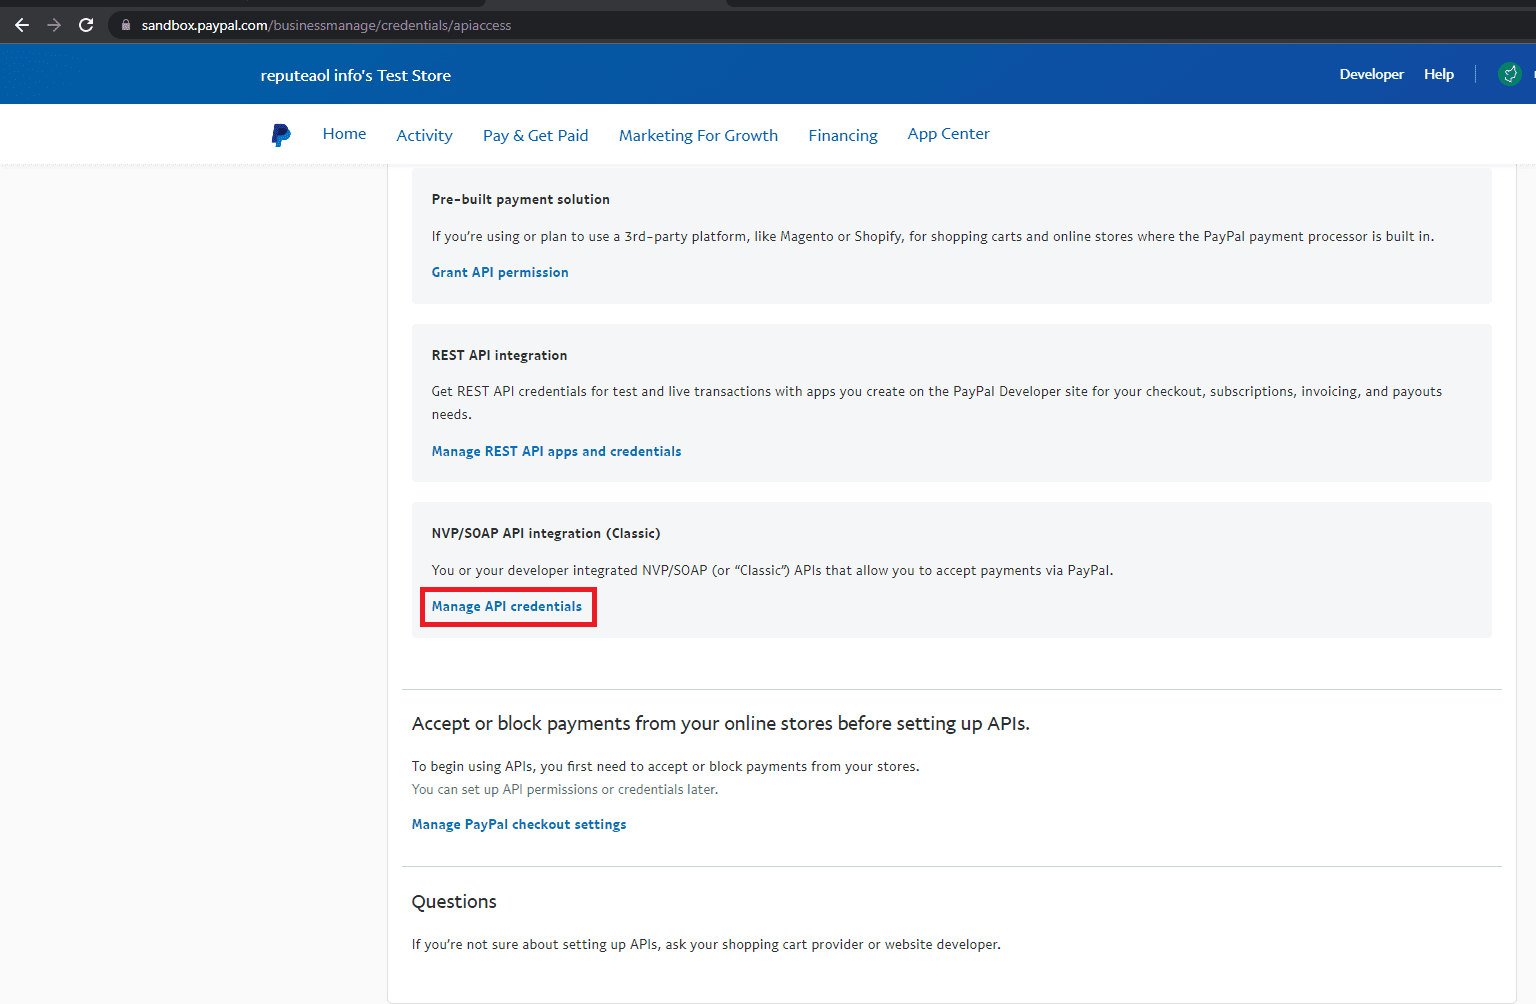
- Click the Get Started link under the Request API Credentials heading.
- Click the Update option for the API access item.
- Complete the API Credential Request form by clicking the agreement checkbox and clicking Submit.
- Copy and paste the API
username,password, andsignatureinto ARMember PayPal Payment Gateway Configuration Settings.
You can find more details about how to get API information from following links: Sandbox API Detail & Live API Detail.
Adding Payment Gateway for Front-End View
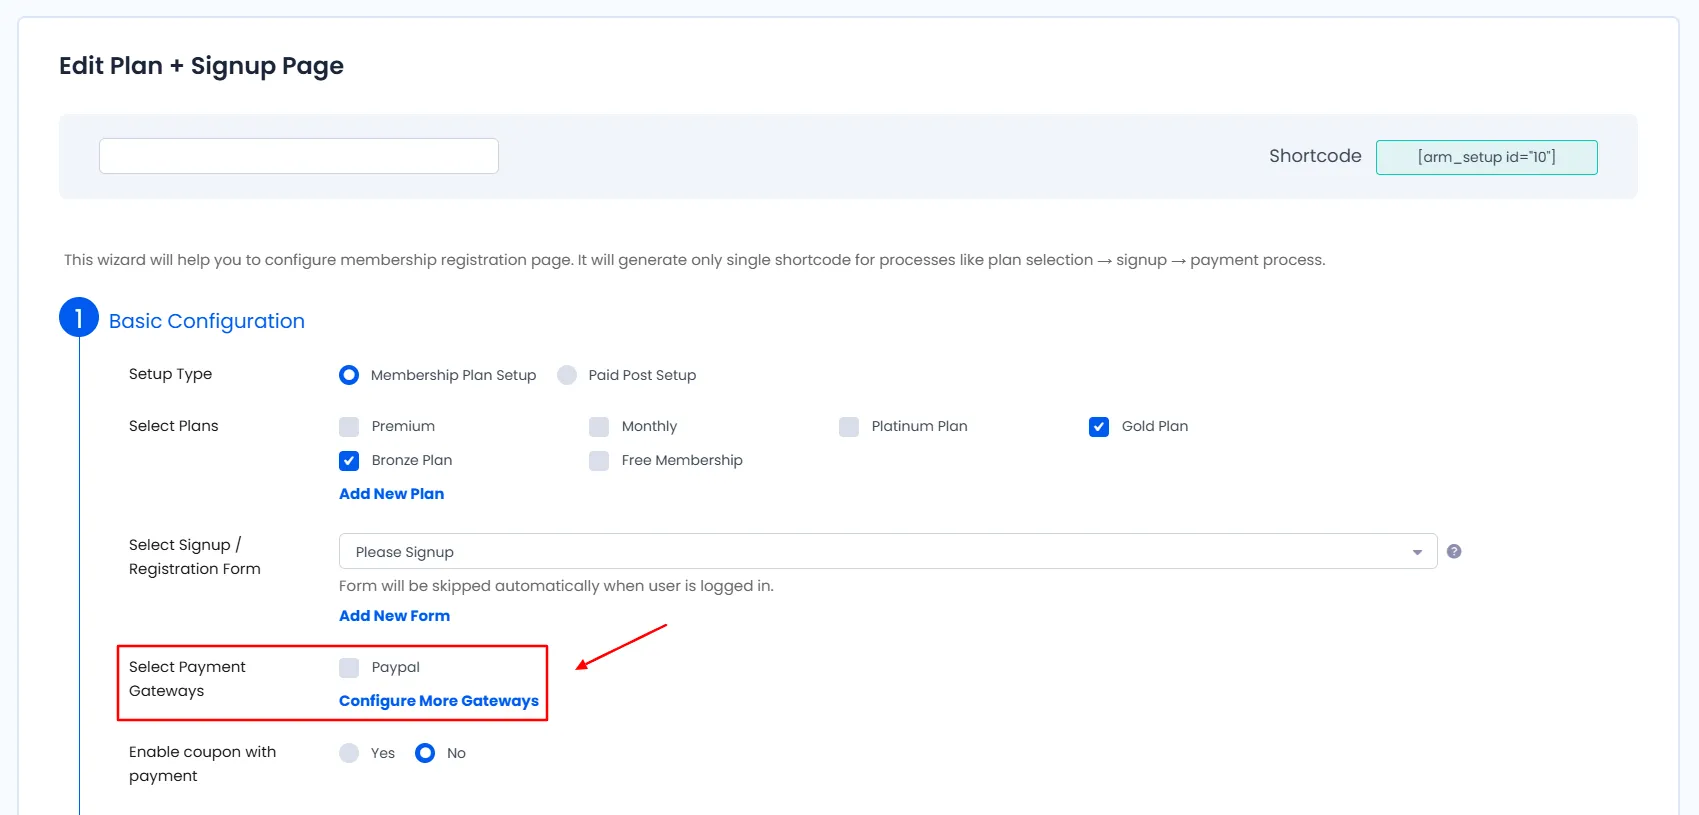
In order to allow the members to purchase the plans through the PayPal Payment Gateway it is important to add this gateway at the plan purchase form(setup form).
Navigate to the ARMember -> Configure Plan + Sign Up page and here edit the form and look for the option Select Payment Gateways and check the checkbox for the PayPal and save the changes. In order to get more detials to setup the plan purchase form click here.
Automatic Redirection Back to Your Website
To activate PayPal’s Auto Return feature, please refer to this helpful guide: How Do I Use PayPal’s Auto Return Feature?
This feature guarantees that your customers are smoothly redirected back to your website after completing their payment.
IPN Configuration
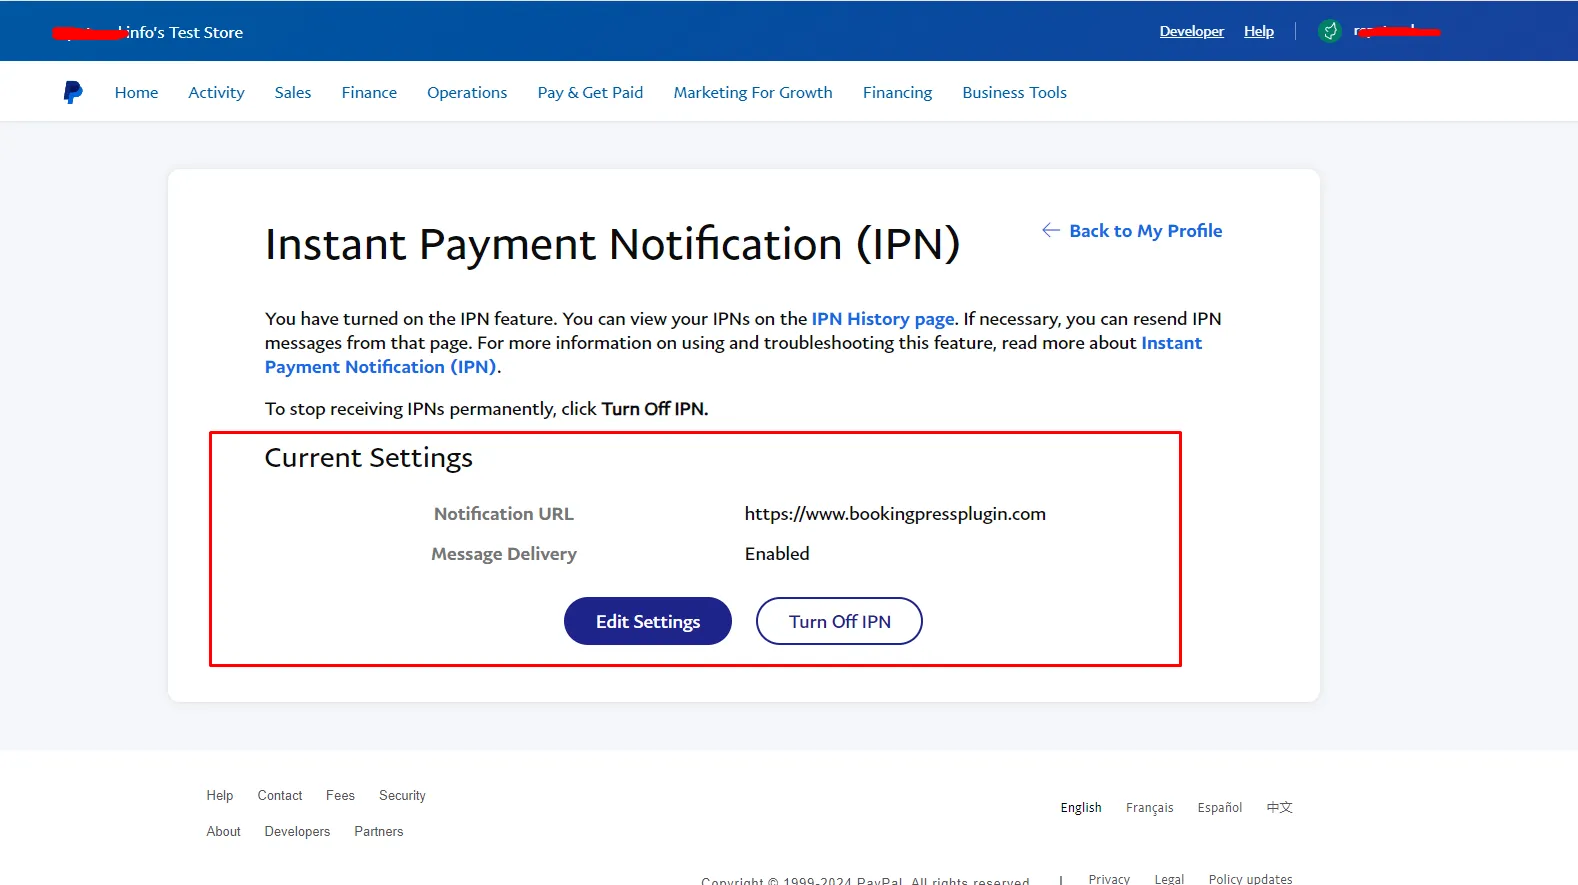
If the payment is successful, but the member is not showing in ARMember or if the plan is not assigned, then it’s crucial to ensure that Instant Payment Notifications (IPN) are enabled on your PayPal account. Here’s how to do it step-by-step:
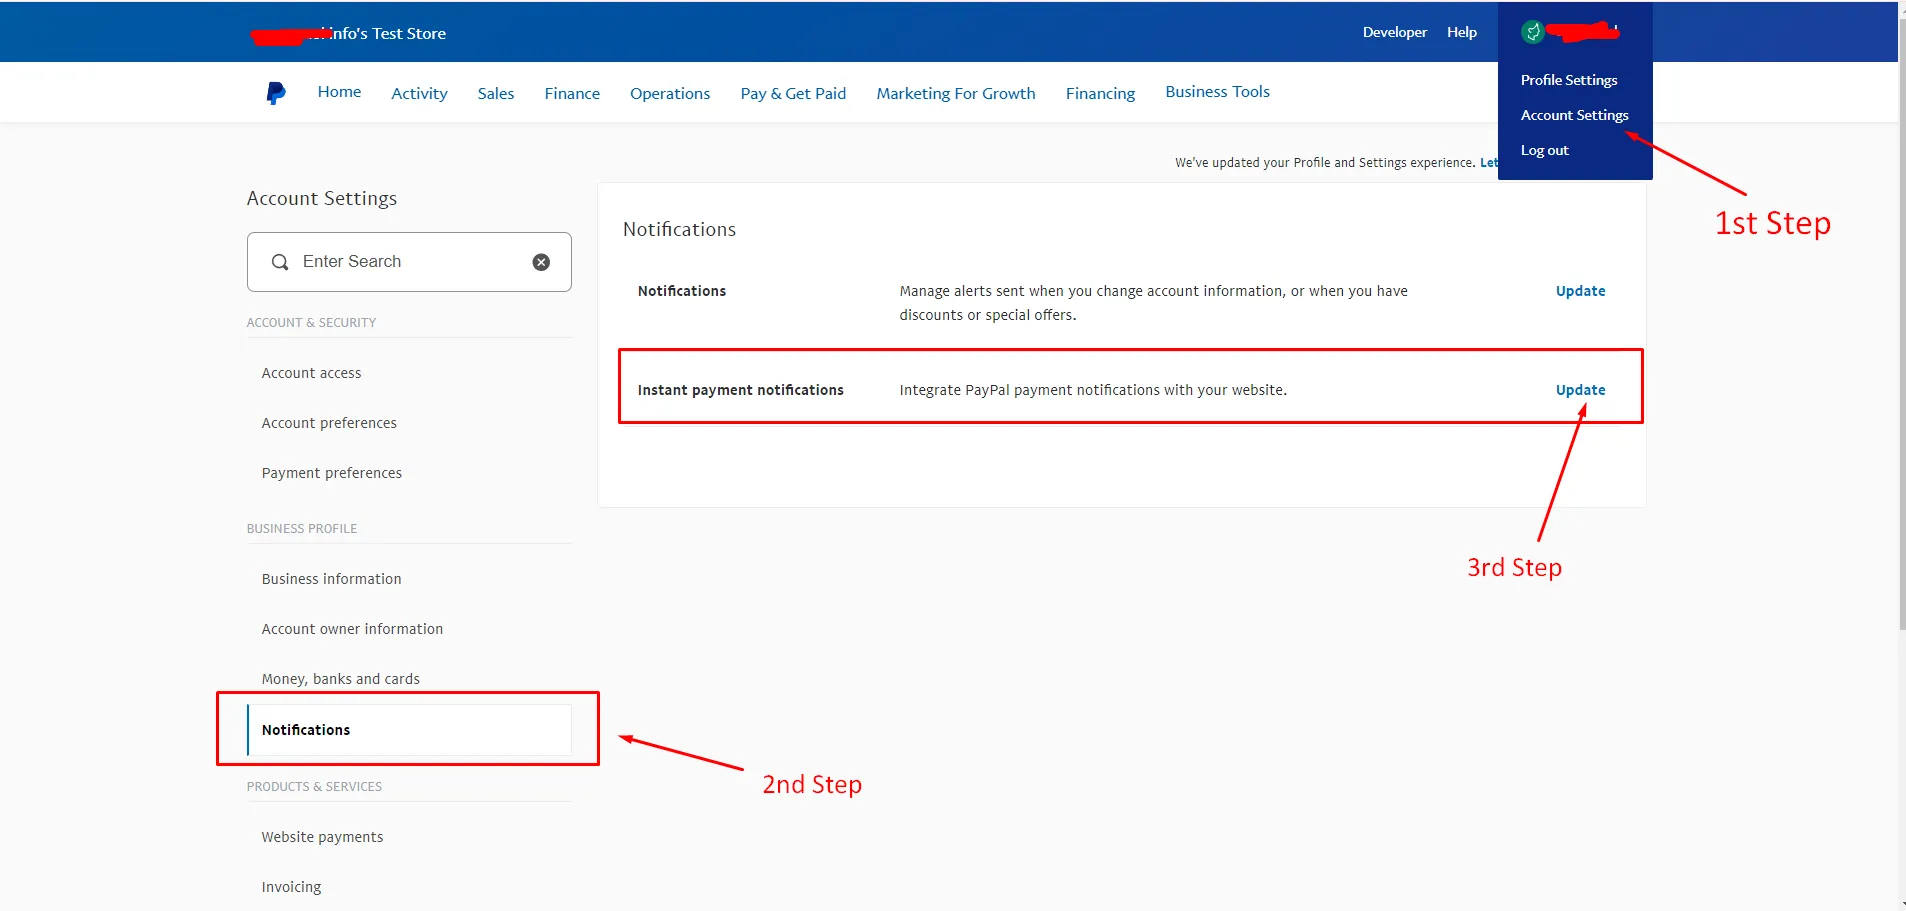
- Log in to your PayPal account.
- Go to Account Settings.
- Select Notifications from the left panel.
- Click the Update button in the ‘Instant Payment Notification’ settings.
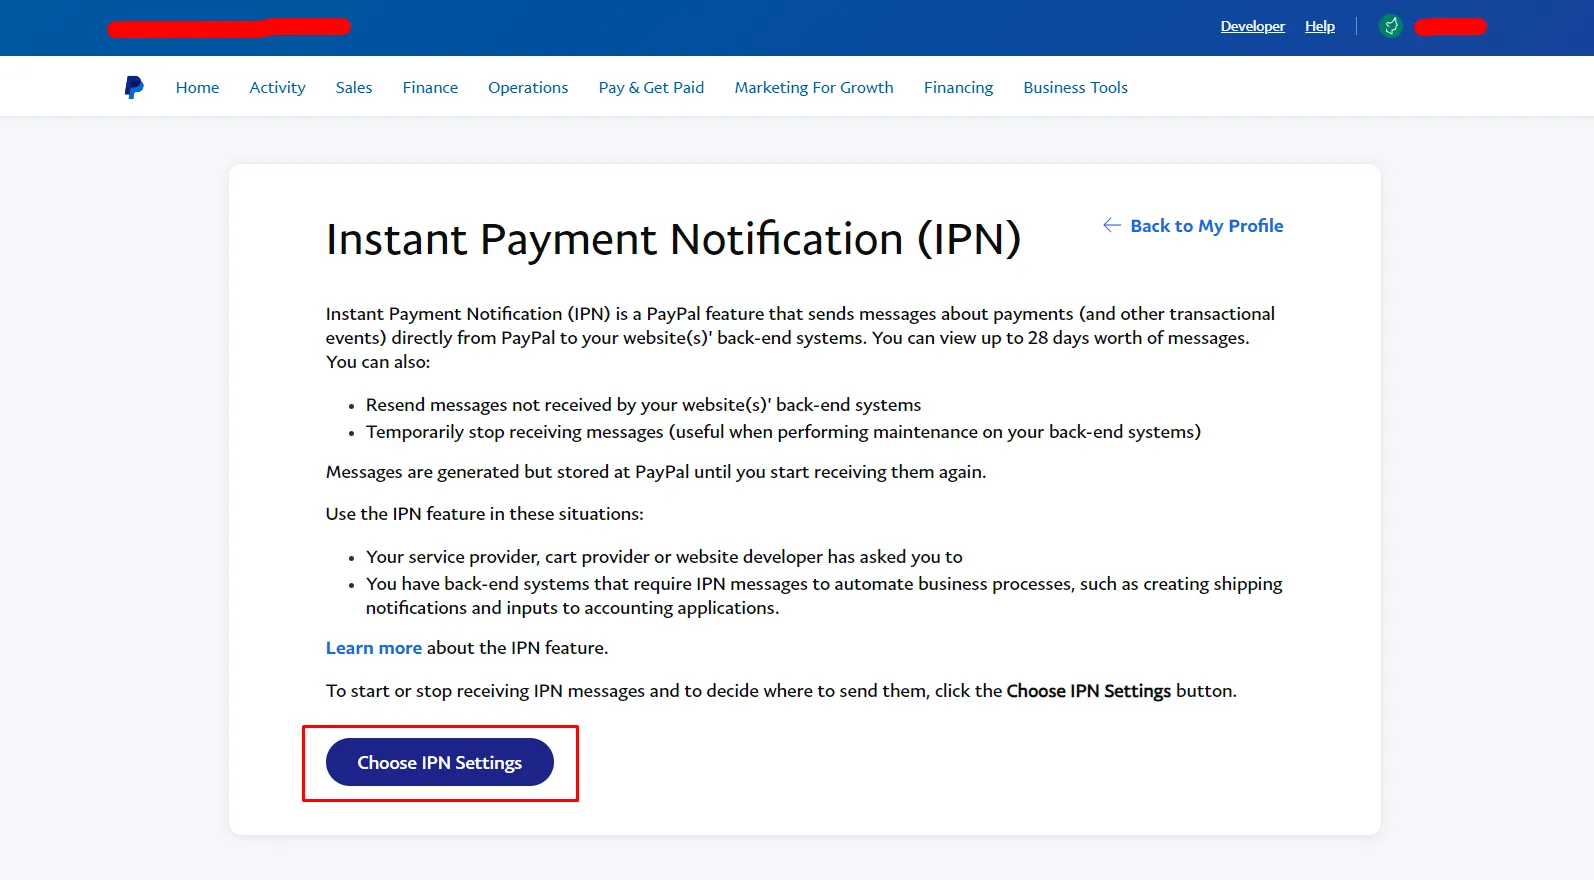
- If IPN is disabled, you’ll encounter a screen that looks like this:
- Click on ‘Choose IPN Settings’.
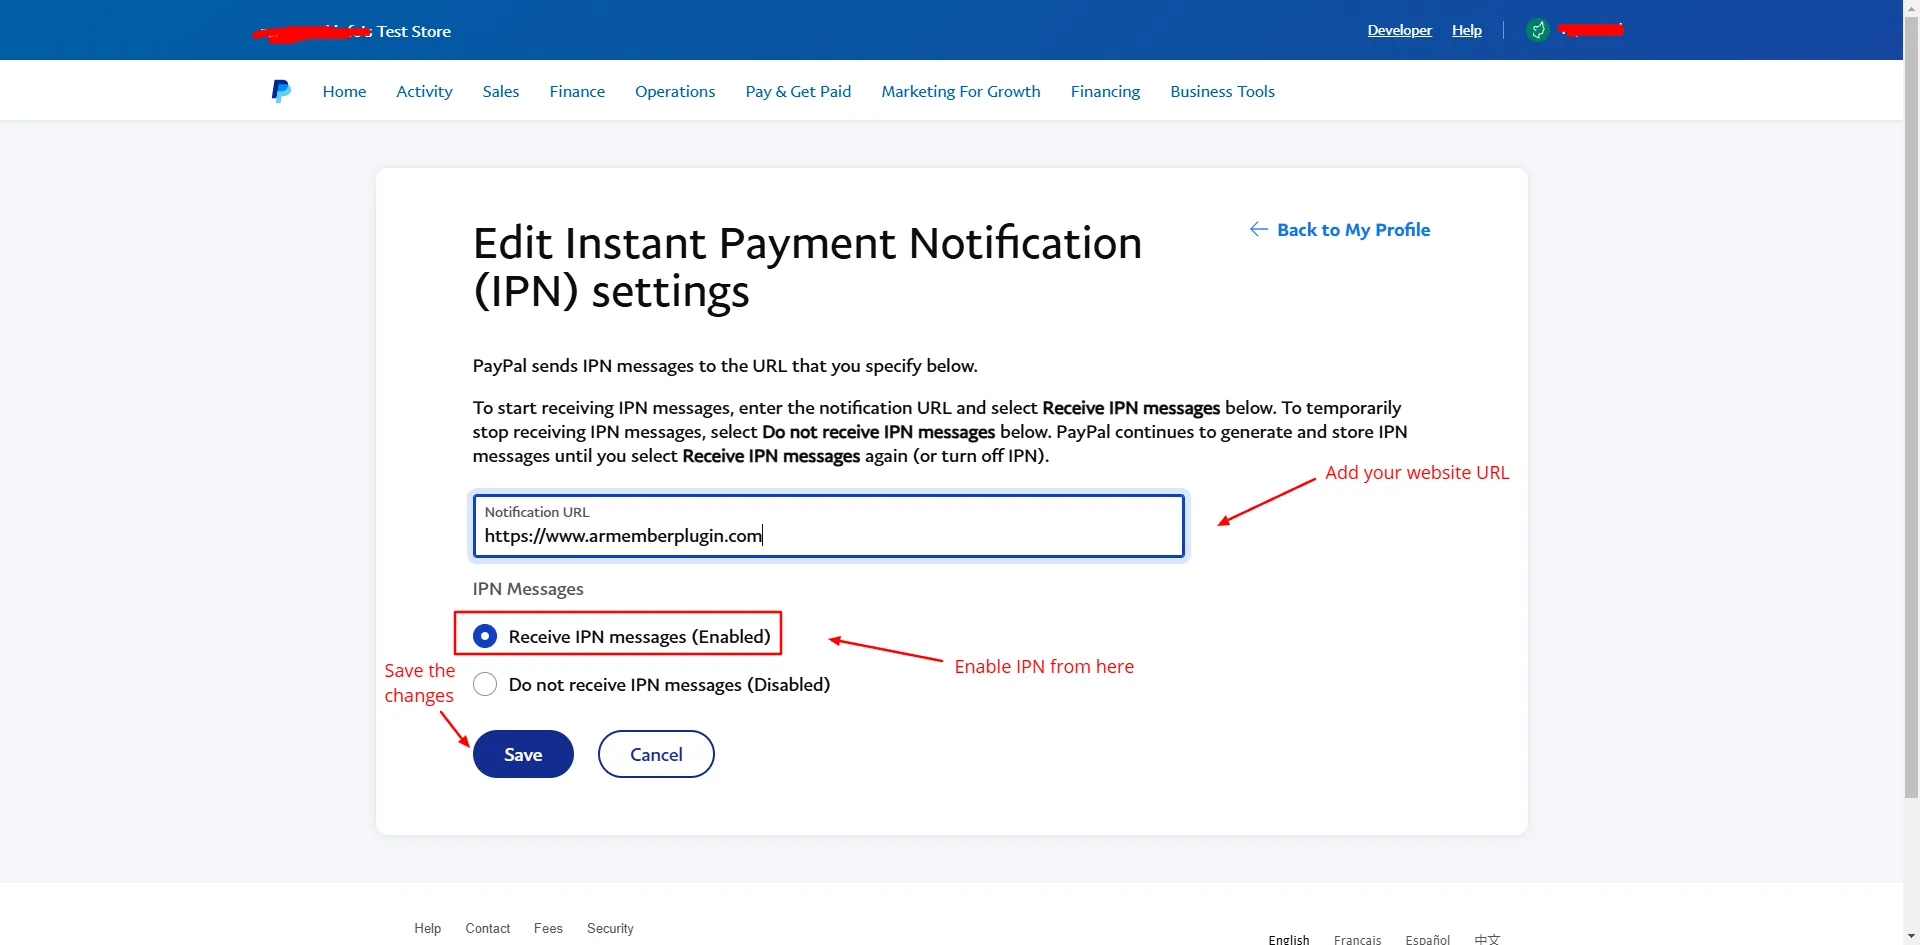
- Next, enter the Notification URL using your website’s URL.
- Then, select the ‘Receive IPN Messages (Enable)’ option.
- Finally, save the settings.
Enabling the IPN settings on your PayPal account allows PayPal to notify your website whenever a payment is received. ARMember will capture these notifications, confirm the payment, and add the member and assign the plan within the system.
Debug Log Data
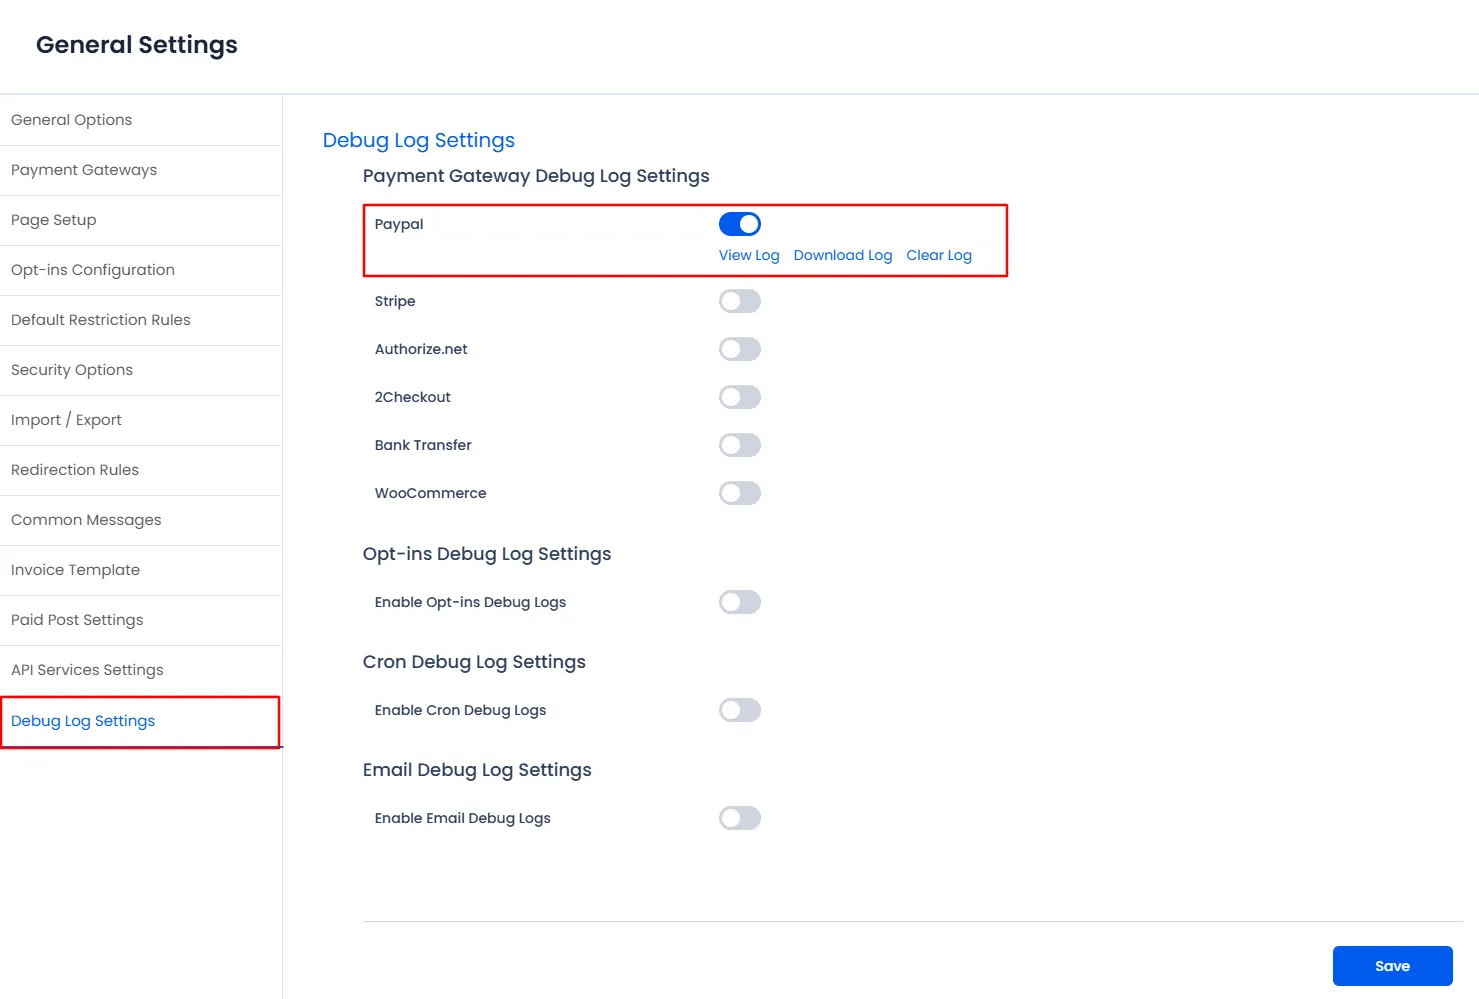
ARMember allows you to check the data which are being received from the payment gateways, where in you can analyze that whether the webhook_data event is reaching at your site or not. As, the ARMember will take any action on the basics of the webhook_data received.
To enable the logs, navigate to the ARMember ⇾ General Settings -> Debug Log Settings page here an option is available Payment Gateway Debug Log Settings under which enable the switch for Paypal and then save the changes. For more information you can click here.


