


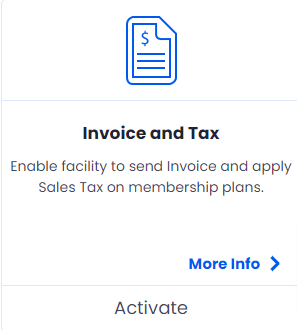
The ARMember Invoice and Tax addon is provided by ARMember that can be used with the Pro version of the Plugin. To activate this invoice and tax Addon, navigate to ARMember ⇾ Addons ⇾ Invoice and Tax. After activating this addon, one can allow the invoices to be visible and also configure the tax.
In this article, we will understand steps to set up and configure the Invoices and Sales Tax. Additionally, we will also understand how to display the invoice and tax to your site’s end users. ARMember offers flexibility to have either the invoices or the taxes activated on your site. If your site only requires the invoices and not taxes, then you can enable the invoices and vice versa.
How to Configure the Invoices for Your Site?
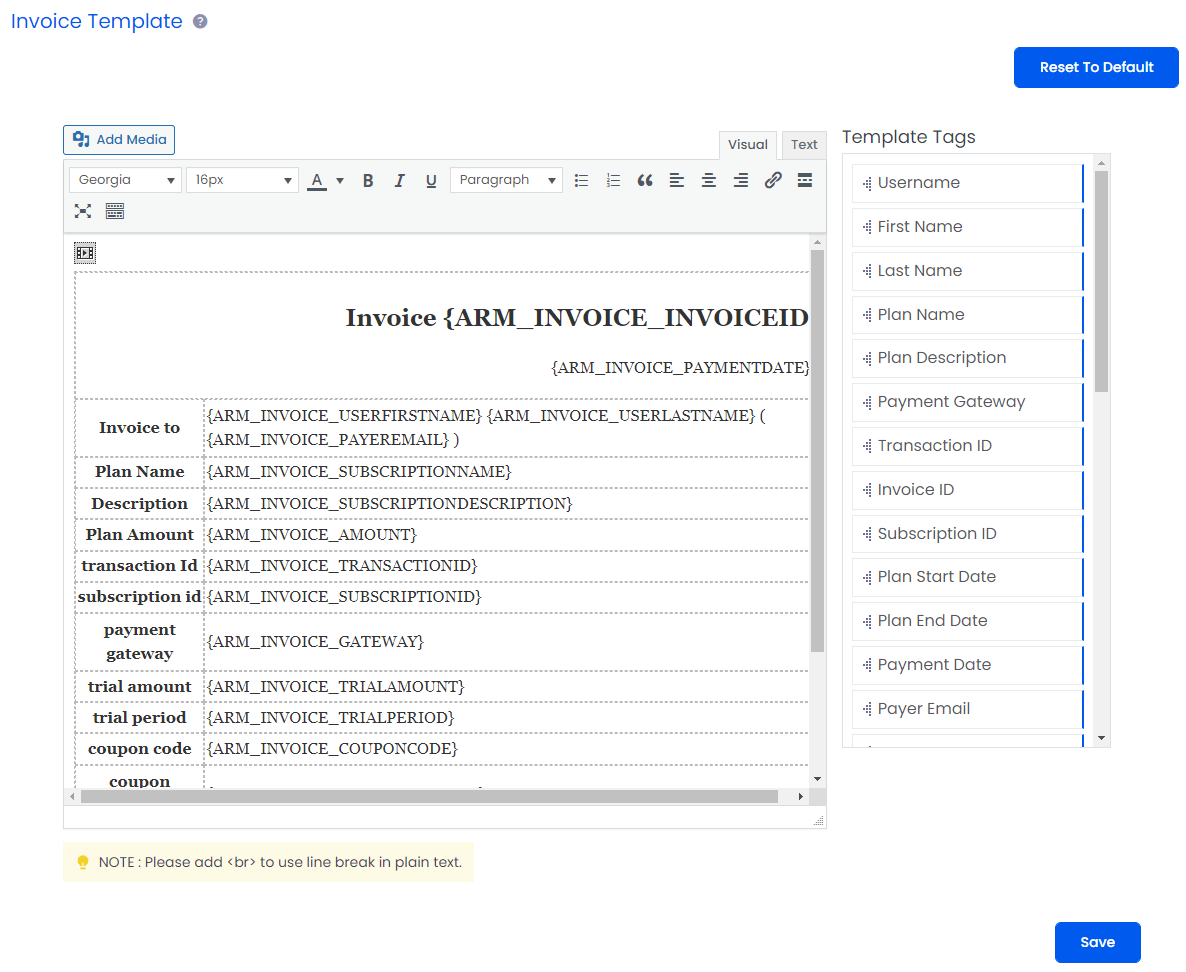
After activating the addon, go to the ARMember ⇾ Invoice Template Tab ⇾ General Settings page. Here, you can change the default template for invoice and then design the invoice as per your requirements.
The editor allows you to add the HTML content. Create the template as per your requirements by adding the desired HTML content.
If you want to reset to “default template” again, then click on Reset To Default Template button. Do not forget to keep back up of template code as after resetting all changes in invoice template will be gone.
Invoice Template Tags That Can Be Used With the Invoice and Tax Addon
Template Tags helps to get the dynamic data as per the user’s plan information. You can check all the following template tags and add them to invoice as per requirements.
Common Tags:
{ARM_INVOICE_USERNAME}: This tag will display the username of the member who made the payment.{ARM_INVOICE_USERFIRSTNAME}: This tag will display the First Name of the member.{ARM_INVOICE_USERLASTNAME}: This tag will display the Last Name of the member.{ARM_INVOICE_SUBSCRIPTIONNAME}: This tag will display the Plan Name which the member has purchased.{ARM_INVOICE_SUBSCRIPTIONDESCRIPTION}: This tag will display the Plan Description which you have added at the plan while creating the plan.{ARM_INVOICE_GATEWAY}: This tag will display the Payment Gateway Name through which the plan amount is paid.{ARM_INVOICE_TRANSACTIONID}: This tag will display the Transaction ID recieved from the payment gateway.{ARM_INVOICE_INVOICEID}: This tag will display the Invoice ID generated by the ARMember.{ARM_INVOICE_SUBSCRIPTIONID}: This tag will display the Subscription ID created at the payment gateway side.{ARM_SUBSCRIPTION_START_DATE}: This tag will display the Start Date of the plan.{ARM_PLAN_END_DATE}: This tag will be display the plan’s End date, for the plan type Free, Infinite, and subscription plan with infinite cycles will display the end date asNeveras gradually these plan do not have end date.{ARM_SUBSCRIPTION_END_DATE}: This tag will display the Plan Due Date, which means they date for which the members next payment will be charged. This tag can be used if plan type is Subscription/Recurring. If the plan type isFree Plan,Paid Plan(Infinite)andPaid Plan(Finite){ARM_INVOICE_PAYMENTDATE}: This tag will display the payment date when the payment went through in the invoice.{ARM_INVOICE_SUBSCRIPTIONAMOUNT}: This tag will display the plan amount(if the tax is activated then too this tag will display the amount without tax).{ARM_INVOICE_TRIALAMOUNT}: This tag will display the trial period amount.{ARM_INVOICE_TRIALPERIOD}: This tag will display the number of days, months and years for which you have added the trial period.
{ARM_INVOICE_AMOUNT}: This tag will display the plan amount(including the tax).{ARM_INVOICE_TAXPERCENTAGE}: This tag will display the tax percentage applied on the plan.{ARM_INVOICE_TAXAMOUNT}: This tag will display the amount of tax applied on the plan.
Tax Tags:
{ARM_INVOICE_COUPONCODE}: This tag will display the Coupon Code applied on the plan.{ARM_INVOICE_COUPONAMOUNT}: This tag will display the discount amount applied for the coupon.
Coupon Tags:
How can Admin Check the Invoice?
ARMember specifically offers a flexibility for the admin to easily View & Print the invoice. The system allows to check the invoice through multiple pages, let’s check each one-by-one:
- Payment History Page
- Manage Subscriptions Page
- Payment Reports Page
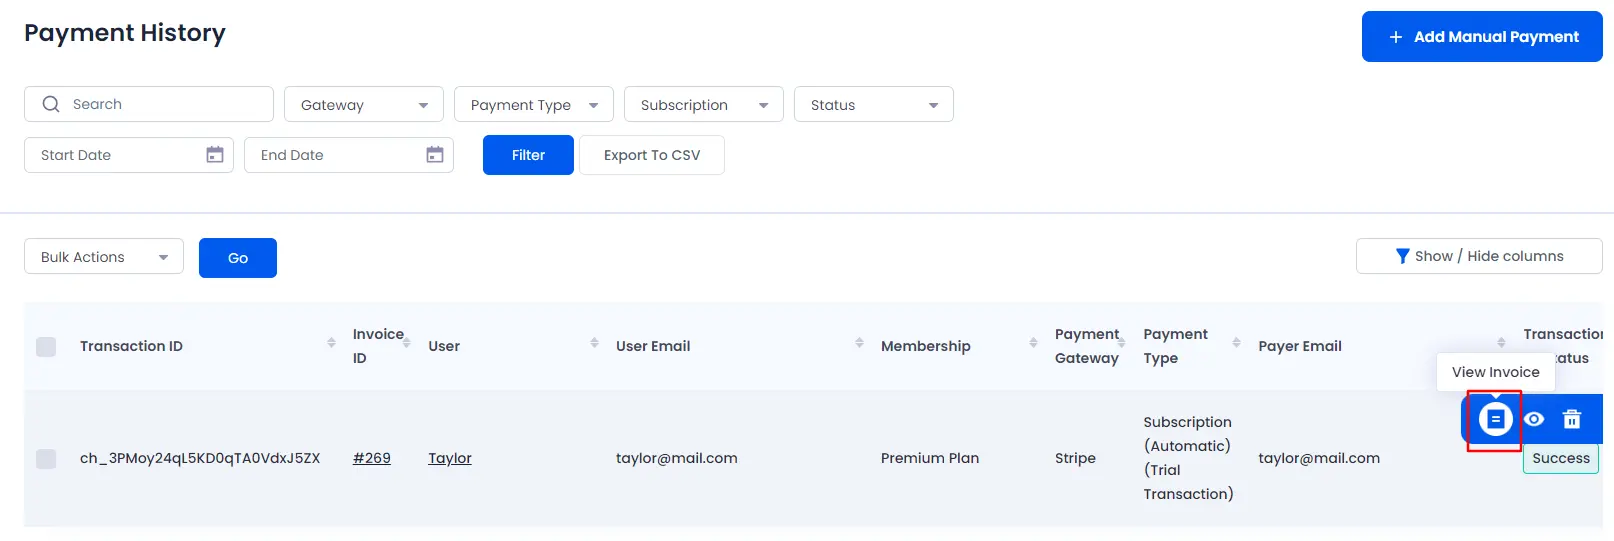
The first way to check the invoice of any member by the admin is by going to the page at ARMember ⇾ Payment History. Here, by hovering on any member at the grid option, the admin can check the invoice. Invoice will open in popup when you click on View Invoice action button. Here in the popup, Print button is available from where you can directly print out the invoice of any particular member.
NOTE:
View Invoice Action button will come only for transaction with Success status.
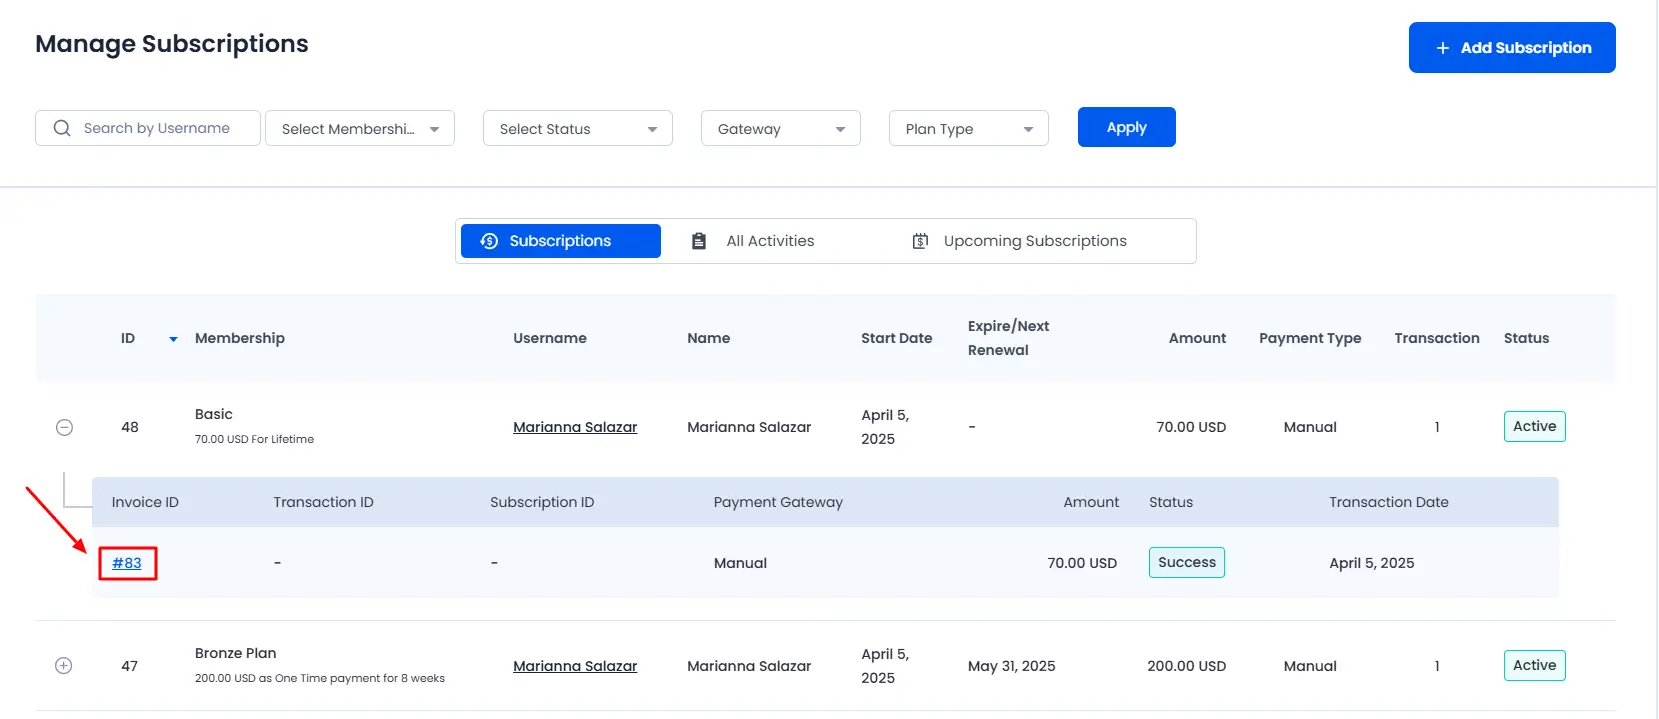
Secondly, you can check the invoice from the admin panel by navigating to the ARMember ⇾ Manage Subscriptions page. Here when you click on “+” icon, then at the child grid you will be able to check Invoice ID. Click on it and you will be able to check the invoice.
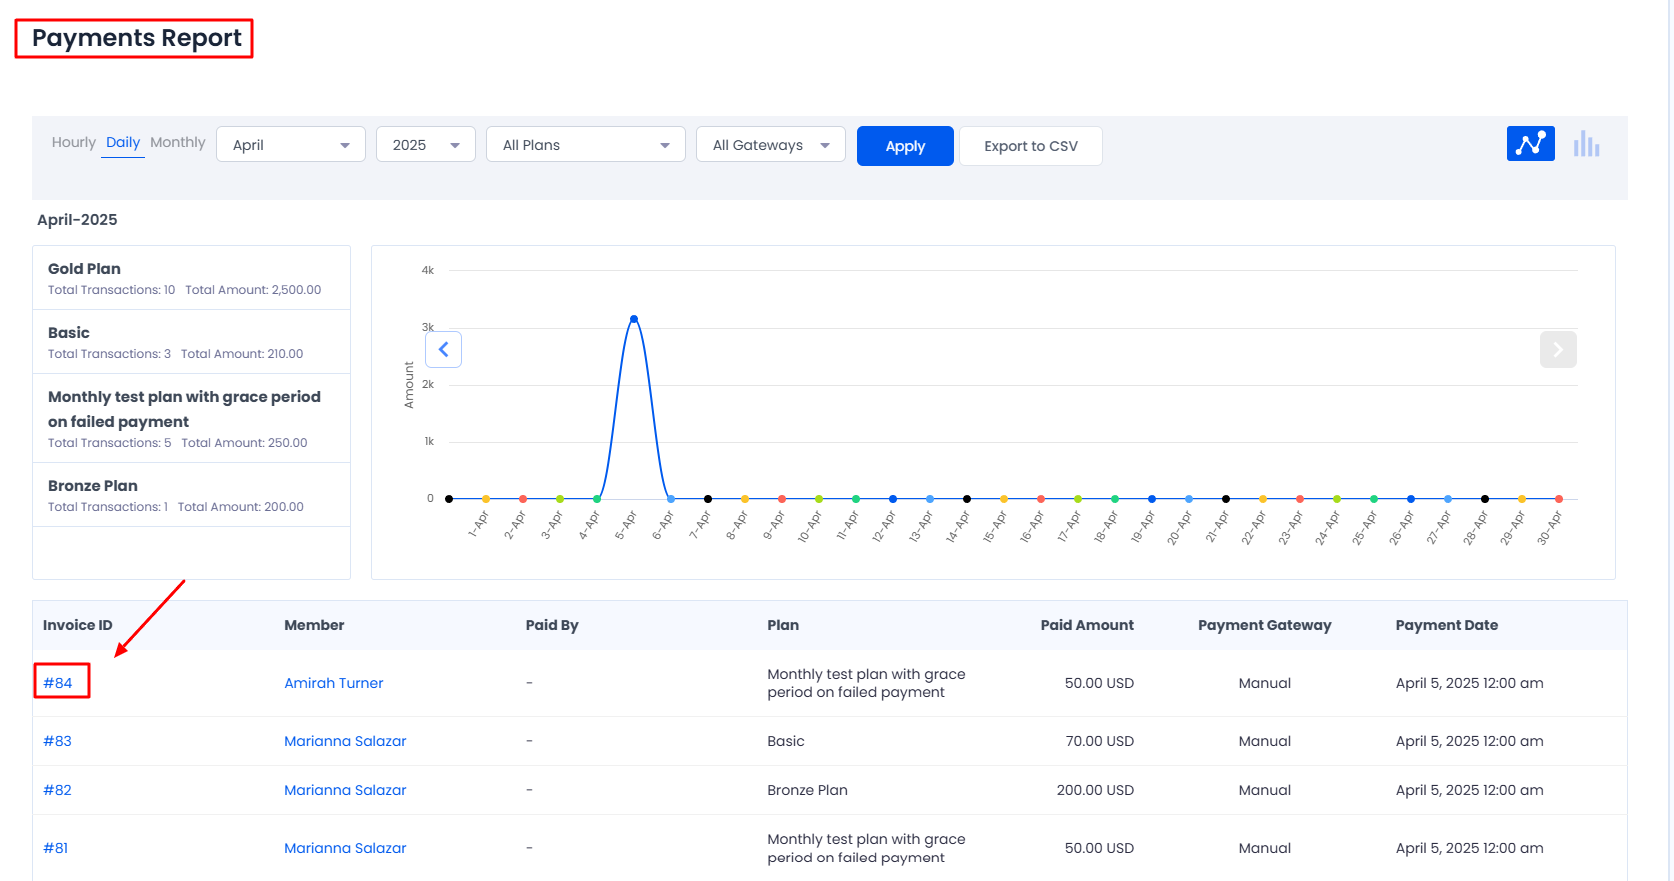
The third way to check the invoice from the admin panel is by navigating to the ARMember ⇾ Reports ⇾ Payment Reports page. Here, the invoice will be visible when the Invoice ID is clicked at the Invoice ID column.
How to Allow the Members to Check their Invoice on Front-end?
ARMember allows the members to check the invoice on their end. Thus, in order to allow this you can add the shortcode through which the members can check the Invoice directly. So, navigate to the Admin Panel ⇾ Pages ⇾ Add/Edit Page. From here you can search the block for the Membership Shortcodes
and when this block is click then hit the “Others” tab at the popup. And here on this tab at the Dropdown select the option Payment Transactions Shortcode and from there you can allow the View Invoice button will be visible.
Attach Invoice as PDF with the Email
If you want to attach a PDF of the invoice at the email notification sent to the members, then the ARMember does provide an Additional Addon PDF Creator Addon. If this addon is activated at your site, then you can attach the invoice generated with the email notifications.
For more details on this section click here.
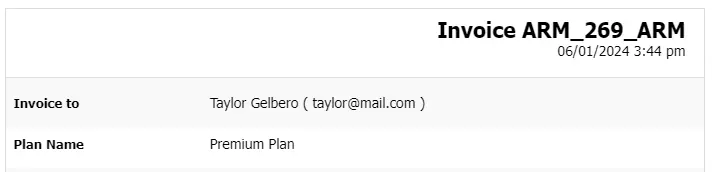
Invoice Prefix/Suffix Settings
To go further, you can find this option at General Settings ⇾ General Options.
By enabling this option you can set prefix, suffix and number of digit for invoice.
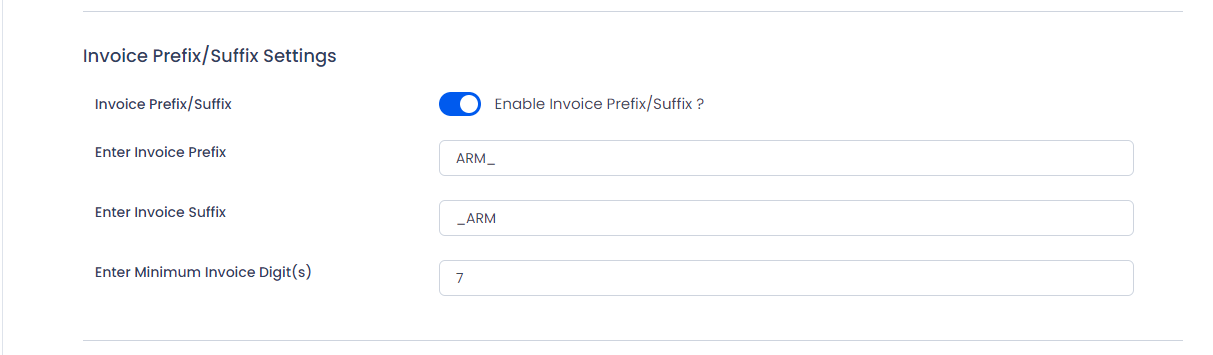
After making the changes do not forget to save the changes, you will see invoice number like following format in the screenshot.
How to Configure Sales Tax?
To set the sales to be applied to the plan, simply navigate to ARMember ⇾ General Settings ⇾ General Options ⇾ Sales Tax Settings
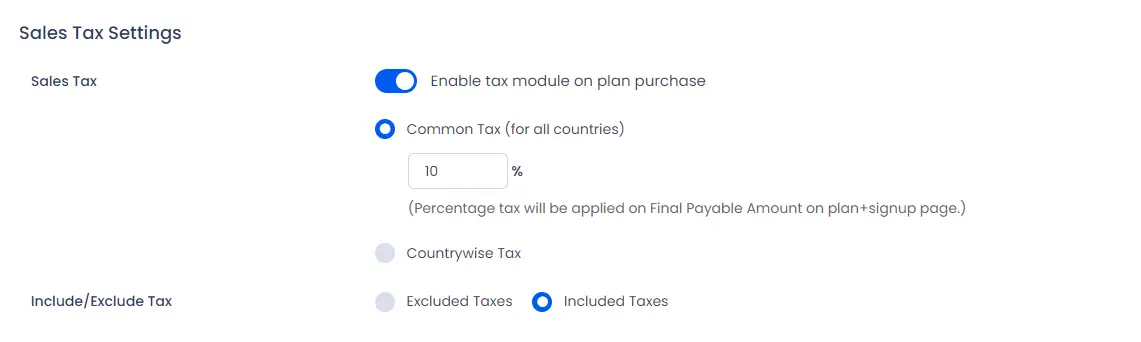
If this switch is enabled, then you can set percentage sales tax that will be applied on final payable amount on Configure Plan + Signup Page. Alternatively, if coupon is applied on plan amount, then tax will be applied on (Final Payable Amount = Plan Amount – Coupon Amount).
Furthermore, if the membership plan is of recurring type, then tax will be applied on every recurrence.
There are two different types of tax offered by ARMember. Thus, let’s check each one-by-one
- Common Tax
- Country-wise Tax
By default Common Tax option is selected which means common sales tax will be applied for all countries.
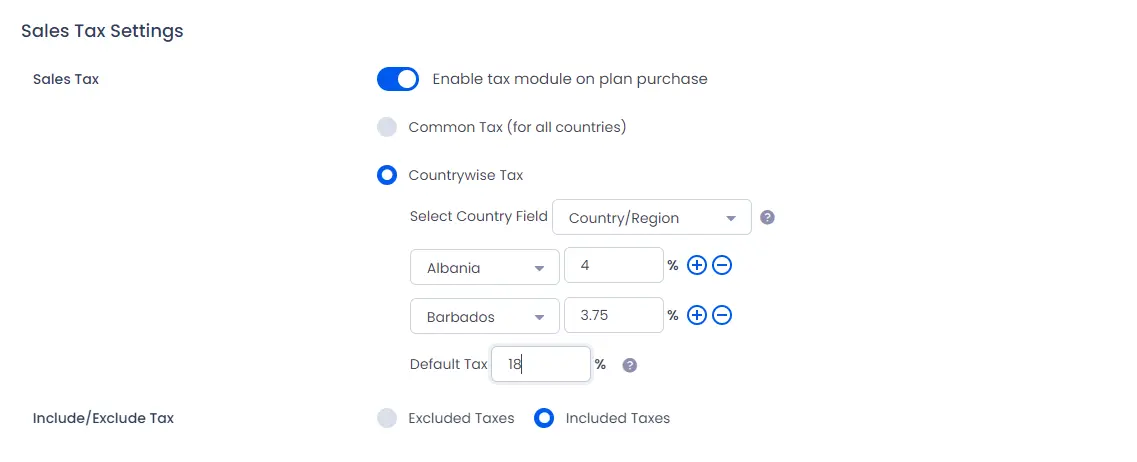
By selecting Country wise Tax Option, you can set different percentage of tax for different countries.
Here Select Country Field have list of Dropdown or Radio type fields only from signup form. So if you are trying to set the Country Wise tax without creating a field for the Country at the Signup form then it will not be possible to set. This is because the ARMember will verify the Country selected by the member and then accordingly apply the tax as set in the settings for that particular country.
Field Default Tax indicates the percentage of tax of other countries apart from country which is listed above.
Include / Exclude Tax
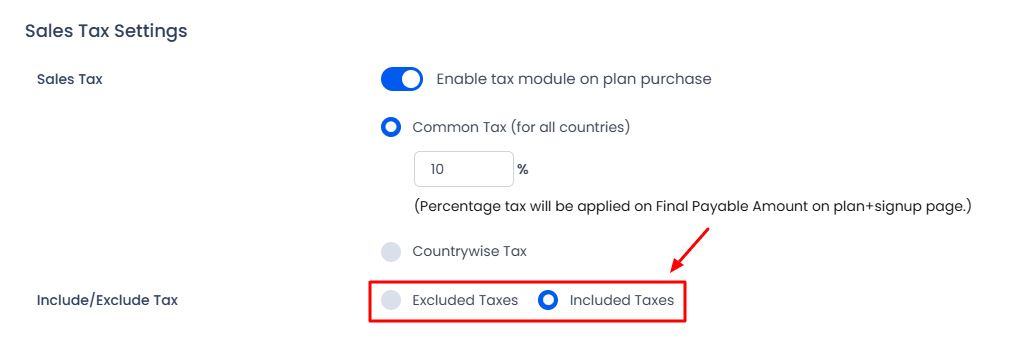
ARMember also provides two options to set the tax
- Included Tax
- Excluded Tax
-
Included Tax
By selecting the
Included Taxoption, you will be able to set the tax which will be included in the final amount payable by the user.For example, if you are having a subscription plan of $700 and the tax is set to 10%, then the final payable amount will be $700 (including 10% tax, i.e, $63.64).
Including Tax amount will be calculated as per the following formula:
tax_amount = price - ( price / ( ( tax_rate / 100 ) + 1 ) ) -
Excluded Tax
By selecting the
Excluded Taxoption, tax will be calculated excluding the final amount.For example, If the final amount is $700 and the if tax to add is 10%, then after adding the tax, the new
Total Payable Amountwill be $770 (with 10% tax).Excluding Tax amount will be calculated as per the given formula:
tax_amount = price * ( tax_rate / 100 )
How to Display Tax Applied on Front-end?
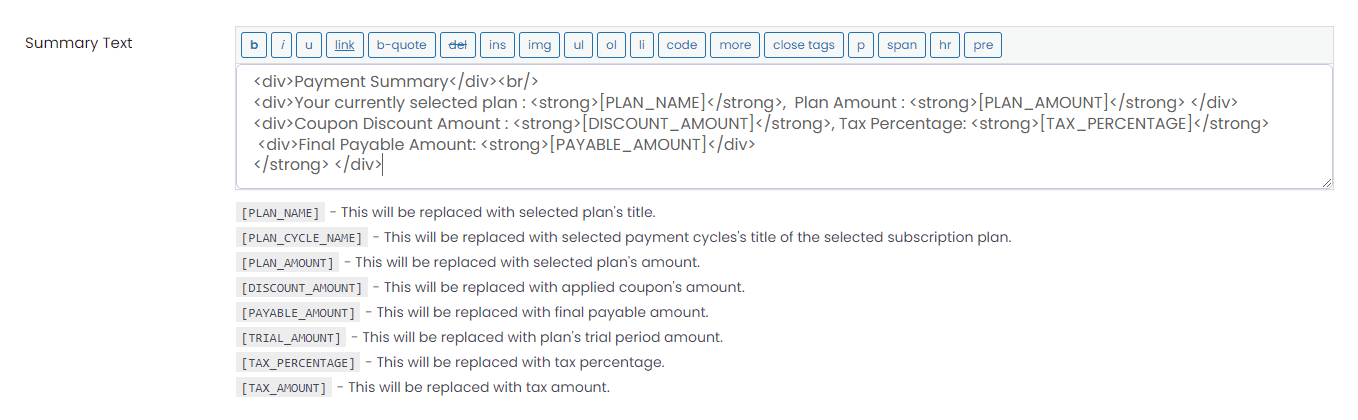
If you want to add tax percentage and total amount applied on final payable amount in payment summary, then you can add [TAX_AMOUNT] and [TAX_PERCENTAGE] short code in payment summary at Configure plan + Sign up page settings.
How to Add Tax Information at Invoice and Emails?
ARMember also provides a facility to add the tax at the email. Thus, if you wish to show the tax at any Standard WordPress Mails then you can add tags like [ARM_TAX_PERCENTAGE] and [ARM_TAX_AMOUNT].
Additionally, in order to display the tax at the Automated Mails you can add the tags like [ARM_MESSAGE_SUBSCRIPTION_TAX_PERCENTAGE] & [ARM_MESSAGE_SUBSCRIPTION_TAX_AMOUNT].
Furthermore, ARMember allows a facility to add the tax tags at the invoices. Specifically for this, you can refer to the above section of invoice template tags.