How to Setup & Use Multi-language Addon with ARMember Pro Plugin
Important Note: This Addon will only work if ARMember plugin is installed with version 6.8.2 or higher
ARMember – Multi-Language Addon is a bridge between Multi Language’s back-end interface and ARMember plugin.
This addon provides you with a seamless multilingual experience. It enables a smooth integration with various translating Plugins so that you can reach your visitors globally, in their preferred language.
From multilingual membership plans to sign-up forms, truly transform your member experience. With membership business availability in multiple languages, you can convert more visitors into paying members. It’s the magic of inclusivity provided through languages.
This Addon will allow you to add all users of your membership website into Multiple Languages, who will register using ARMember Registration Form.
Here’s few of the popular translating plugins that the Multi-Language Add-on is compatible with:
- WPML (WordPress Multilingual)
- Weglot
- TranslatePress
- Polylang
- WPGlobus
Here, kindly take a note that ARMember is compatible with all the Translating Plugins that follow the Standard WordPress rules regarding the process.
Steps For Installation And Activation
You can install plugin in following two ways.
New install via FTP
- Download Addon and extract it. You will find a directory armembermultilanguage..
- In your WordPress installation directory, upload armembermultilanguage to
wp-content/plugins/ - Activate the
ARMember Multi-Language Addonthrough thePluginsmenu from WordPress admin panel.
New install via the WordPress Uploader
- Download Addon.
- Log in to your WordPress admin panel
- Go to
Plugins->Add New->Upload - Click on “choose file” and browse the download package. When the Addon uploads successfully, click on
Activate Plugin.
Steps to Setup Multi Language For Your Website
Let’s setup ARMember – Multi-Language Addon for your website :
After plugin activation, please go to ARMember -> General Settings -> General Options -> Multi Language Settings section and please select languages dropdown to which you want to translate your ARMember Form on the Front-end.

Important Note:Please select all the languages apart from your Default WordPress Language here as you can alter the labels for the Default Language directly. Your WordPress Default Language won’t show up here.
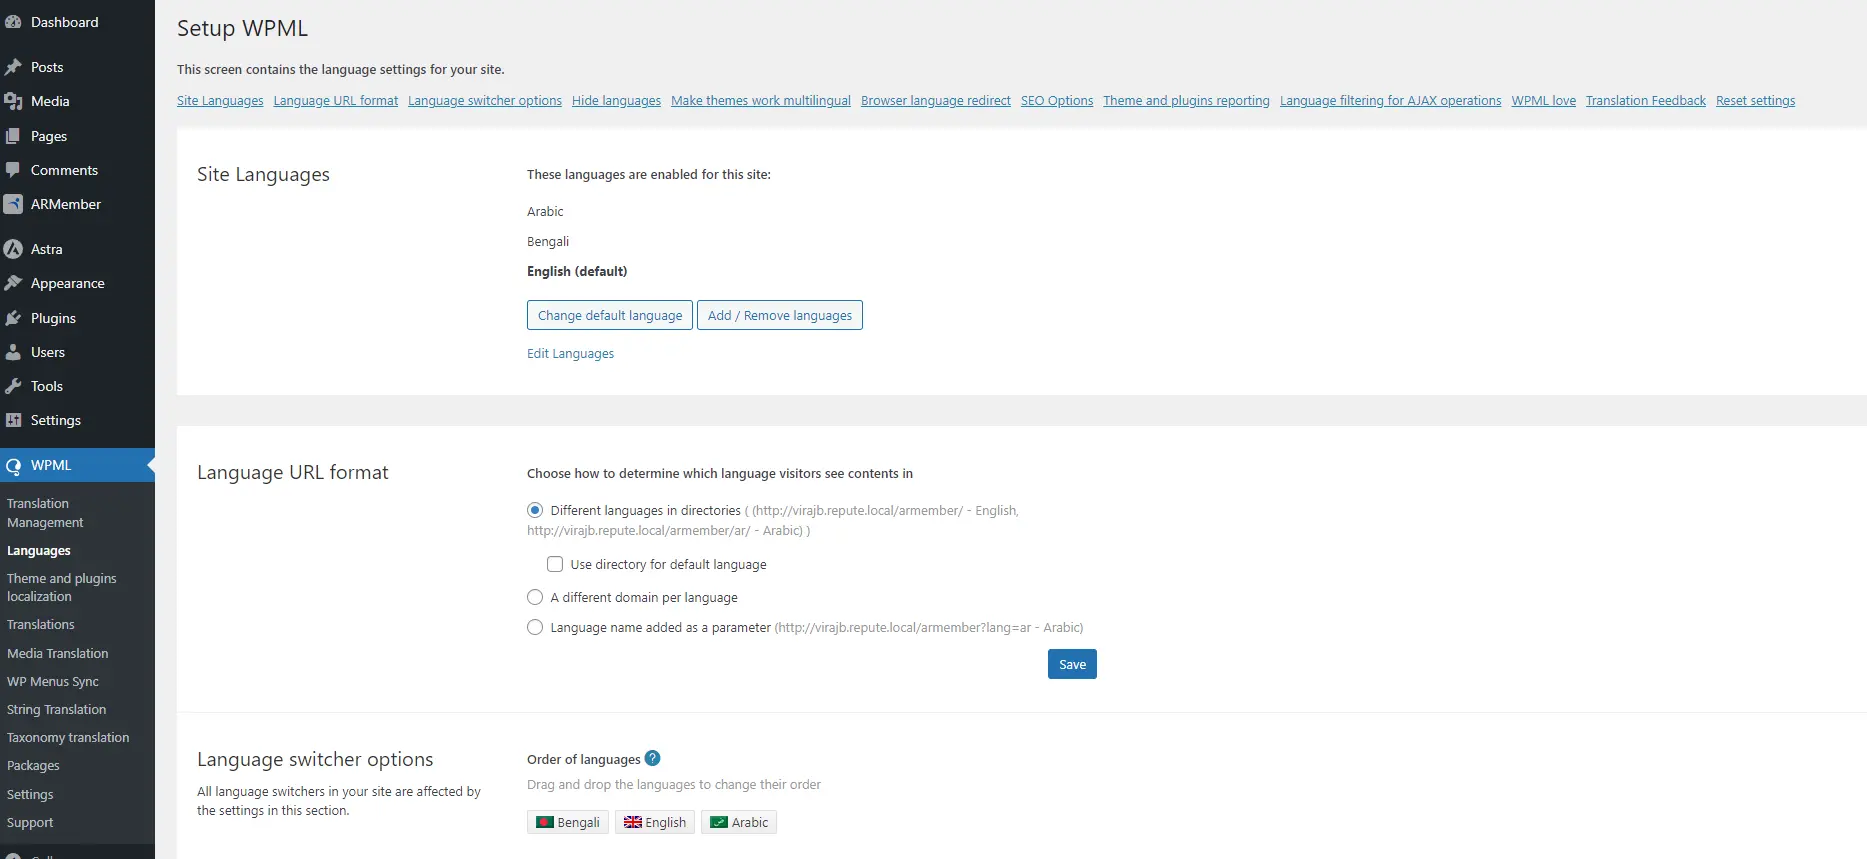
Configuring Multi-Language Add-on with WPML :
- Firstly, Install and activate the WPML Plugin on your WordPress site.
- After activation, you will be greeted with a setup Wizard that can help you set your languages and WPML in general you can either opt for that or simply choose Not Right Now and then head over to
Languages>Languages - From here you have the option to include additional languages on your website, such as Afrikaans, Portuguese (Brazil), or French. Choose one language to be the default, typically the language your website is already in ans also select languages which is available is your website. Once selected, save the settings.
- Now you can go to
ARMember->General Settings. Here, scroll down to Language Settings section, and select the Languages from the Select dropdown to which you want to translate your ARMember Form on the Front-end apart from your default WordPress Language as you can already alter the Labels for your default Language by heading over toARMember->Manage Forms. Here in the Label Settings on the right you can alter the labels directly for your default language.
Configuring Multi-Language Add-on with Weglot :
- Firstly, Install and activate the Weglot Plugin on your WordPress site.
- After activation, you will be greeted with a setup Wizard that can help you set your languages and Weglot in general you can either opt for that or simply choose Not Right Now and then head over to
Original LanguagesandDestination Languages - From here you have the option to include additional languages on your website, such as Afrikaans, Portuguese (Brazil), or French. Choose one language to be the
Original Languages, typically the language your website is already in, andDestination Languagesthe language your website which will user can change the language of the website. Once selected, save the settings. - Now you can go to
ARMember->General Settings. Here, scroll down to Language Settings section, and select the Languages from the Select dropdown to which you want to translate your ARMember Form on the Front-end apart from your default WordPress Language as you can already alter the Labels for your default Language by heading over toARMember->Manage Forms. Here in the Label Settings on the right you can alter the labels directly for your default language.

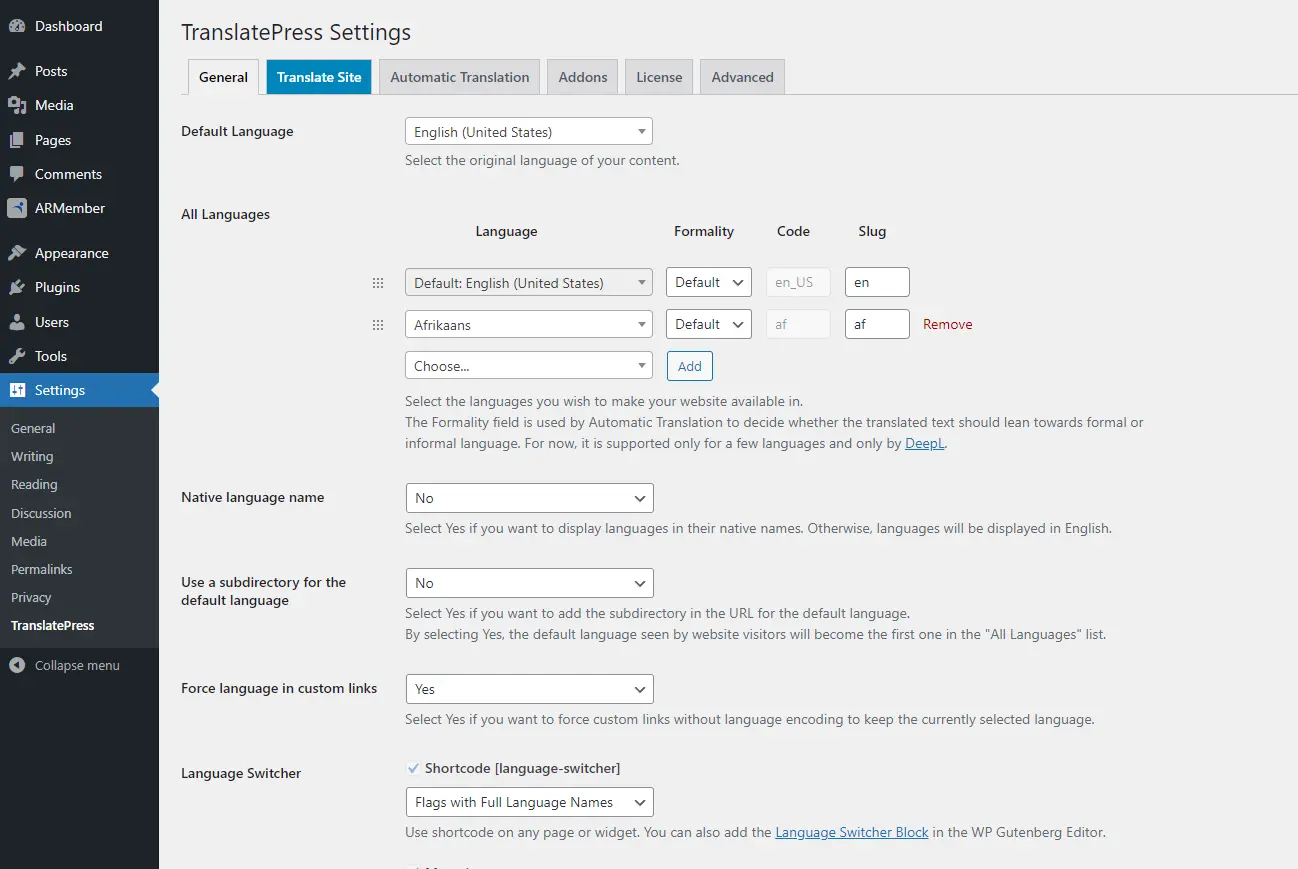
Configuring Multi-Language Add-on with TranslatePress:
- Firstly, Install and activate the Translate Multilingual sites – TranslatePress Plugin on your WordPress site.
- After activation, head over to
Settings->TranslatePress - From here you have the option to include additional languages on your website, such as Afrikaans, Portuguese (Brazil), or French. Choose one language to be the default, typically the language your website is already in. Once selected, save the settings.
- Now you can go to
ARMember->General Settings. Here, scroll down to Language Settings section, and select the Languages from the Select dropdown to which you want to translate your ARMember Form on the Front-end apart from your default WordPress Language as you can already alter the Labels for your default Language by heading over toARMember->Manage Forms. Here in the Label Settings on the right you can alter the labels directly for your default language.
Configuring Multi-Language Add-on with Polylang :
- Firstly, Install and activate the Polylang Plugin on your WordPress site.
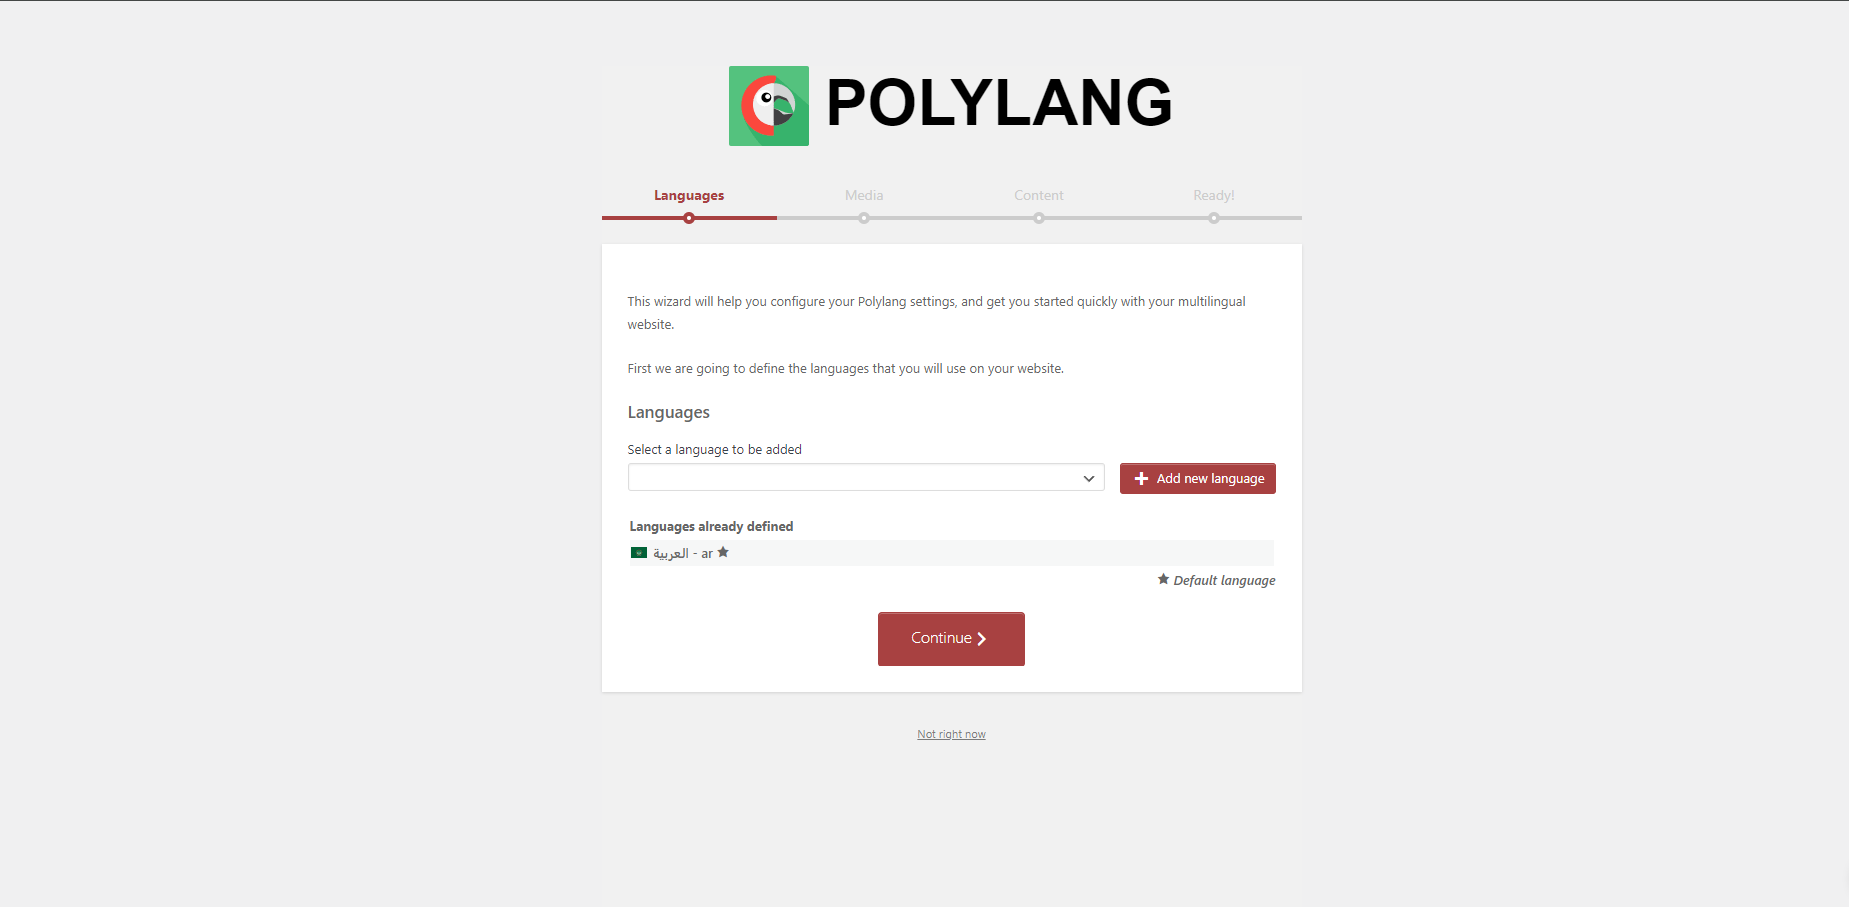
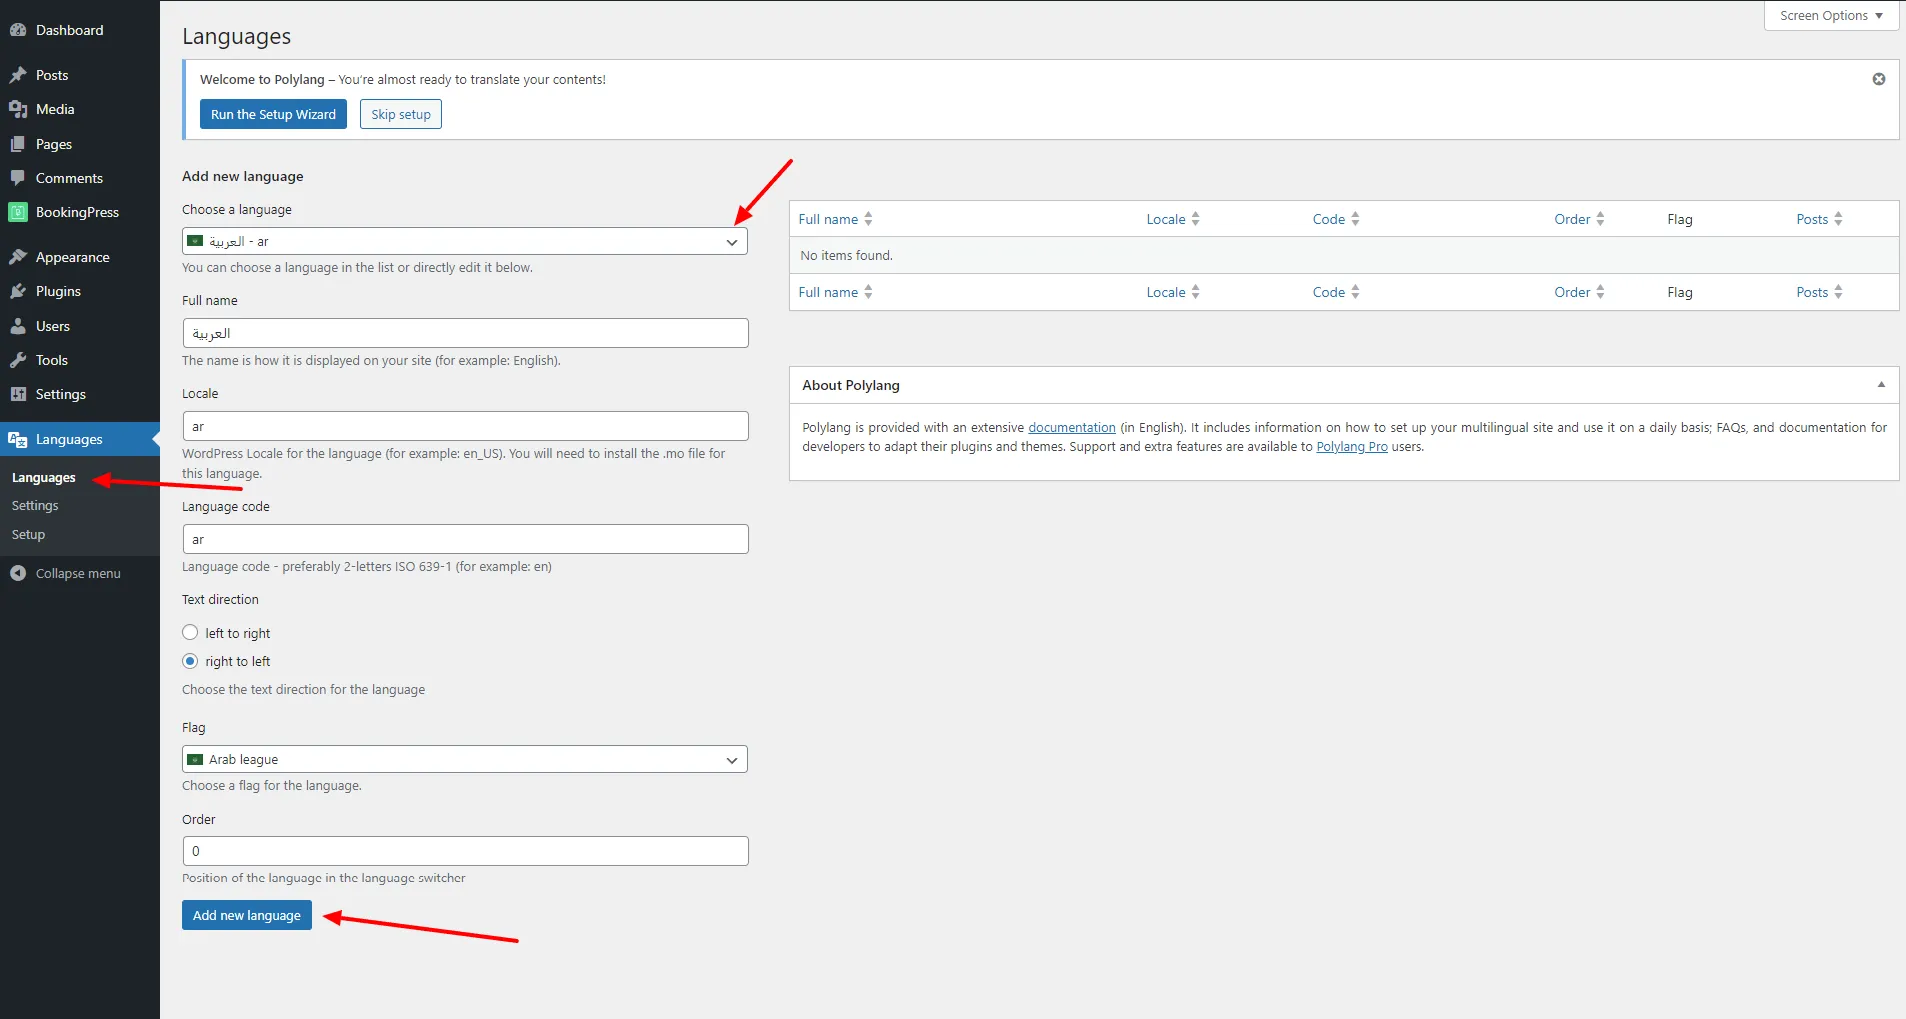
- After activation, you will be greeted with a setup Wizard that can help you set your languages and Polylang in general you can either opt for that or simply choose Not Right Now and then head over to
Languages->Languages - From here you have the option to include additional languages on your website, such as Afrikaans, Portuguese (Brazil), or French. Choose one language to be the default, typically the language your website is already in. Once selected, save the settings.
- Now you can go to
ARMember->General Settings. Here, scroll down to Language Settings section, and select the Languages from the Select dropdown to which you want to translate your ARMember Form on the Front-end apart from your default WordPress Language as you can already alter the Labels for your default Language by heading over toARMember->Manage Forms. Here in the Label Settings on the right you can alter the labels directly for your default language.
Configuring Multi-Language Add-on with WPGlobus :
- Firstly, Install and activate the WPGlobus Plugin on your WordPress site.
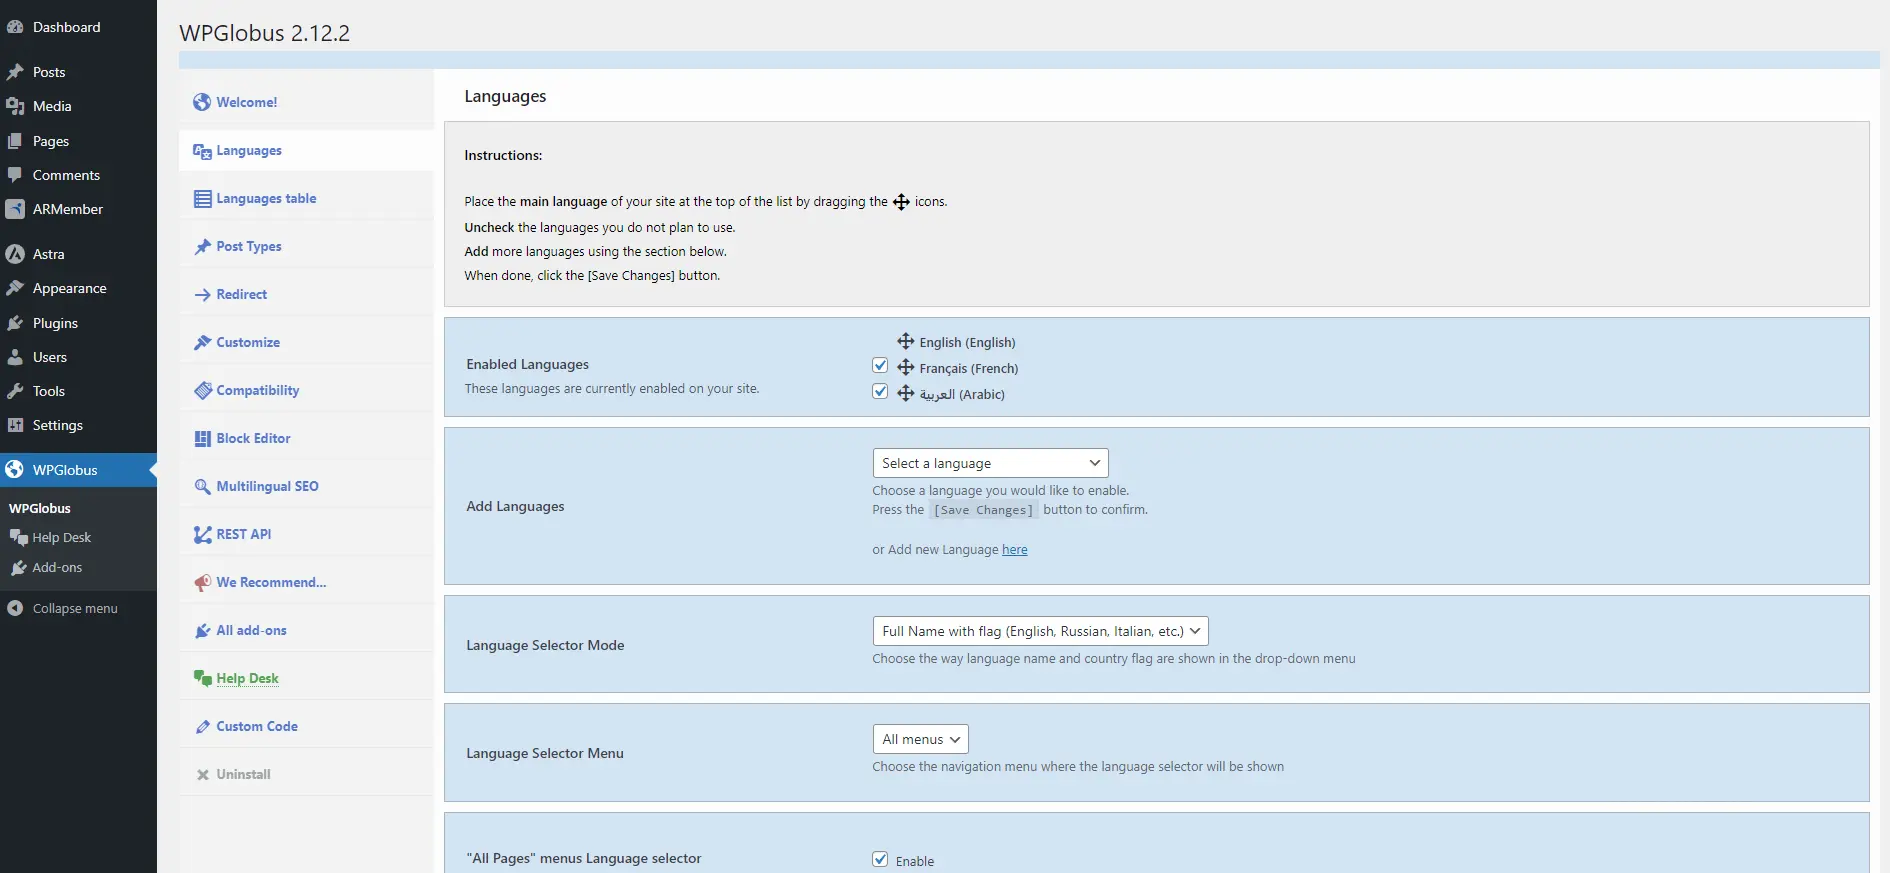
- After activation, head over to
WPGlobus->Languages - From here you have the option to include additional languages on your website, such as Afrikaans, Portuguese (Brazil), or French. Add languages from
Add languagesfor your website which will user can change the language of the website. Once selected, save the settings. - Now you can go to
ARMember->General Settings. Here, scroll down to Language Settings section, and select the Languages from the Select dropdown to which you want to translate your ARMember Form on the Front-end apart from your default WordPress Language as you can already alter the Labels for your default Language by heading over toARMember->Manage Forms. Here in the Label Settings on the right you can alter the labels directly for your default language.
Integration with ARMember
Configure Common Messages Settings In Multiple Languages
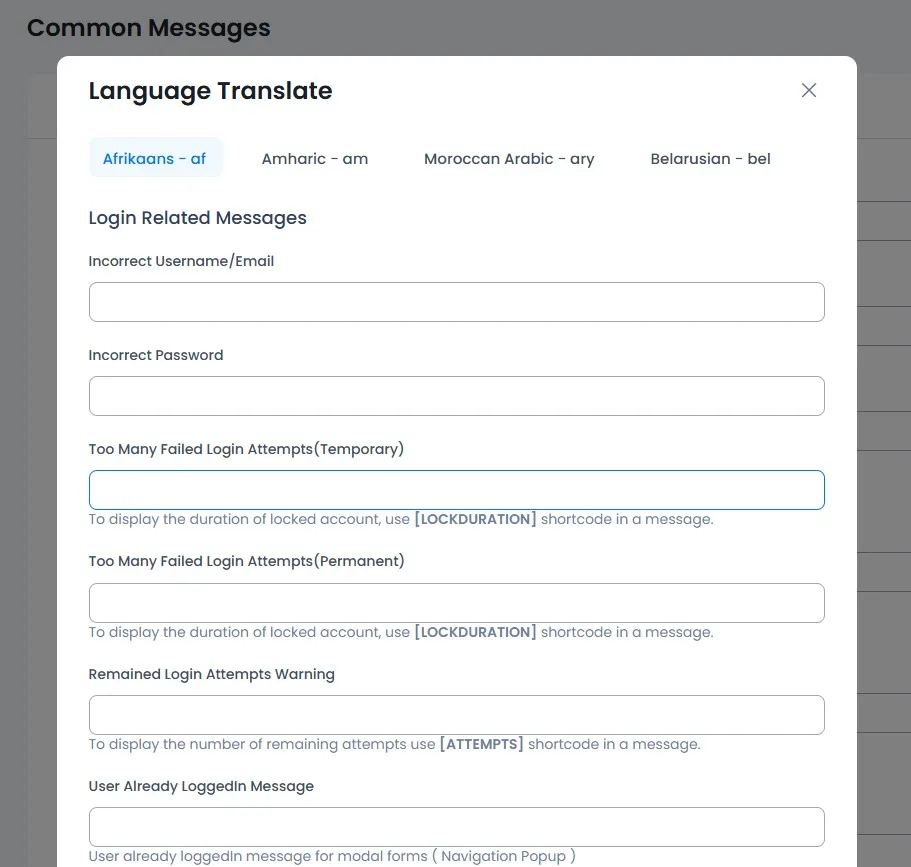
- To configure the Common Messages, go to
ARMember->General Settings->Common Messages. Here, click on the Translate button from the top right corner of the page, and you will be able to see a popup of Translation options on the center of the screen. - Now, select the Language and configure all the common messages in multiple languages as per your requirement and these messages will be displayed as per the languages of the website.
Configure Security Options Settings In Multiple Languages
- To configure the Security Options, go to
ARMember->General Settings->Security Options. Here, click on the Translate button from the top right corner of the page, and you will be able to see a popup of Translation options on the center of the screen. - Now, select the Language and configure all the security options in multiple languages as per your requirement and these messages will be displayed as per the languages of the website.

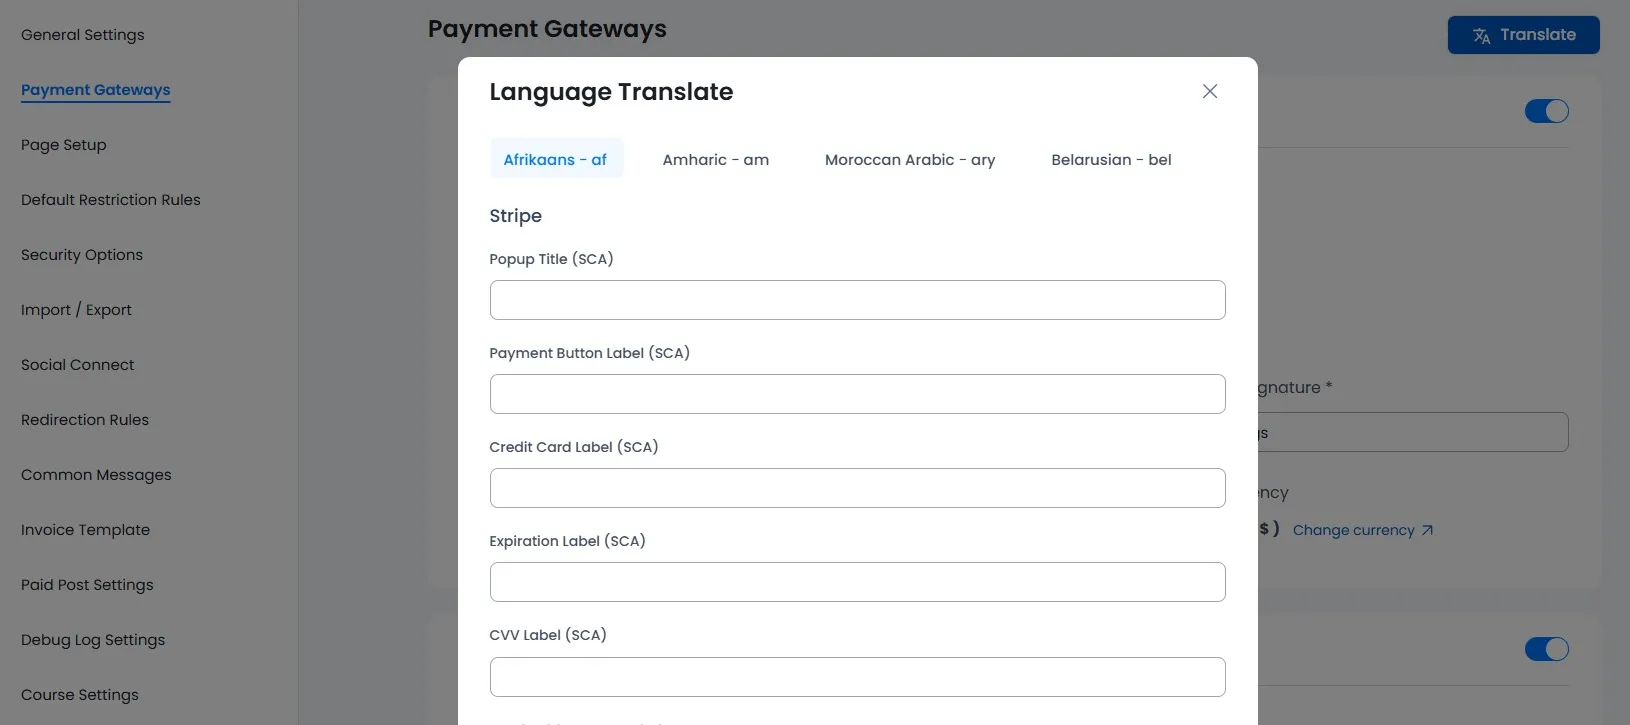
Configure Payment Gateways Settings In Multiple Languages
- To configure the Payment Gateways, go to
ARMember->General Settings->Payment Gateways. Here, click on the Translate button from the top right corner of the page, and you will be able to see a popup of Translation options on the center of the screen. - Now, select the Language and configure all the payment gateways in multiple languages as per your requirement and these messages will be displayed as per the languages of the website.
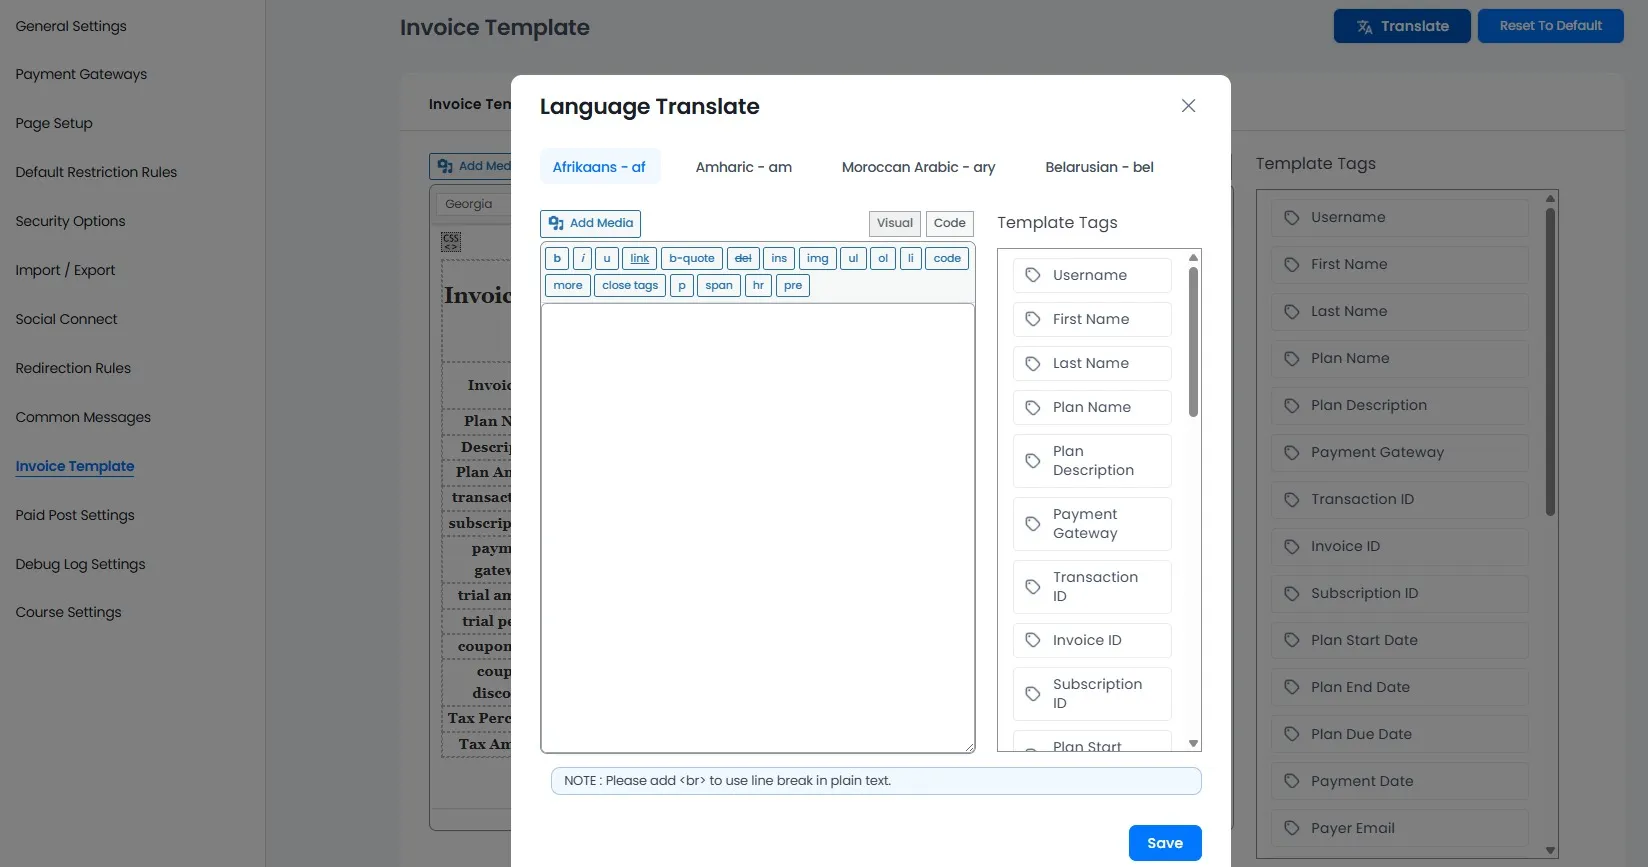
Configure Invoice Settings In Multiple Languages
- To configure the invoice settings, go to
ARMember->General Settings->Invoice Settings. Here, click on the Translate button from the top right corner of the page, and you will be able to see a popup of Translation options on the center of the screen. - Now, select the Language and configure all the invoice settings in multiple languages as per your requirement and these messages will be displayed as per the languages of the website.
Configure Email Notifications In Multiple Languages
- To configure the Email Notifications, go to
ARMember->Email Notifications->Add/Edit Email Notifications. Here, click on the Translate button from the top right corner of the page, and you will be able to see a popup of Translation options on the center of the screen. - Now, select the Language and configure all the email notifications in multiple languages as per your requirement and these messages will be displayed as per the languages of the website.
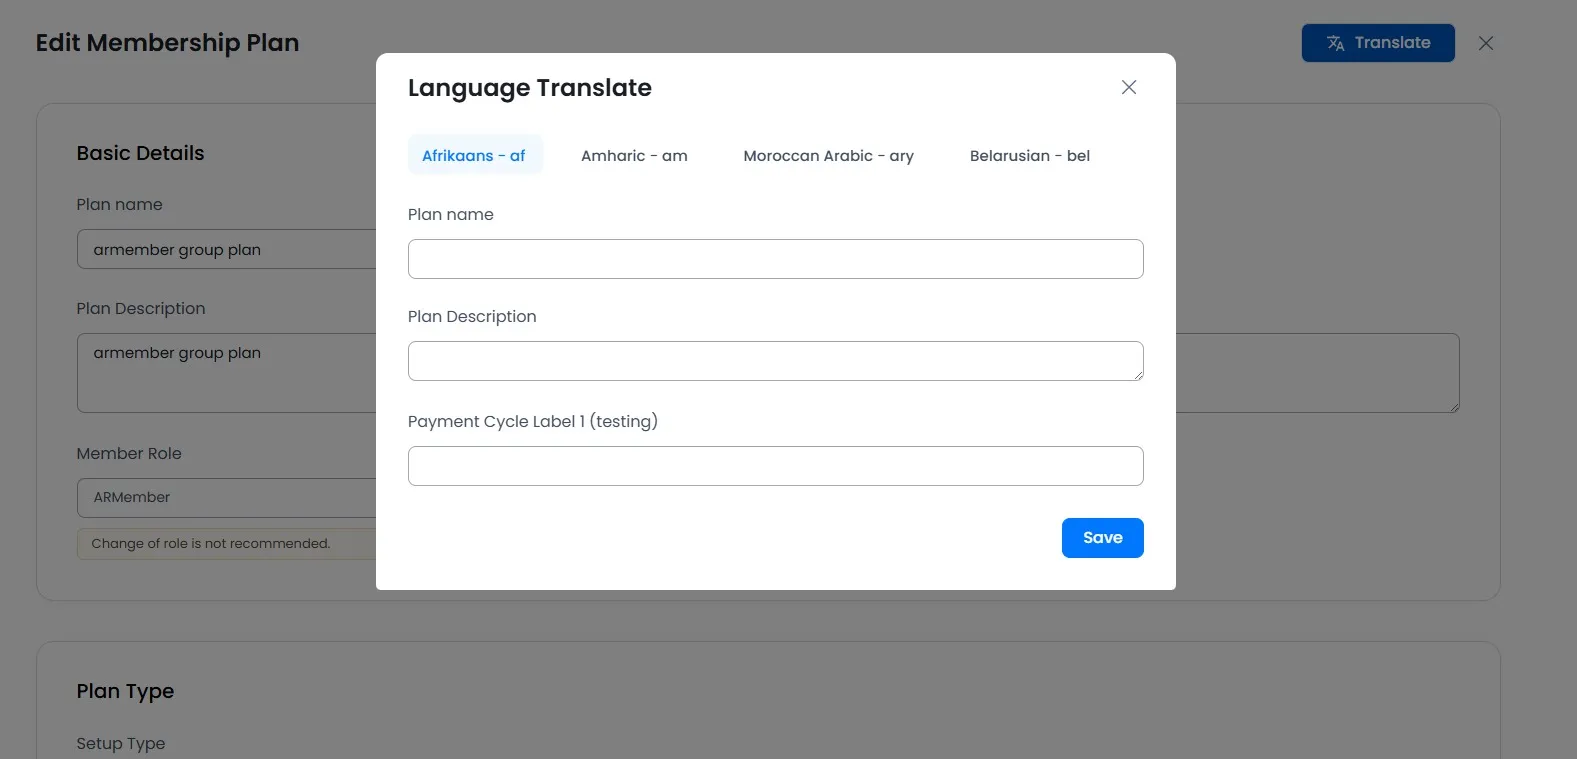
Configure Manage Plans In Multiple Languages
- To configure the Manage Plans, go to
ARMember->Manage Plans->Add/Edit Plans. Here, click on the Translate button from the top right corner of the page, and you will be able to see a popup of Translation options on the center of the screen. - Now, select the Language and configure all the fields of the plan in multiple languages as per your requirement and these messages will be displayed as per the languages of the website.
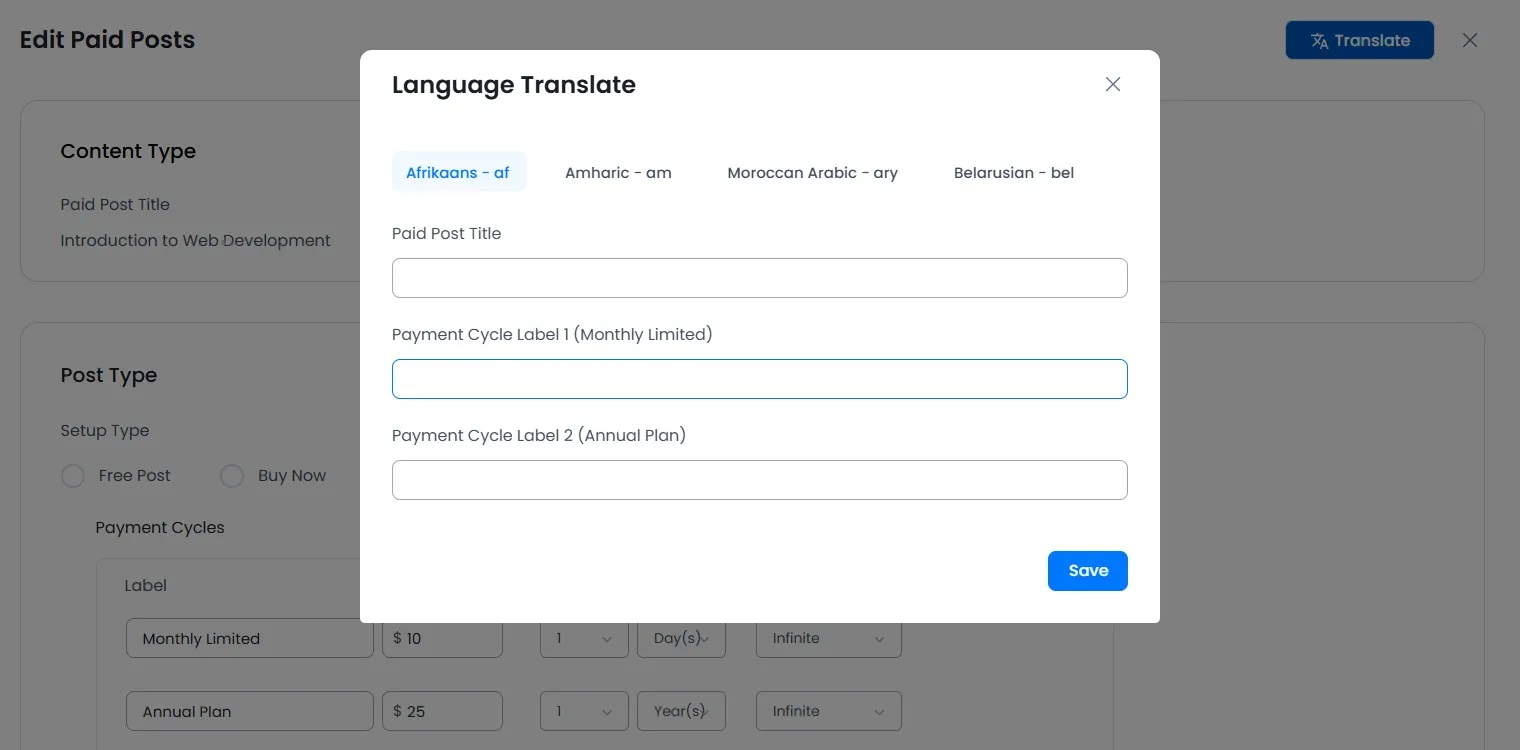
Configure Manage Paid Post In Multiple Languages
- To configure the Manage Paid Post, go to
ARMember->Manage Paid Post->Add/Edit Paid Post. Here, click on the Translate button from the top right corner of the page, and you will be able to see a popup of Translation options on the center of the screen. - Now, select the Language and configure all the fields of the plan in multiple languages as per your requirement and these messages will be displayed as per the languages of the website.
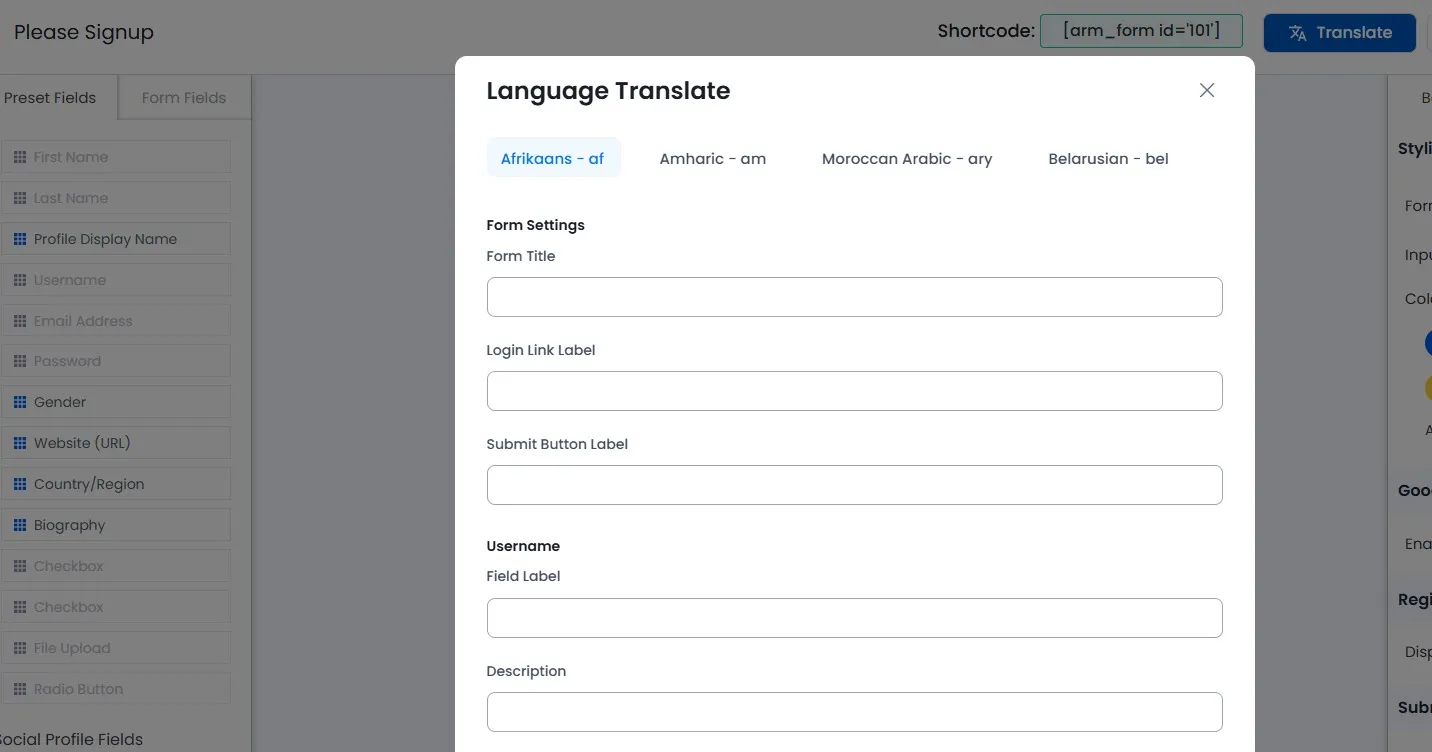
Configure Manage Forms In Multiple Languages
- To configure the Manage Forms, go to
ARMember->Manage Forms->Add/Edit Form. Here, click on the Translate button from the top right corner of the page, and you will be able to see a popup of Translation options on the center of the screen. - Now, select the Language and configure all the fields of the plan in multiple languages as per your requirement and these messages will be displayed as per the languages of the website.
Important Notes :
-
For the
Checkbox Radio ButtonsandDropdownoptions then need to follow for the Default LanguageOriginal LabelAnd For Other LanguagesTranslated Label:Original Labelformat. For example, if you want to translate theRadio Buttonwith options likeYesandNothen you need to follow the following format.
For Default LanguageYesNoAnd For OtherLanguages Translated Label:Yes Translated Label:No -
For the
Checkbox Radio ButtonsandDropdownoptions then need to follow for the Default LanguageOriginal Label:ValueAnd For Other LanguagesTranslated Label:Valueformat. For example, if you want to translate theRadio Buttonwith options likeYesandNothen you need to follow the following format.
For Default LanguageYes:1No:0And For Other LanguagesTranslated Label:1 Translated Label:0
Configure Preset Fields In Multiple Languages
- To configure the Preset Fields, please go to
ARMember->General Settings->General Options->Manage PresetForm Fields and click onEdit Preset Form Fields.
You can see langauge wise tab selection for Preset Fields. Default Language will be selected by default.Important Note: For the other than default language, if you change the label or string from the
General SettingspageEdit Preset Form Fieldsthen, it will automatically sync to theSignupandProfile Forms fieldstoo.
- Now, select the Language and configure all the fields of the form fields in multiple languages as per your requirement and these fields lables will be displayed as per the languages of the website.
Important Note: You can see the
Membership FieldsforMembership Card,Membership DirectoryandMember Profile Pageonly for other than default language.

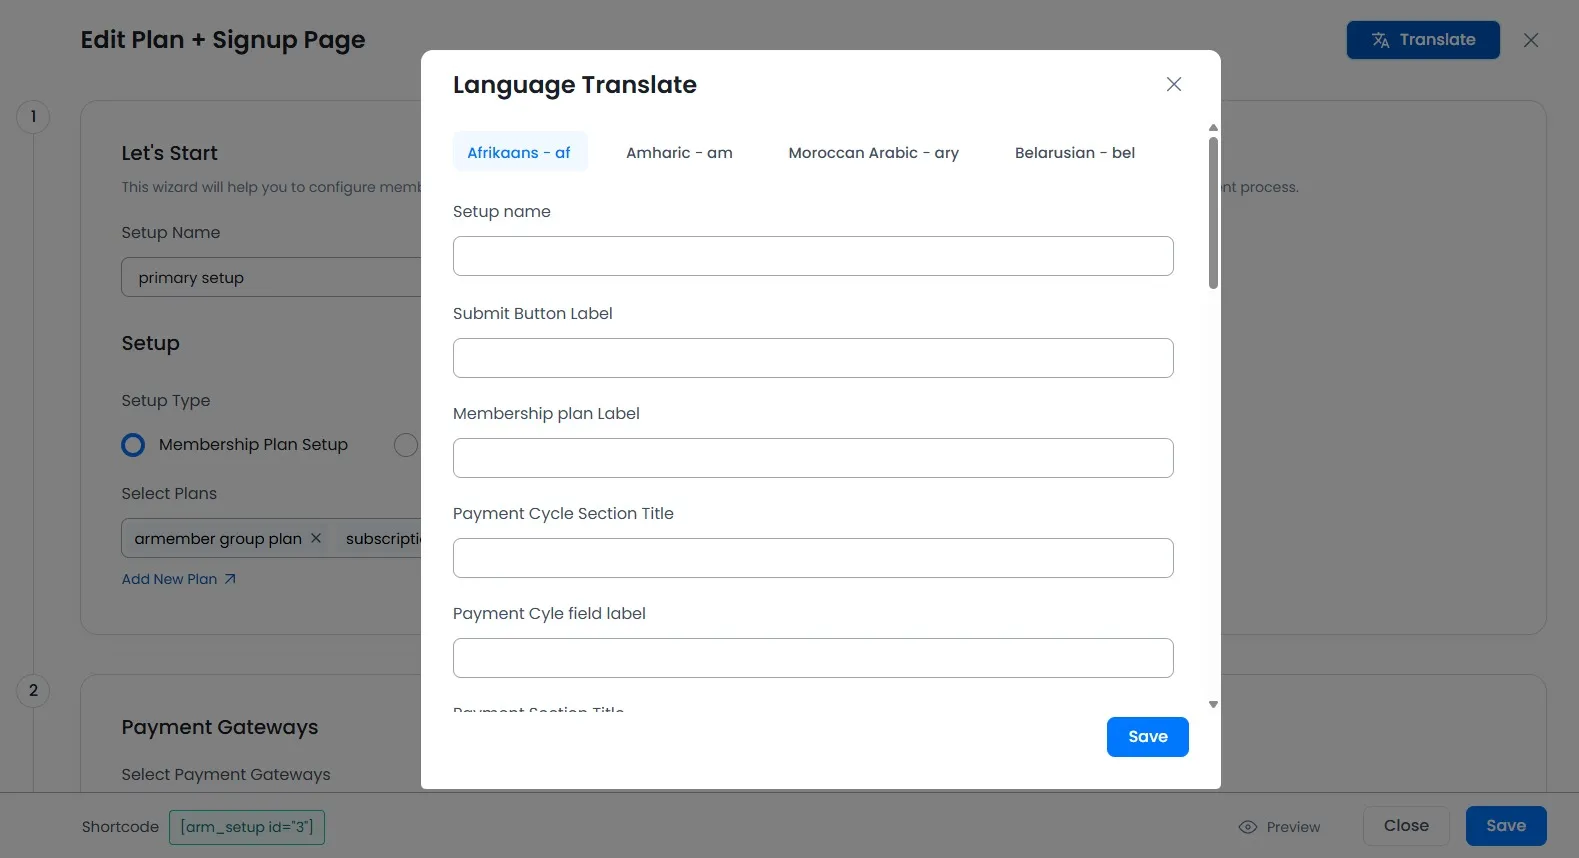
Configure Plan + Signup Page In Multiple Languages
- To configure the Configure Plan + Signup Page, go to
ARMember->Configure Plan + Signup Page->Add/Edit Configure Plan + Signup Page. Here, click on the Translate button from the top right corner of the page, and you will be able to see a popup of Translation options on the center of the screen. - Now, select the Language and configure all the fields of the plan in multiple languages as per your requirement and these messages will be displayed as per the languages of the website.
Integrations in Email Notifications
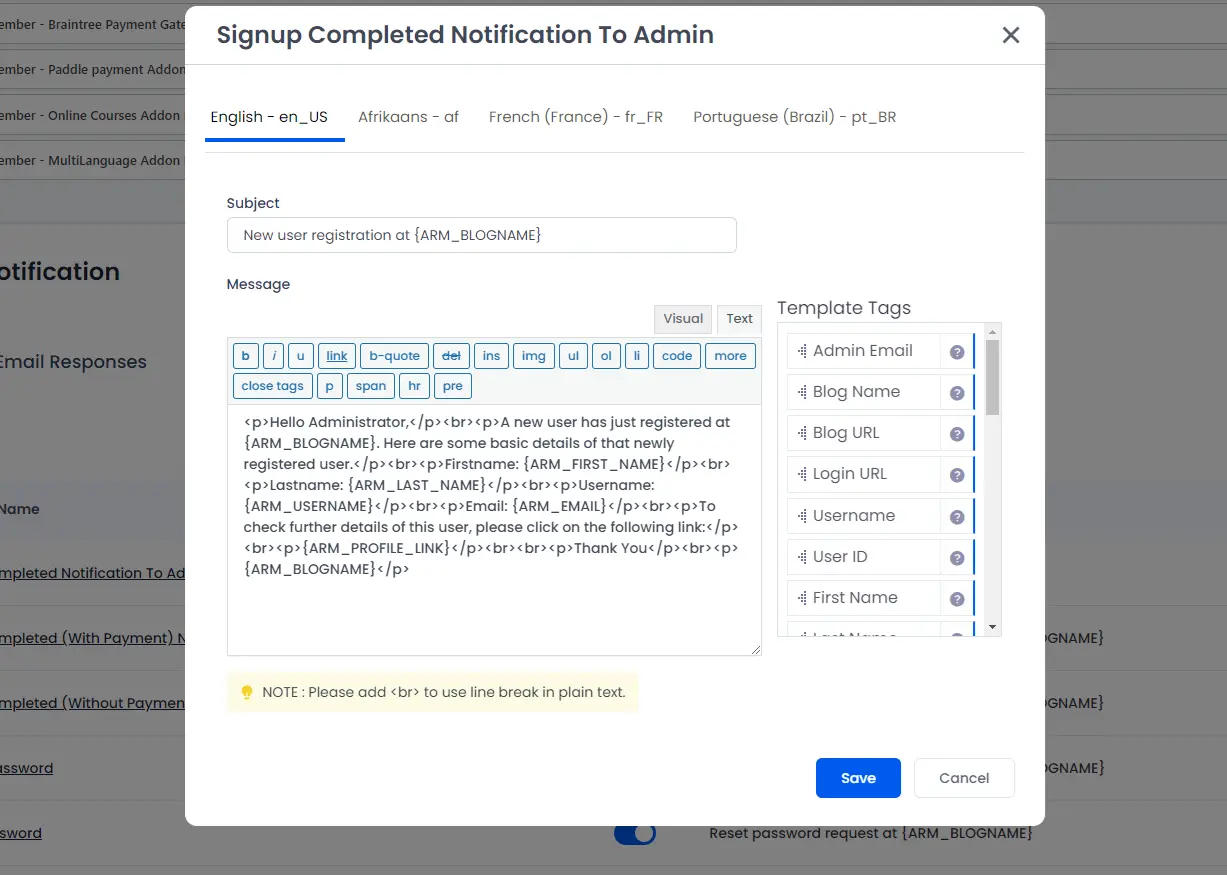
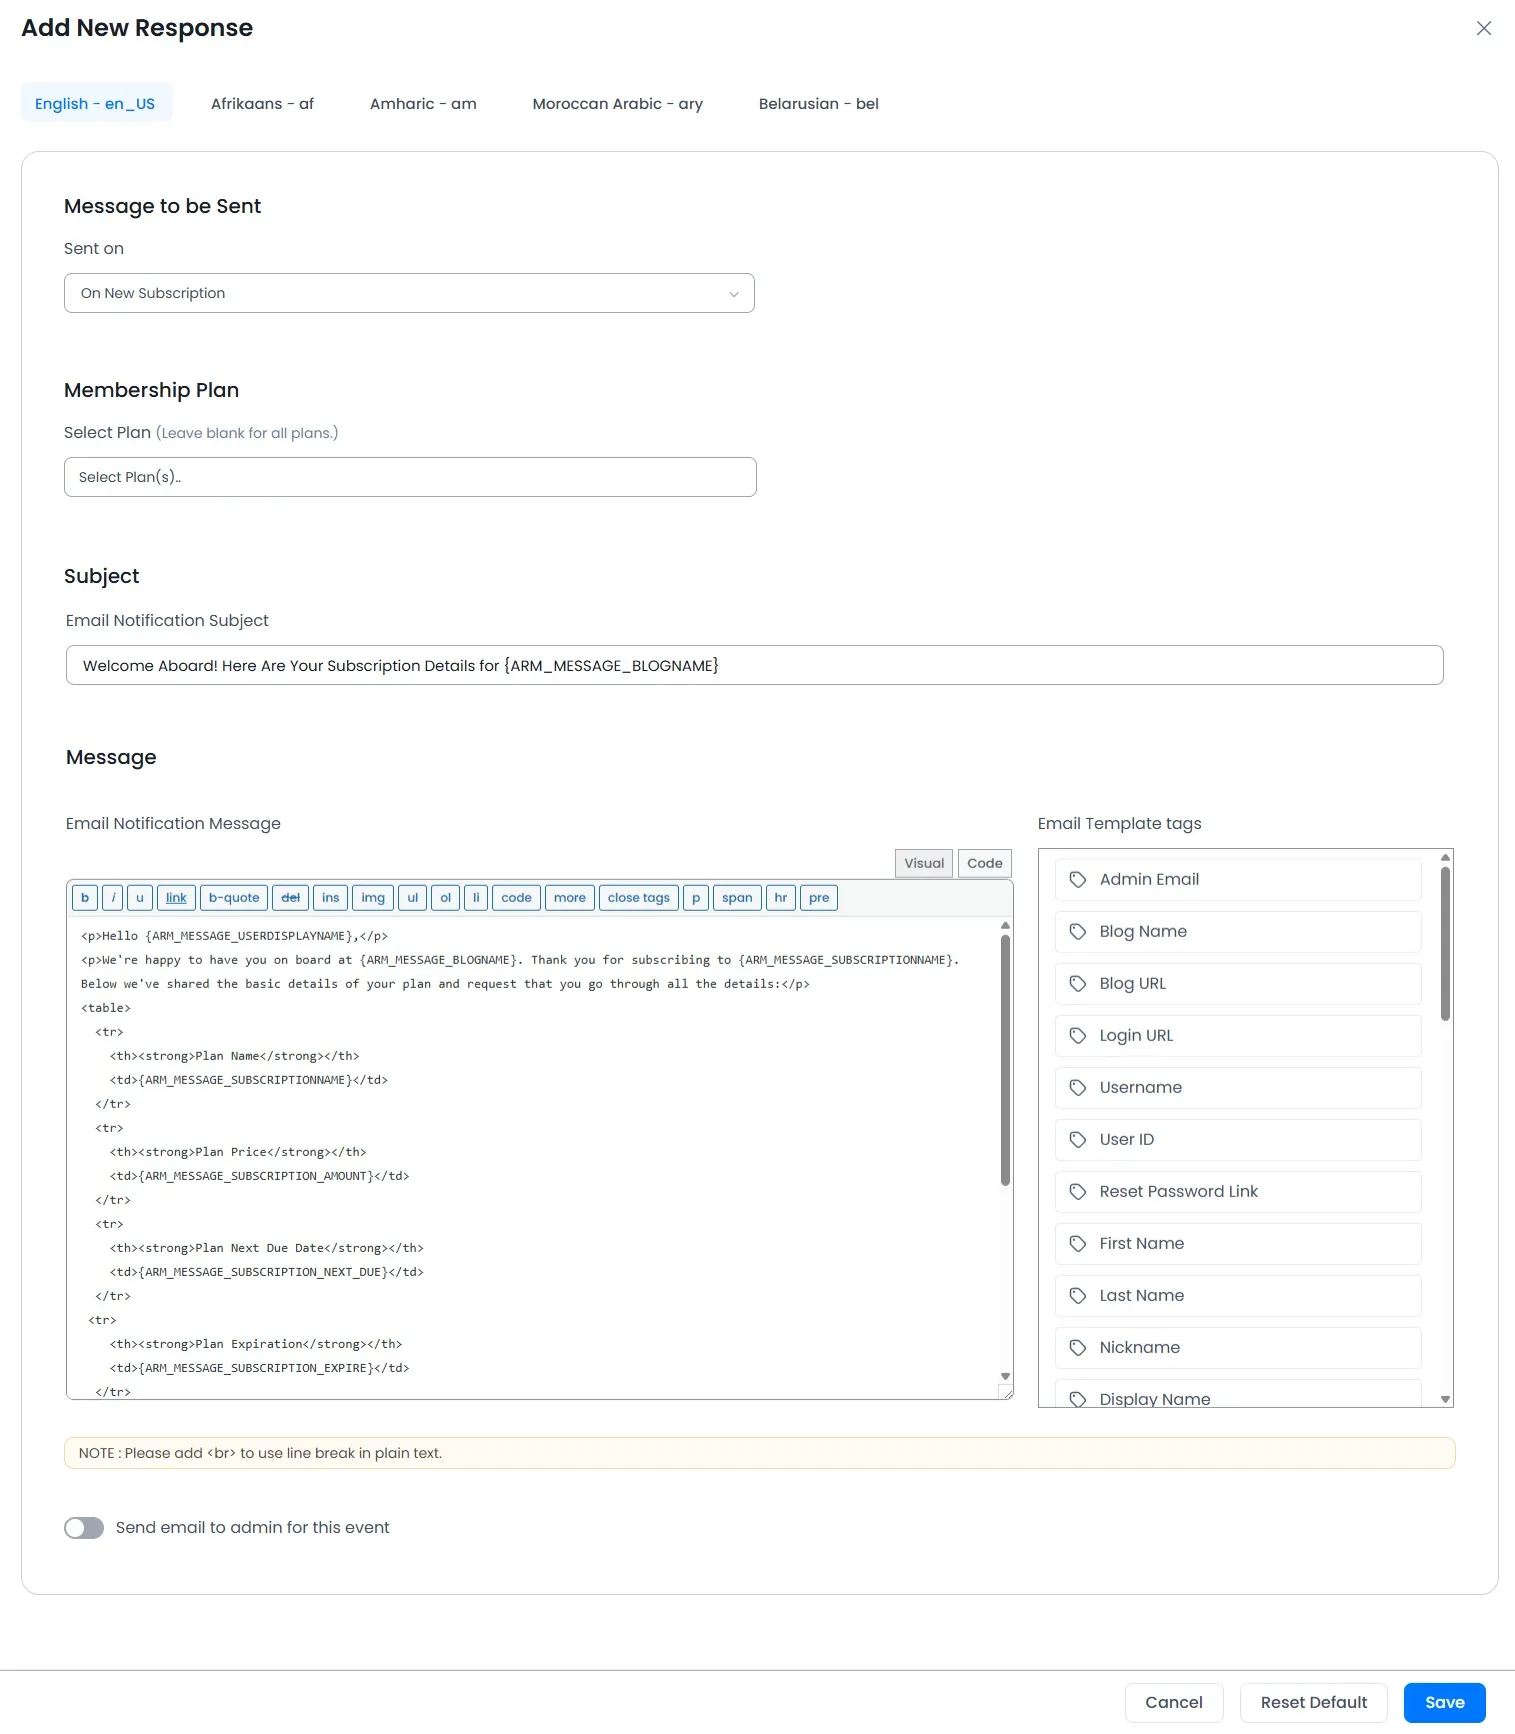
Configure Email Notifications In Multiple Languages
- To configure the Email Notifications, go to
ARMember->Email Notifications->Add/Edit Email Notifications. Here, click on the Translate button from the top right corner of the page, and you will be able to see a popup of Translation options on the center of the screen. - Now, select the Language and configure all the email notifications in multiple languages as per your requirement and these messages will be displayed as per the languages of the website.
Important Notes :
-
If you want to send mail to user in user specific language then you have to follow some specifications which is mentioned below.
-
In the
Manage Formspage, select the form and click onAdd/Edit Form. -
Then Add a new drop down box with the meta key select as arm_locale and set options as per installed languages and converstations are avaiable in your site with the help of ARMember Multi-Language Addon.
-
Here are the exmaple of arm_locale options.
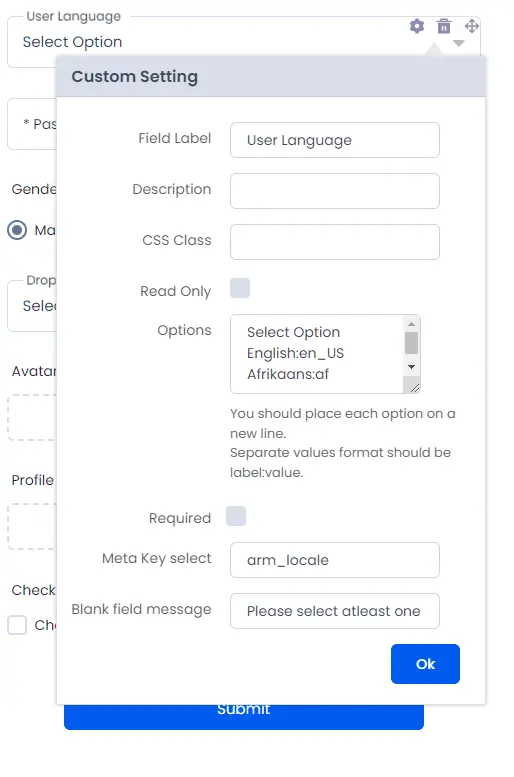
Note:You can set this field in Registration Form or Edit Profile Form
You can see available languages with language code in the ARMember Multi-Language Addon by clicking on Available Languages
Important Note: If you enable Send email to admin for this event and disable Set different email content for admin in the Automated Email Messages section while Add/Edit Email Response then the email content will just duplicate for the admin which means user and admin mail content will be same.
Available Languages In ARMember Multi-Language
| Language Name | Language Code |
|---|---|
| Afrikaans | af |
| Amharic | am |
| Aragonese | arg |
| Arabic | ar |
| Moroccan Arabic | ary |
| Assamese | as |
| South Azerbaijani | azb |
| Azerbaijani | az |
| Belarusian | bel |
| Bulgarian | bg_BG |
| Bengali (Bangladesh) | bn_BD |
| Tibetan | bo |
| Bosnian | bs_BA |
| Catalan | ca |
| Cebuano | ceb |
| Czech | cs_CZ |
| Welsh | cy |
| Danish | da_DK |
| German (Austria) | de_AT |
| German (Formal) | de_DE_formal |
| German (Switzerland) | de_CH |
| German | de_DE |
| German (Switzerland, Informal) | de_CH_informal |
| Lower Sorbian | dsb |
| Dzongkha | dzo |
| Greek | el |
| English (Australia) | en_AU |
| English (Canada) | en_CA |
| English (New Zealand) | en_NZ |
| English (South Africa) | en_ZA |
| English (UK) | en_GB |
| Esperanto | eo |
| Spanish (Colombia) | es_CO |
| Spanish (Costa Rica) | es_CR |
| Spanish (Venezuela) | es_VE |
| Spanish (Mexico) | es_MX |
| Spanish (Ecuador) | es_EC |
| Spanish (Peru) | es_PE |
| Spanish (Dominican Republic) | es_DO |
| Spanish (Uruguay) | es_UY |
| Spanish (Chile) | es_CL |
| Spanish (Puerto Rico) | es_PR |
| Spanish (Guatemala) | es_GT |
| Spanish (Argentina) | es_AR |
| Spanish (Spain) | es_ES |
| Estonian | et |
| Basque | eu |
| Persian | fa_IR |
| Persian (Afghanistan) | fa_AF |
| Finnish | fi |
| French (Belgium) | fr_BE |
| French (France) | fr_FR |
| French (Canada) | fr_CA |
| Friulian | fur |
| Frisian | fy |
| Scottish Gaelic | gd |
| Galician | gl_ES |
| Gujarati | gu |
| Hazaragi | haz |
| Hebrew | he_IL |
| Hindi | hi_IN |
| Croatian | hr |
| Upper Sorbian | hsb |
| Hungarian | hu_HU |
| Armenian | hy |
| Indonesian | id_ID |
| Icelandic | is_IS |
| Italian | it_IT |
| Japanese | ja |
| Javanese | jv_ID |
| Georgian | ka_GE |
| Kabyle | kab |
| Kazakh | kk |
| Khmer | km |
| Kannada | kn |
| Korean | ko_KR |
| Kurdish (Sorani) | ckb |
| Kyrgyz | kir |
| Lao | lo |
| Lithuanian | lt_LT |
| Latvian | lv |
| Macedonian | mk_MK |
| Malayalam | ml_IN |
| Mongolian | mn |
| Marathi | mr |
| Malay | ms_MY |
| Myanmar (Burmese) | my_MM |
| Norwegian (Bokmål) | nb_NO |
| Nepali | ne_NP |
| Norwegian (Nynorsk) | nn_NO |
| Occitan | oci |
| Panjabi (India) | pa_IN |
| Polish | pl_PL |
| Pashto | ps |
| Portuguese (Portugal) | pt_PT |
| Portuguese (Angola) | pt_AO |
| Portuguese (Portugal, AO90) | pt_PT_ao90 |
| Portuguese (Brazil) | pt_BR |
| Rohingya | rhg |
| Romanian | ro_RO |
| Russian | ru_RU |
| Sakha | sah |
| Sindhi | snd |
| Sinhala | si_LK |
| Slovak | sk_SK |
| Saraiki | skr |
| Slovenian | sl_SI |
| Albanian | sq |
| Serbian | sr_RS |
| Swedish | sv_SE |
| Swahili | sw |
| Silesian | szl |
| Tamil (India) | ta_IN |
| Tamil (Sri Lanka) | ta_LK |
| Telugu | te |
| Thai | th |
| Tagalog | tl |
| Turkish | tr_TR |
| Tatar | tt_RU |
| Tahitian | tah |
| Uighur | ug_CN |
| Ukrainian | uk |
| Urdu | ur |
| Uzbek | uz_UZ |
| Vietnamese | vi |
| Chinese (China) | zh_CN |
| Chinese (Taiwan) | zh_TW |
| Chinese (Hong Kong) | zh_HK |