

Important Note: This Addon will only work if ARMember plugin is installed with version 6.9 or higher
Omnisend is an all-in-one marketing automation platform designed specifically for businesses. It helps online website owners to create, manage, and optimize their marketing campaigns across various channels, including email.
This Addon will allow you to add all users of your membership website into Omnisend Contacts, who will register using ARMember Registration Form.
This Addon does not just add users to Omnisend Contacts but also facilitates you to add users in specific Omnisend Segments. Also, You will be allowed to add users, who will register from different Sign Up Forms used for different purposes, into in different Omnisend Segments.
ARMember – Omnisend Addon Key Features:
- Easy Installation And Setup
- Easily Create Contact in Omnisend when New User will register using ARMember Registration Form
- Easily Assign New User to particular Omnisend Segment
- Assign Different Segments to Users who will register using Different Sign Up Forms
Steps For Installation And Activation
ARMember – Omnisend Addon requires ARMember Plugin installed and active. You can install this Addon in following two ways.
New installation via FTP
- Download Addon and extract it. You will find a directory armemberomnisend.
- In your WordPress installation directory, upload armemberomnisend to
wp-content/plugins/ - Activate the
ARMember - Omnisend Addonthrough thePluginsmenu from WordPress admin panel.
New installation via the WordPress Uploader
- Download Addon.
- Log in to your WordPress admin panel
- Go to
Plugins->Add New->Upload - Click on “choose file” and browse the download package. When the Addon uploads successfully, click on
Activate Plugin.
Steps to Set up Omnisend For Your Website
Lets setup ARMember – Omnisend Addon for your website :
-
When Addon is activated, Omnisend section will be displayed in
ARMember->General Settings->Opt-ins. Please note that opt-ins tab will be displayed only if Opt-ins module is activated under Addons.Please see below screen.

-
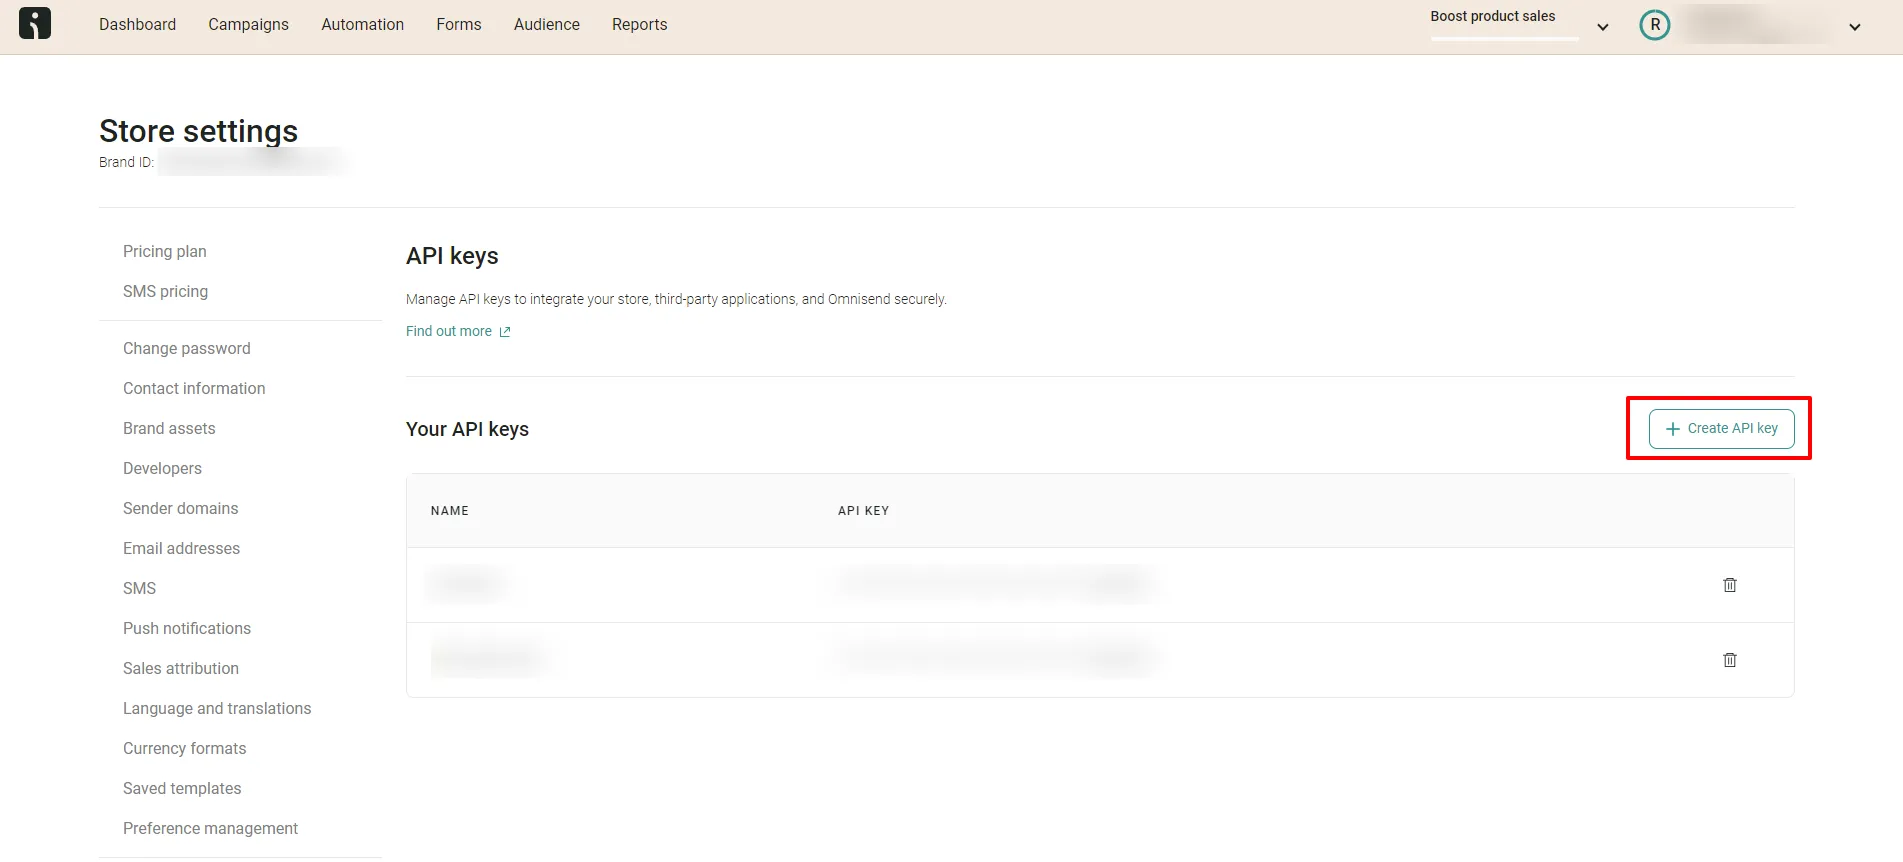
Get an API Key for Omnisend
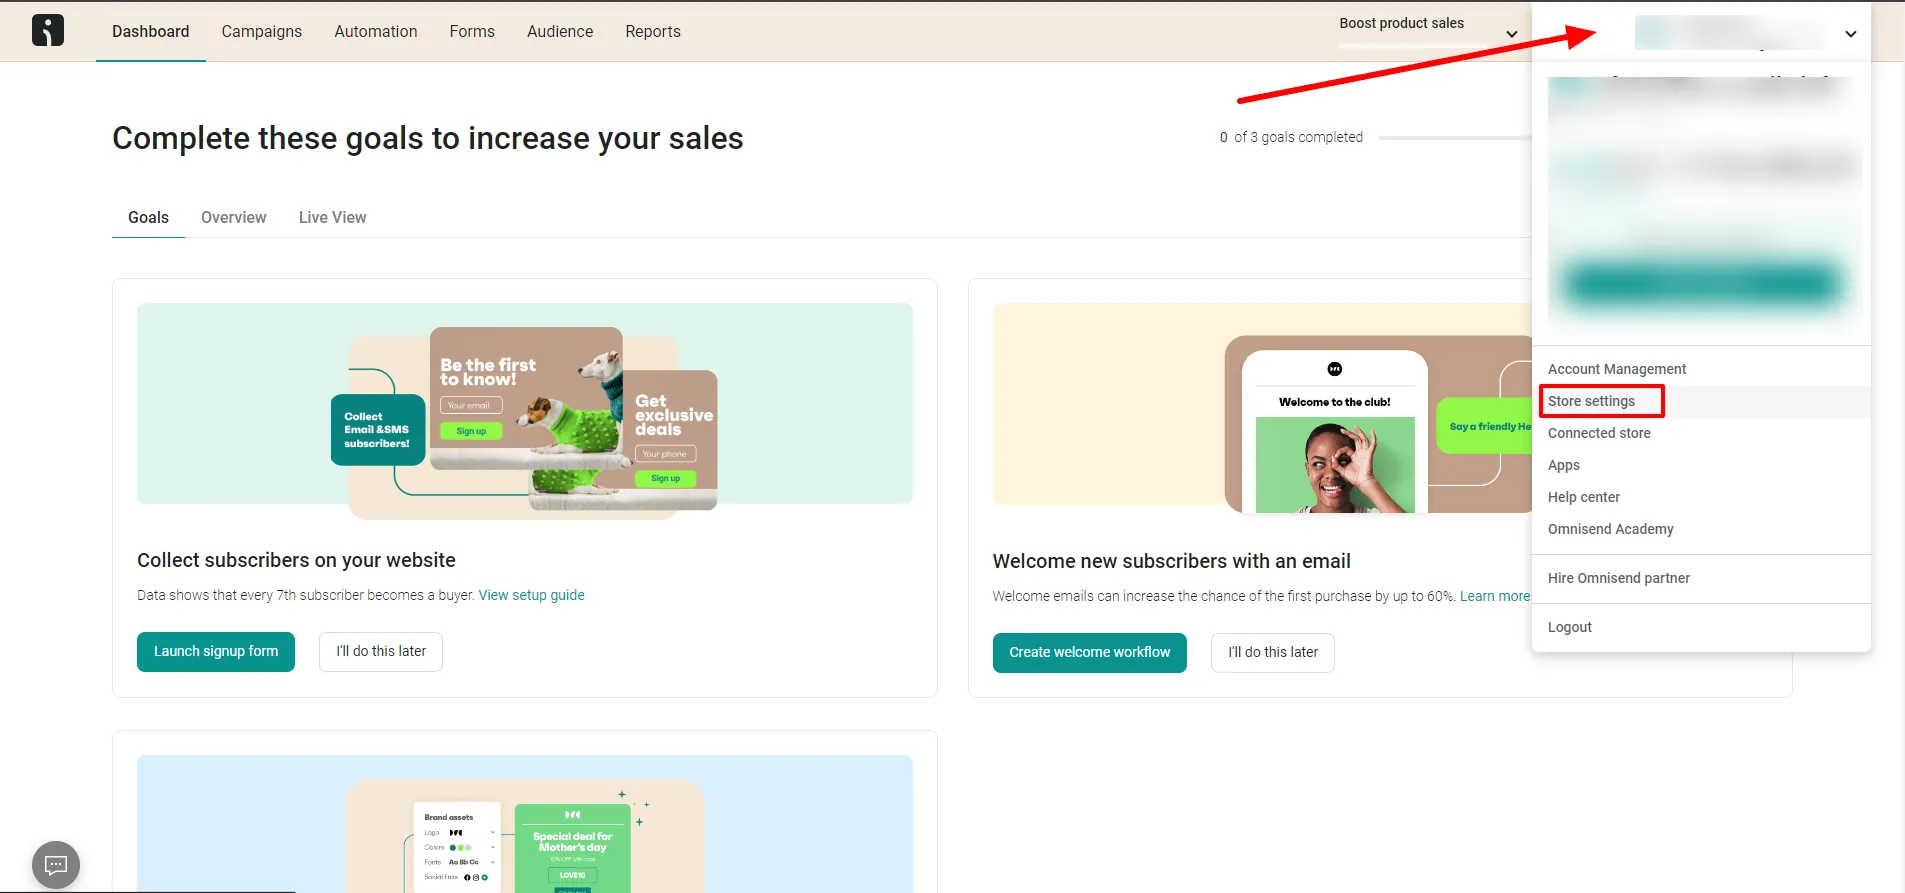
- Login into Omnisend, if you haven’t created an account, you can create one here.
- To generate an API key, simply click on your Profile on the top right.
- Select Store settings.
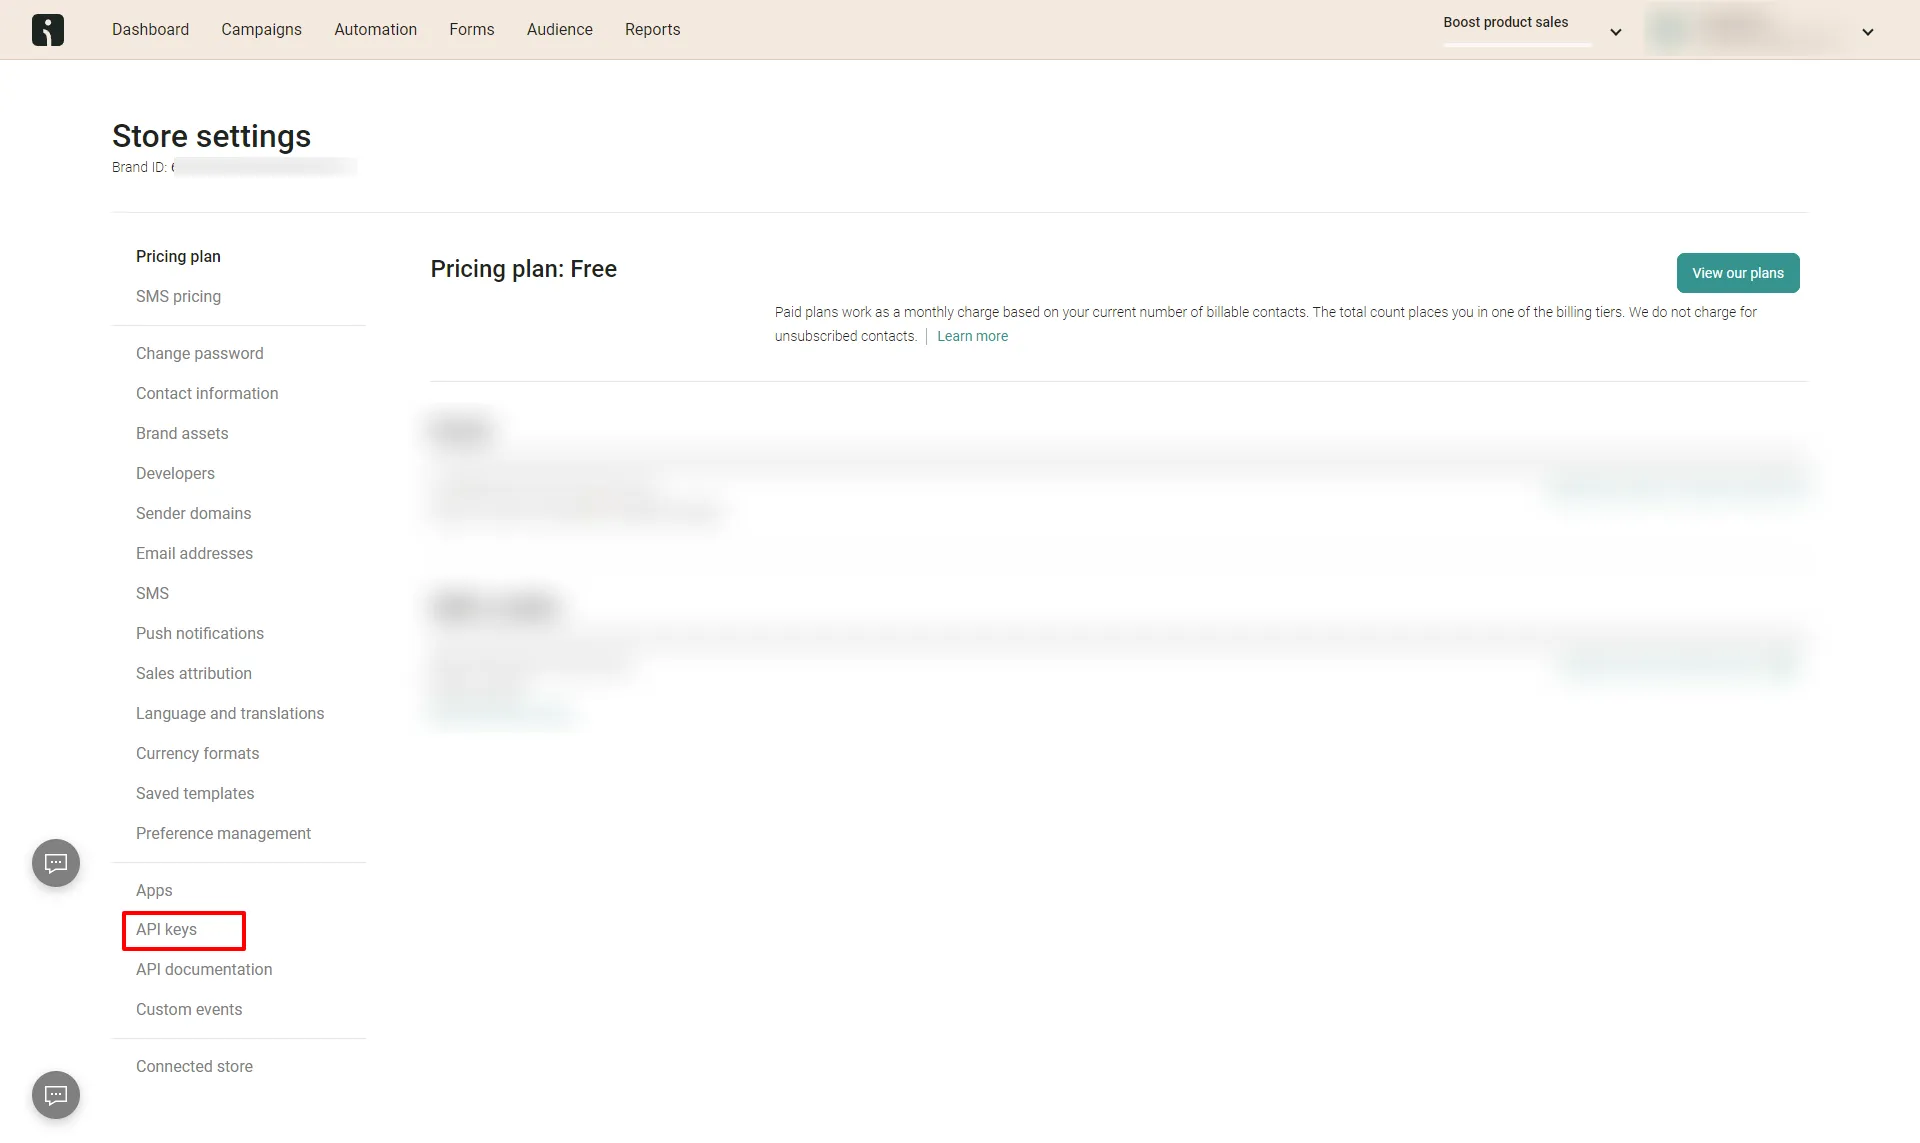
- Here on the left, you can see the Profile menu and click on API keys.
- You will now see your created API keys here. To create a new one, simply click on the “+ Create API key” button
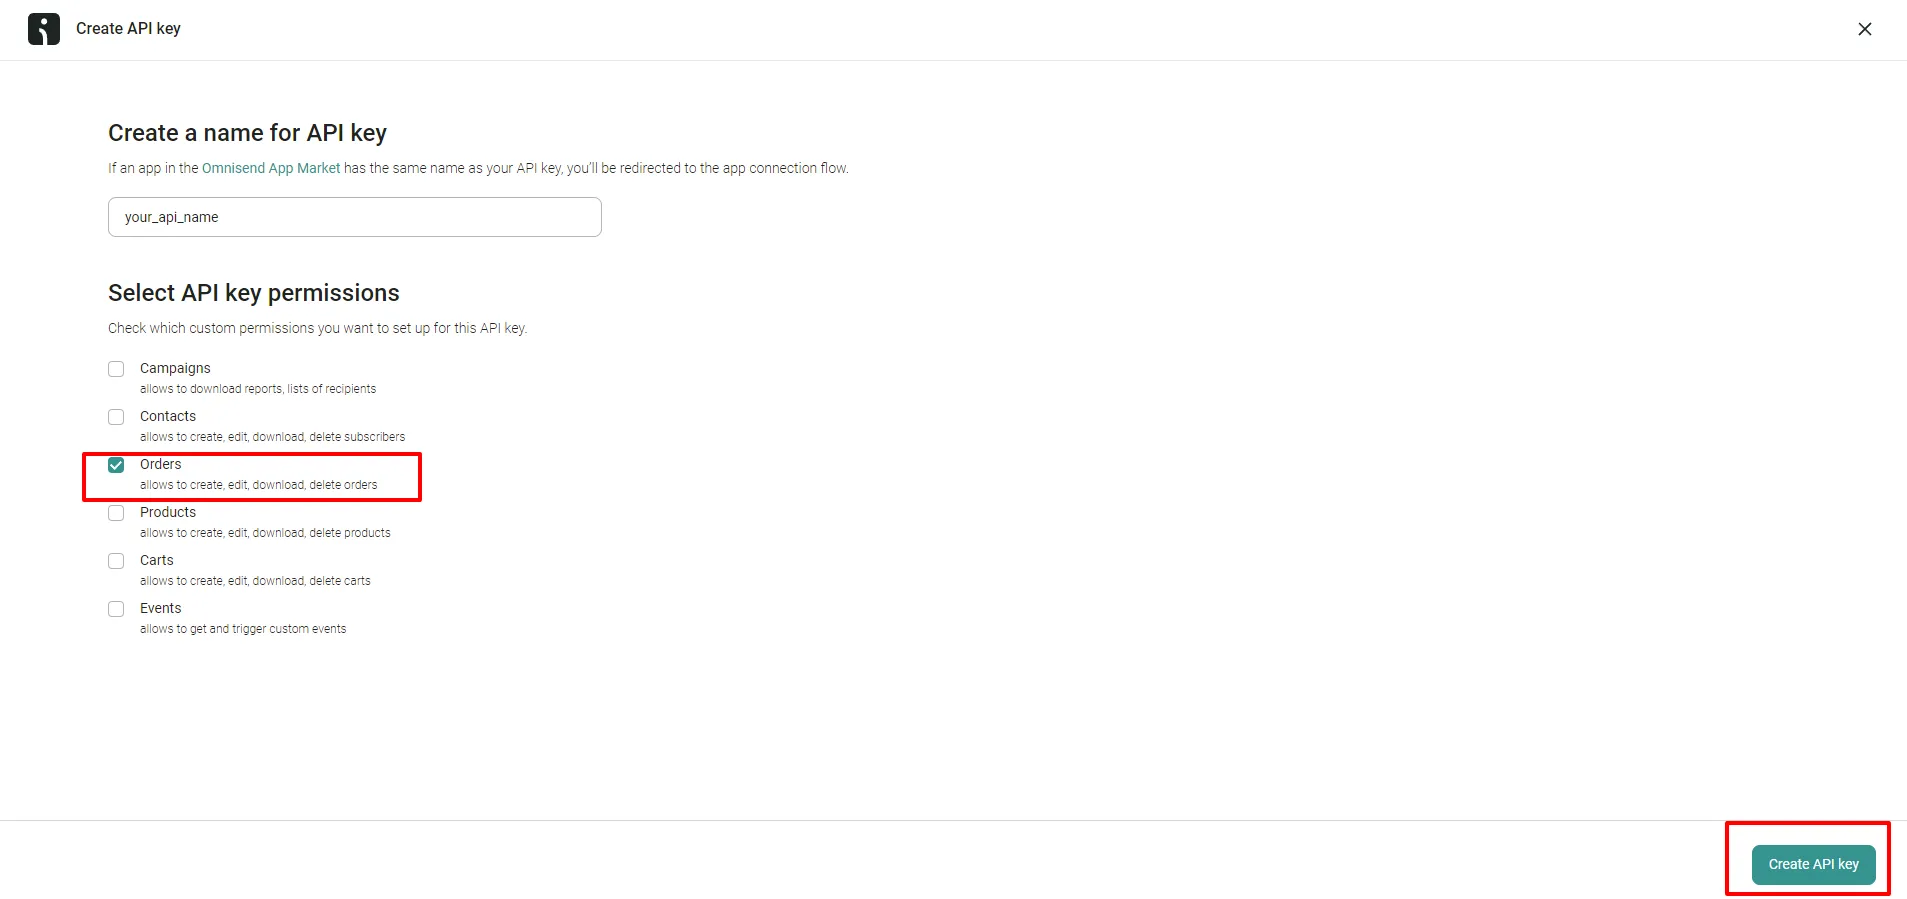
- Here, enter your desired name for the key.
- When it comes to key permissions, make sure to select only orders and keep the remaining of them unchecked.
- Once you are done, simply click on the Create API key button present on the bottom right.
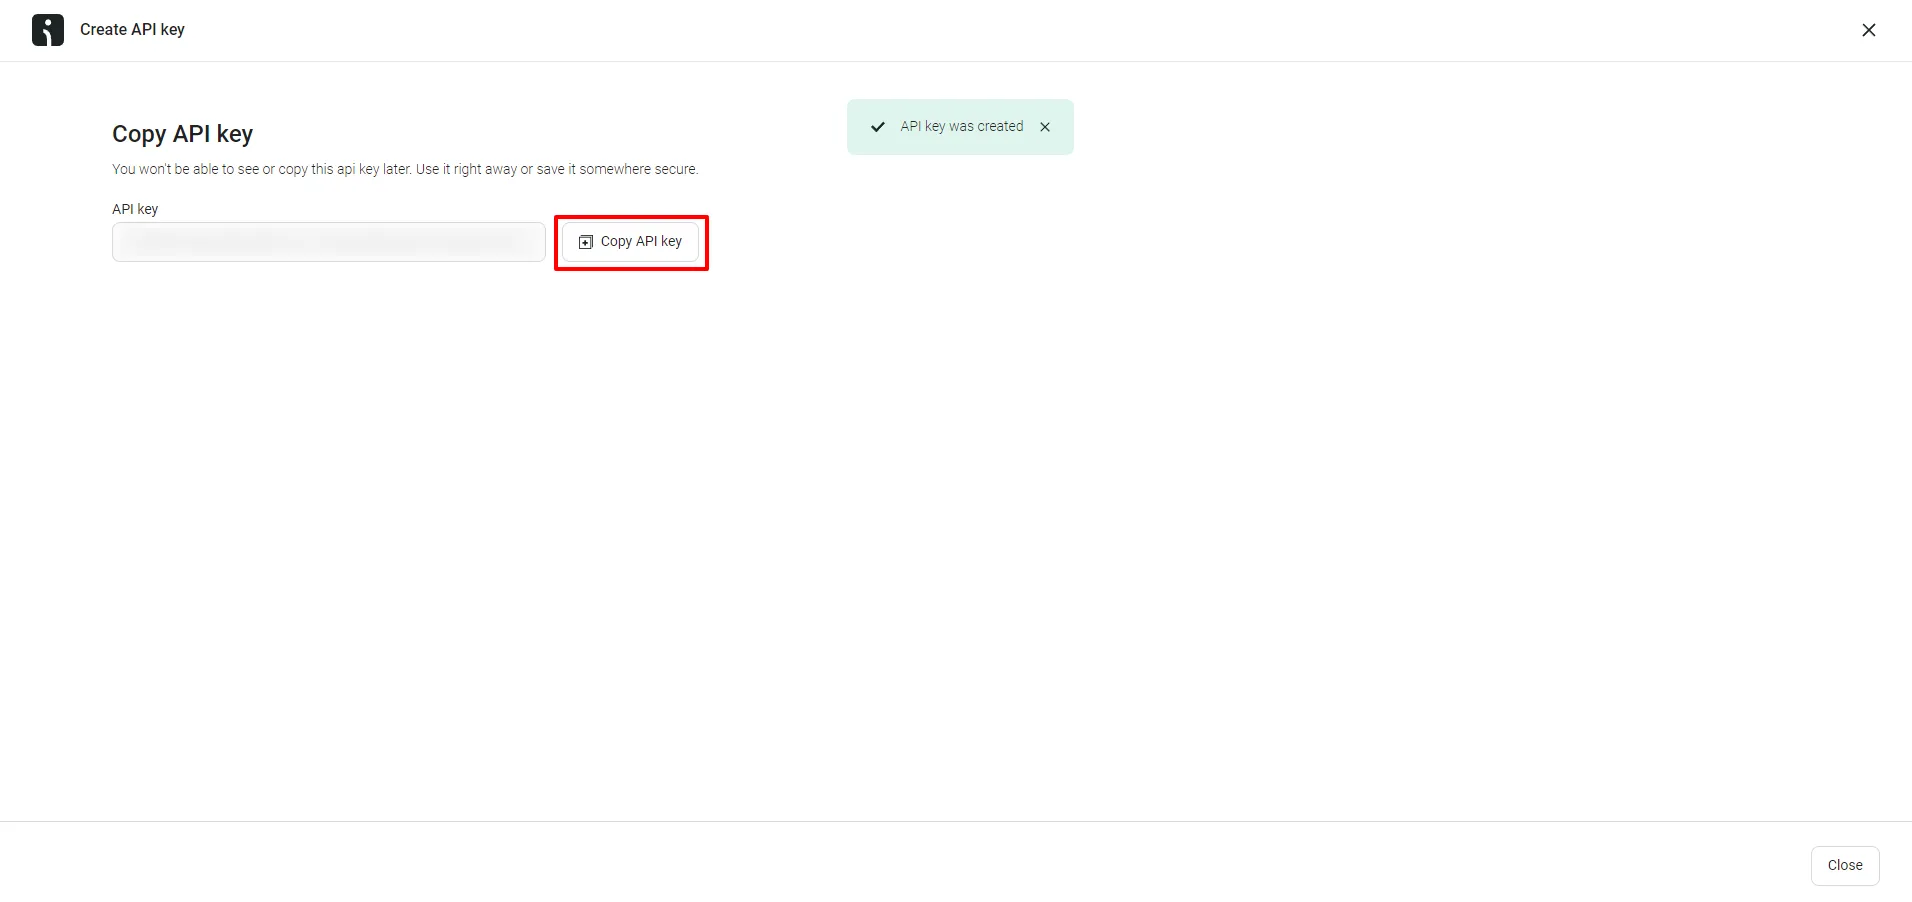
- You have your API key, make sure to copy this key and keep it at some secure place as you won’t be able to view the same key again.


-
After getting an API Key from Omnisend, enter the Key value in the API key field under Omnisend Section on the Opt-ins Configuration page, and Click on the verify link.
-
If is verified successfully, then it will give success message, and add Map Form Fields switch and Membership Plan switch.
-
If Map Form Fields switch enable, You can add a ARMember form fields in omnisend custom field by mapped details.
If Membership Plan switch enable, Membership Plan value add “armember_membership_plan” Omnisend Custom Property.
Sync Contacts button will add/update the omnisend contacts with the members currently included on the
ARMember->Manage Memberspage and all the mapped details will be updated. -
After save the Opt-ins Configuration by click on save button at the end to save the Omnisend details.
You can delete the Omnisend configuration by click on Delete Configuration, after Delete Configuration save the Opt-ins Configuration page.
-
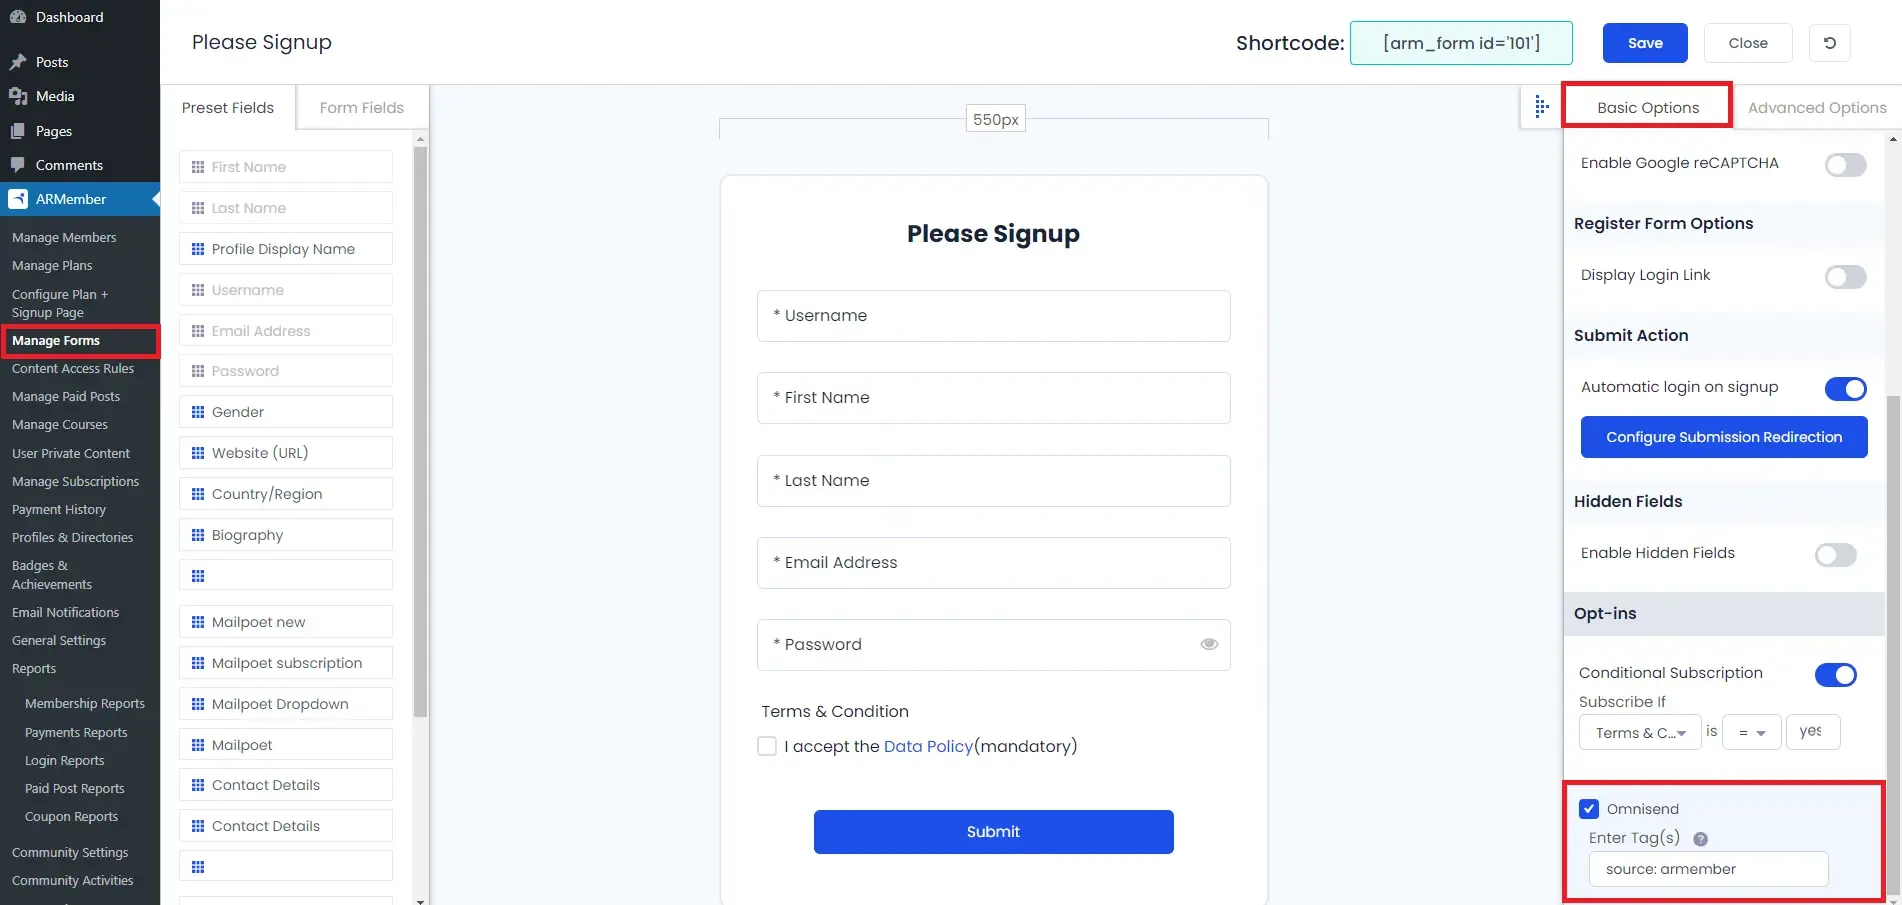
After setup completes, go to Manage Forms page, then click on edit link of your Registration Form. You can see Omnisend checkbox under Opt-ins in Right panel.

-
Enter a comma separate tag in which you want to assign to your website users who will register using this registration form.
Click Save Button.
-
If your website have more than one Registration Forms for different purposes, you can set different Tags for different forms and can manage your users in Omnisend easily.
Click Save Button. Now All is Set.
-
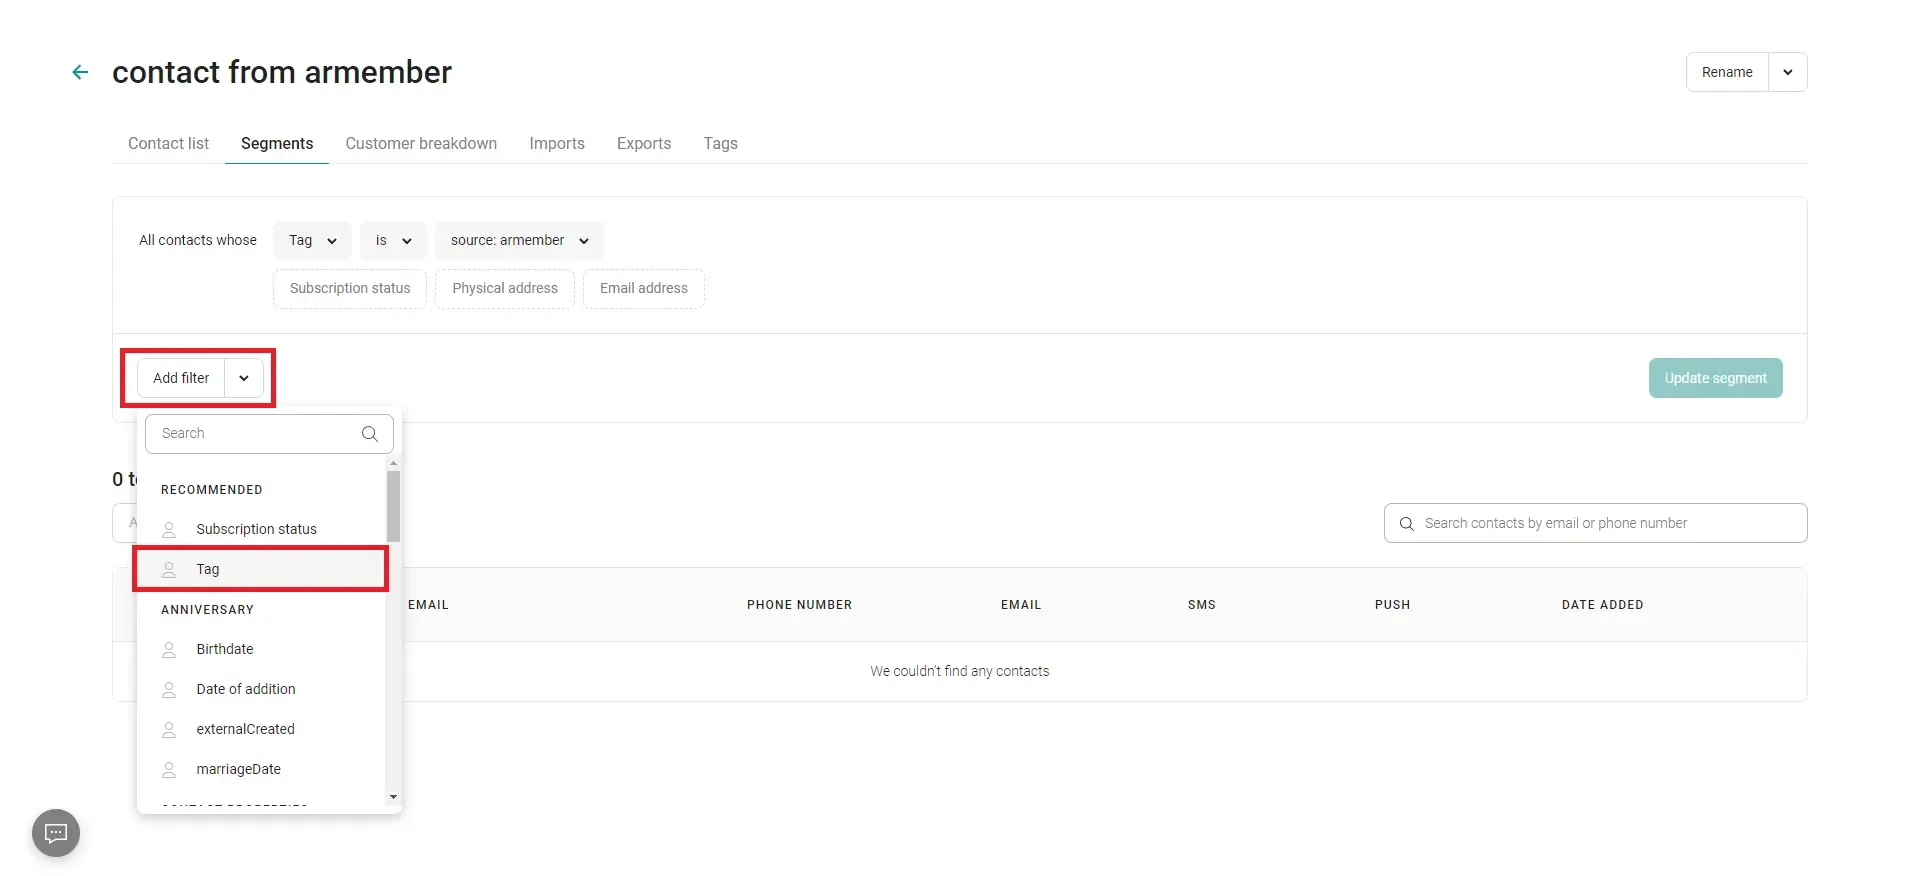
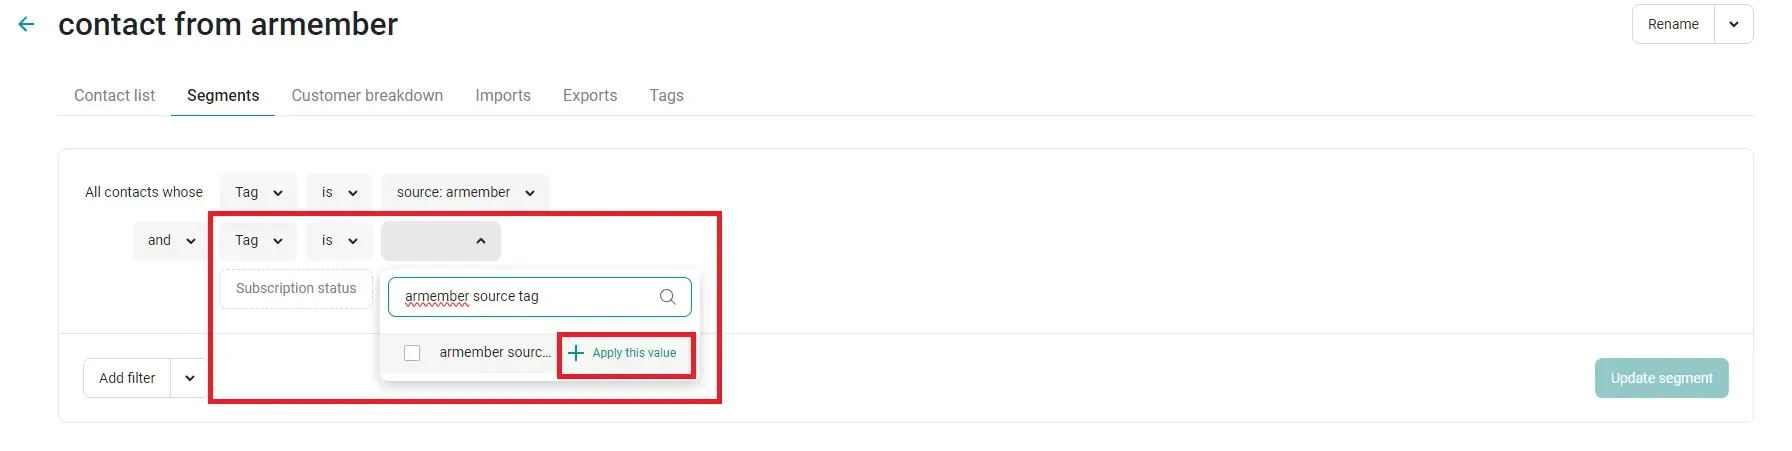
To manage your contact and add contact to any specific Segment in Omnisend add tag filter from add/edit Segment.


Please see the below screen.
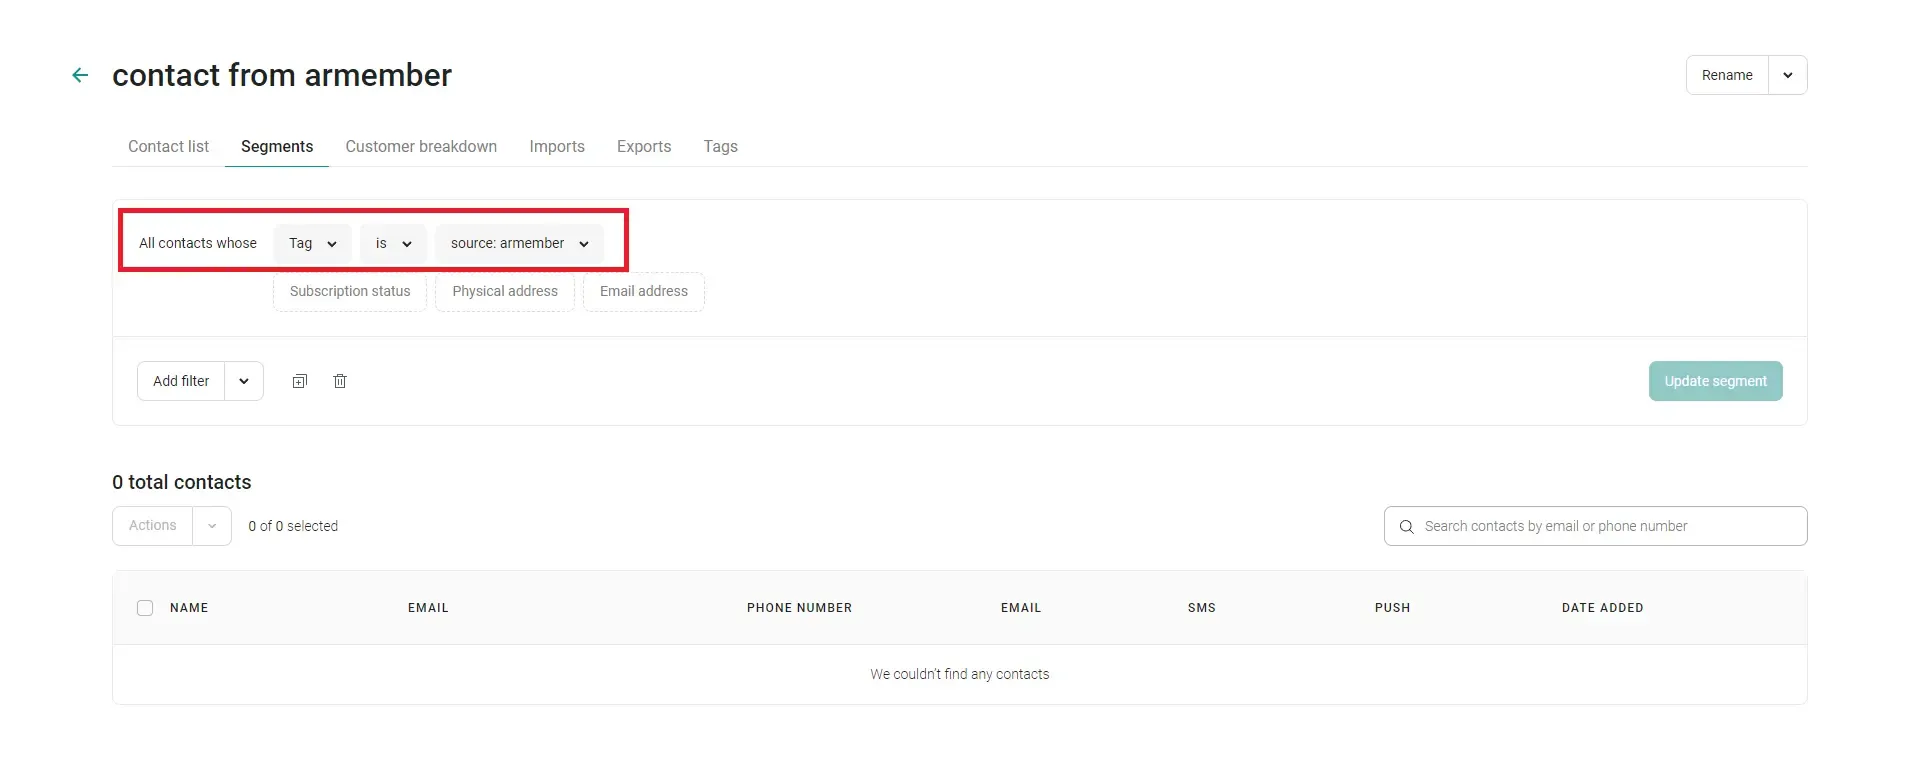
When a new user registers using the ARMember registration form, their contact information will automatically be added to your Omnisend account with a specific tag. This tag corresponds to the setting you defined in ARMember by navigating to Manage Form > Add/Edit Form > Opt-ins Settings.
If that contact tag match with any of your Segment tag filter value, so Omnisend automatically add contact to that segment.
To get more information omnisend please refer Omnisend User Guide.
After completing this setup, you will be able to view all users who register on your website through this form by going to Audience > Contact List in your Omnisend account.
For Omnisend Contact click here..
Opt-in data will be updated on the below provided actions:
- On Simple Register form submission.
- On Purchase Membership Plan.
- On Cancel Membership Plan By Member or admin.
- On Membership Plan End Of Term.
- On Membership Plan Suspended.
- On Membership Plan Change.
- On the Membership Plan Subscription, the Next payment has failed.
- On Subscription Plan recurring payment received.
- On Import Users from the ARMember.
- Admin can Sync Existing member data from Admin Panel to Opt-ins.